
Hello there! Let's talk about keeping your car's interior looking fantastic. Cleaning cloth car seats isn't overly complicated, but doing it right makes all the difference. The professional approach is simple: vacuum thoroughly, treat stains with a dedicated automotive upholstery cleaner, gently agitate the fabric, extract the grime and moisture, and let it dry completely. Sounds straightforward, right? Well, the secret is in the details. Rushing these steps or using the wrong products is where many well-intentioned cleanups go wrong.
Why Pro-Level Methods Are a Game-Changer for Your Car's Interior
Let’s be honest—stained, dingy cloth seats can make an otherwise clean car feel a bit grubby. While it's tempting to grab a household cleaner for a quick fix, those products can often set stains permanently or even damage the fabric. As professional detailers, we've seen the unfortunate results of DIY experiments, and we want to guide you through the methods that deliver consistently great results.
The secret isn't a magical spray; it's a reliable process: proper preparation, smart cleaning techniques, and patient drying. This is the foundation for a truly deep clean.
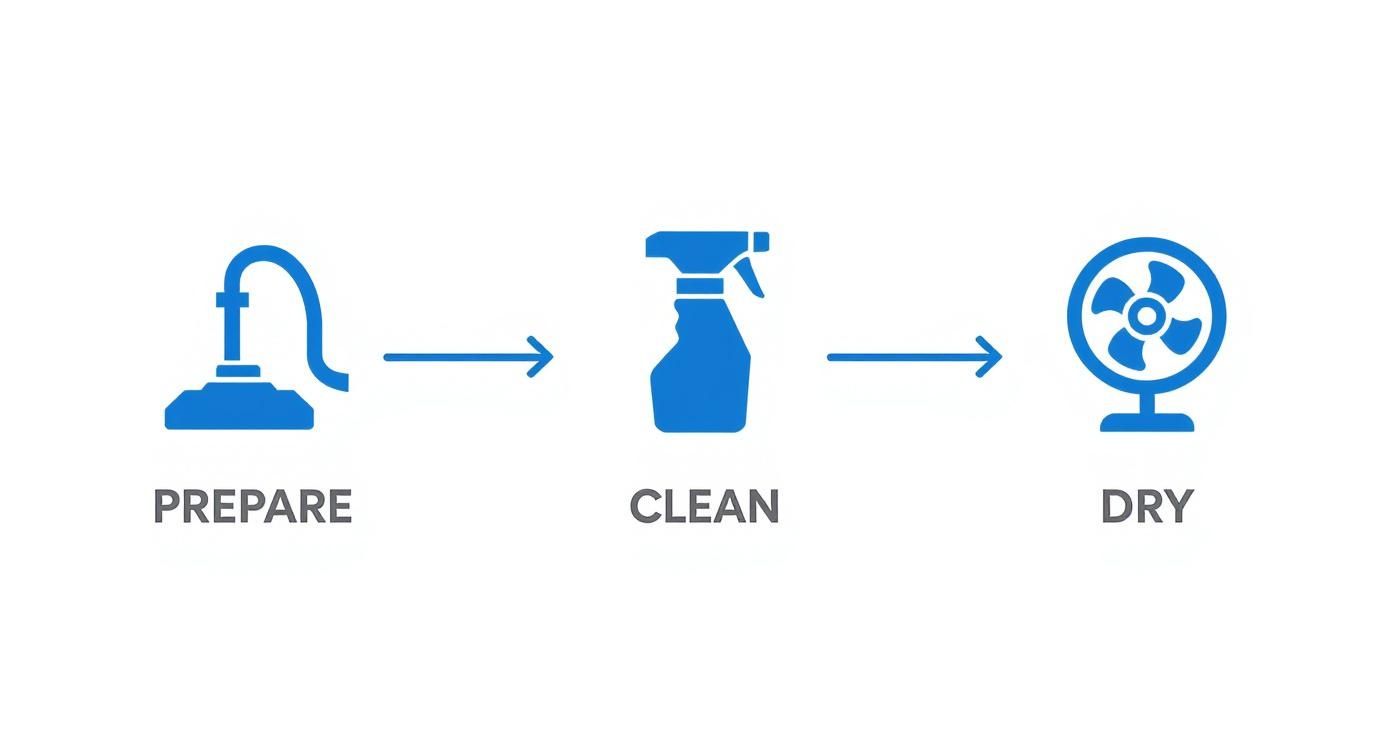
Following this simple Prepare-Clean-Dry sequence is your best defense against common issues like water stains, mildew smells, and the frustration of a stain that just won't disappear.
The Value of a Professional Touch
You're not alone in wanting a pristine interior. The automotive upholstery cleaning market is a big deal, valued at around $2.8 billion in 2023. With nearly 45% of vehicle owners calling in professionals at least once a year, it's clear people value results they can see and feel. You can get a deeper dive into the best car care products and their market impact in a great report from the folks at Car and Driver.
We see it every day: skipping steps or using harsh household chemicals leads to disappointment. The entire goal is to lift dirt and grime out of the fabric, not just push it deeper into the seat foam where it can cause odors and damage later on.
Here’s a quick comparison of why professional methods are the gold standard for cleaning cloth seats versus common DIY attempts.
Professional vs DIY Cleaning at a Glance
Ultimately, a professional detailer has the right tools and, more importantly, the experience to know exactly what your car's interior needs. If you’re in Central Pennsylvania and want to see what a difference this makes firsthand, you can always find our mobile team on our Google Business Profile.
We'll walk you through how we tackle everything from everyday dirt to those "oh no" spills, so you can feel confident in restoring your car’s interior the right way.
The Critical First Step: Prepping Your Seats
Want to know the secret to a fantastic cleaning job? It all starts before a single drop of cleaner touches your seats. Rushing this first step is the biggest mistake people make, and honestly, it’s why most DIY attempts fall short of that professional finish.
Think of it like painting a room—you wouldn't just slap a coat of paint on a dusty wall and expect it to look perfect, right? The same principle applies here.
The very first thing we do on any job is a thorough inspection. We're not just looking for dirt; we're assessing the fabric type, identifying the kinds of stains we're dealing with (is that coffee or grease?), and checking for any heavy wear spots. This quick evaluation tells us exactly which professional-grade tools and cleaners to use.
The Power of a Professional-Grade Vacuum
Once we know what we're up against, the real prep work begins with a serious vacuuming session. This isn't your average swipe with a shop vac. We use a variety of specific attachments to get every last bit of embedded debris out.
- Crevice Tool: This is our go-to for getting deep into the seams and tight corners where years of crumbs and sand love to hide.
- Stiff Brush Attachment: We use this to gently agitate the fabric, breaking loose all the packed-in dirt and dust that’s settled deep into the fibers.
- Specialized Pet Hair Brushes: If you have a four-legged co-pilot, you know the struggle. We switch to dedicated rubber or silicone brushes that are amazing at grabbing stubborn pet hair without damaging the upholstery.
This isn't just about making things look tidy. All that hidden sand and grit acts like sandpaper, slowly grinding away at your seat fabric every time you get in and out of the car. Removing it is crucial for the longevity of your interior.
When you properly prep the seat, the cleaning solutions can get straight to work on the actual stains instead of fighting through a layer of surface grime. It makes the whole process faster, more effective, and gives you that truly deep-clean result. It’s a non-negotiable step for a professional finish.
As a mobile detailer, I bring all this professional-grade equipment and expertise right to your driveway. You can see the kind of "before-and-after" magic our prep work creates on our Google Business Profile.
Applying Cleaner the Professional Way
Alright, this is where the real transformation begins. If you've ever used a foaming spray from an auto parts store, you might know the feeling—you spray it on, and suddenly you have a giant, soggy mess that seems to just spread the stain around. We do things a bit differently, focusing on a deep clean that doesn't turn your car into a swamp.
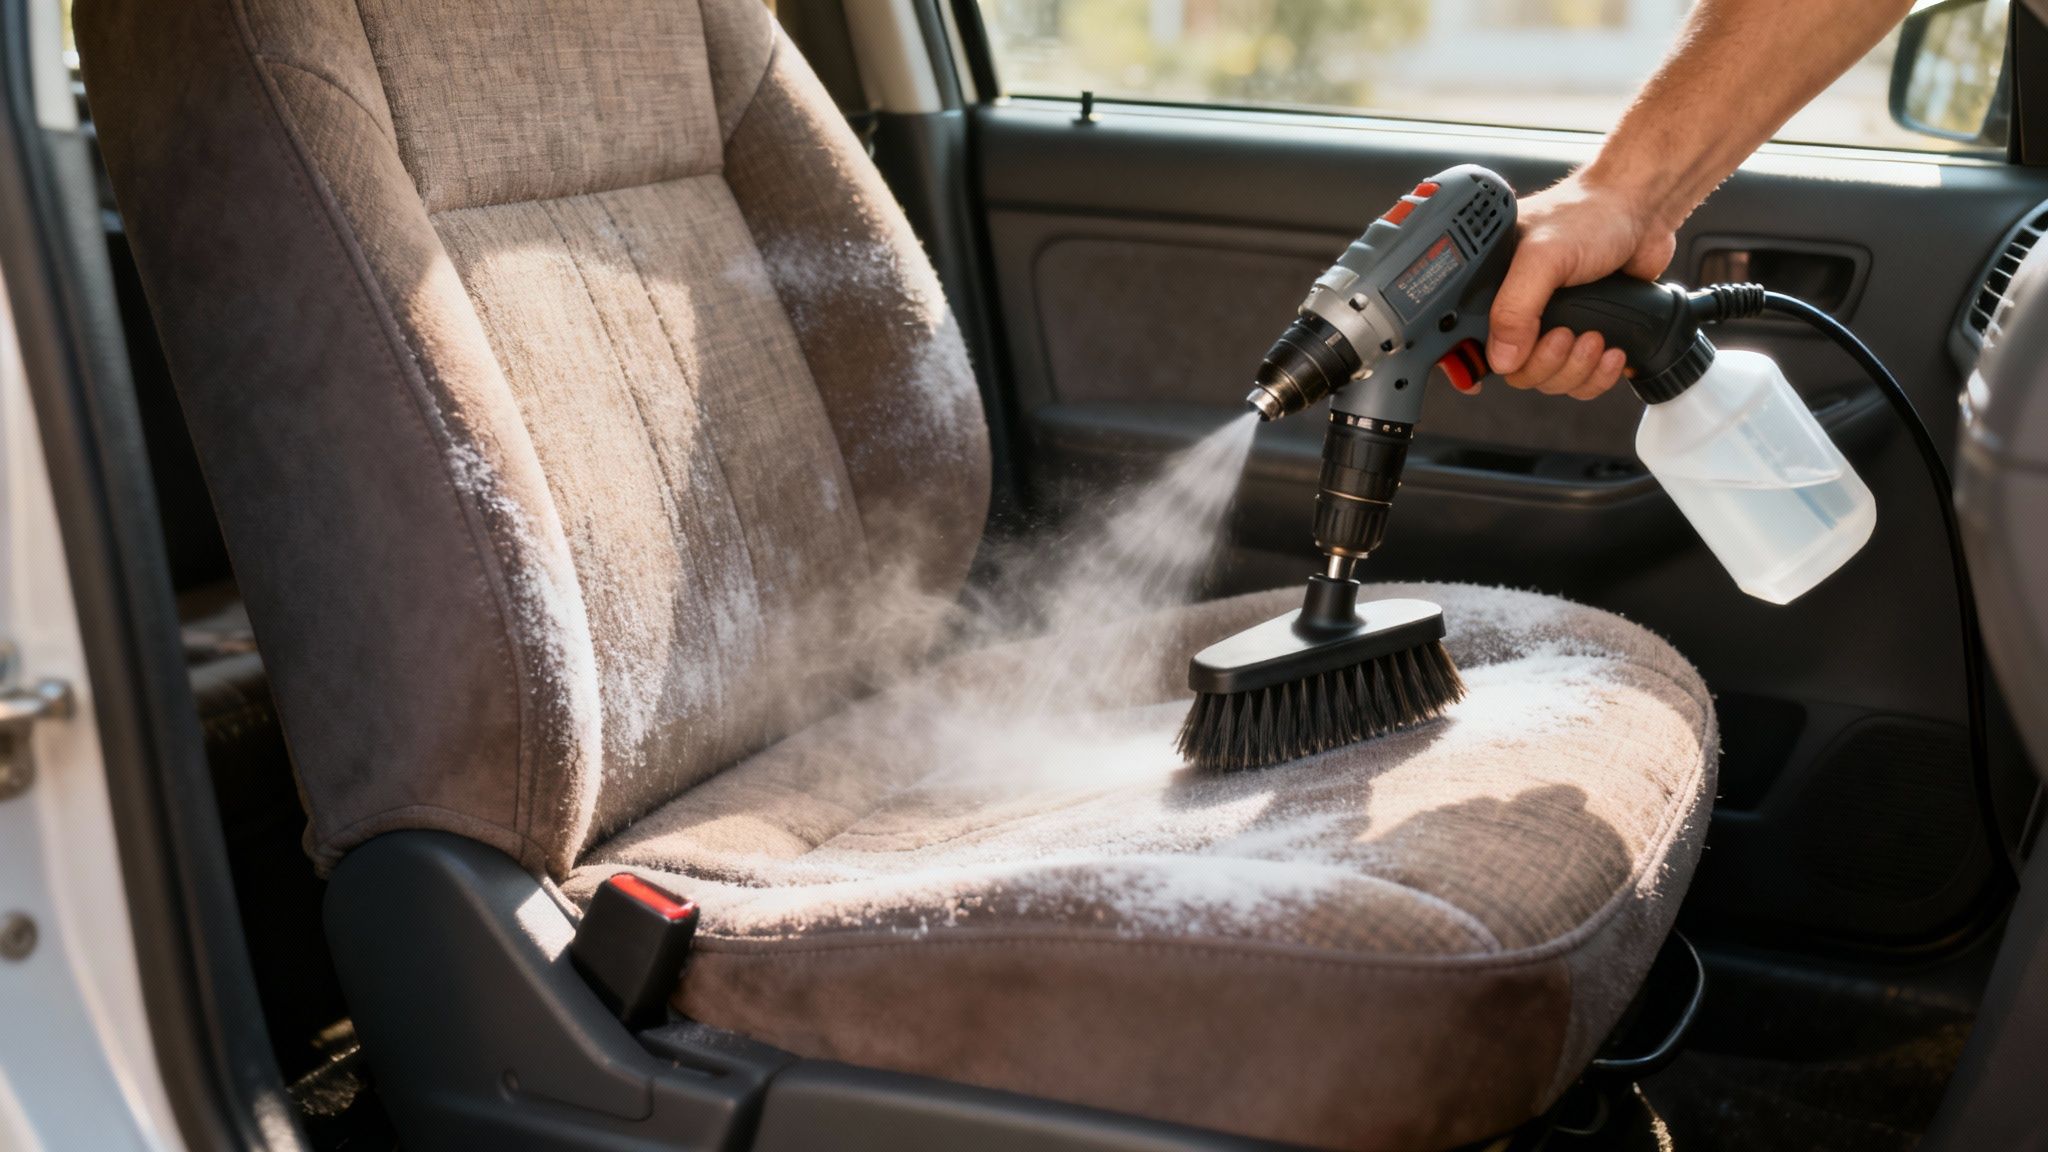
The first rule is to use the right product. We always start with a high-quality, pH-neutral upholstery cleaner made specifically for automotive fabrics. The trick is to apply a light, even mist across the surface. You never want to soak the seat. Over-saturating the material just pushes dirt deeper into the foam padding, which can lead to mildew and musty odors.
Why Agitation and Extraction Are Game-Changers
Once the cleaner is applied, it’s time to get to work. We use a soft-bristle drill brush to gently agitate the cleaner into the fibers. This isn't about brute force; it's a controlled motion that creates a powerful cleaning action, lifting embedded dirt, body oils, and grime to the surface. It’s far more effective than just scrubbing by hand.
The difference is actually measurable. Studies have shown that using a rotary machine for agitation can achieve 65-78% better stain removal than just hand-scrubbing. When you pair that with a professional enzymatic cleaner, the stain removal rate jumps to 72-85%. Compare that to the typical 45-55% you might get with basic soap and water, and you can see why professional methods get superior results. You can dive into more of the data on these powerful professional detailing techniques and their results if you're curious.
Immediately after agitation, we bring in the real hero of interior detailing: the hot water extractor. This machine does two critical jobs at once. It flushes the fabric with clean, hot water while its powerful vacuum sucks out all the loosened dirt and cleaning solution. This process removes the grime completely instead of just smearing it around.
The goal is to lift and remove contaminants, not just hide them. Without a proper extraction process, you're often leaving behind a residue that will attract more dirt over time, causing stains to reappear.
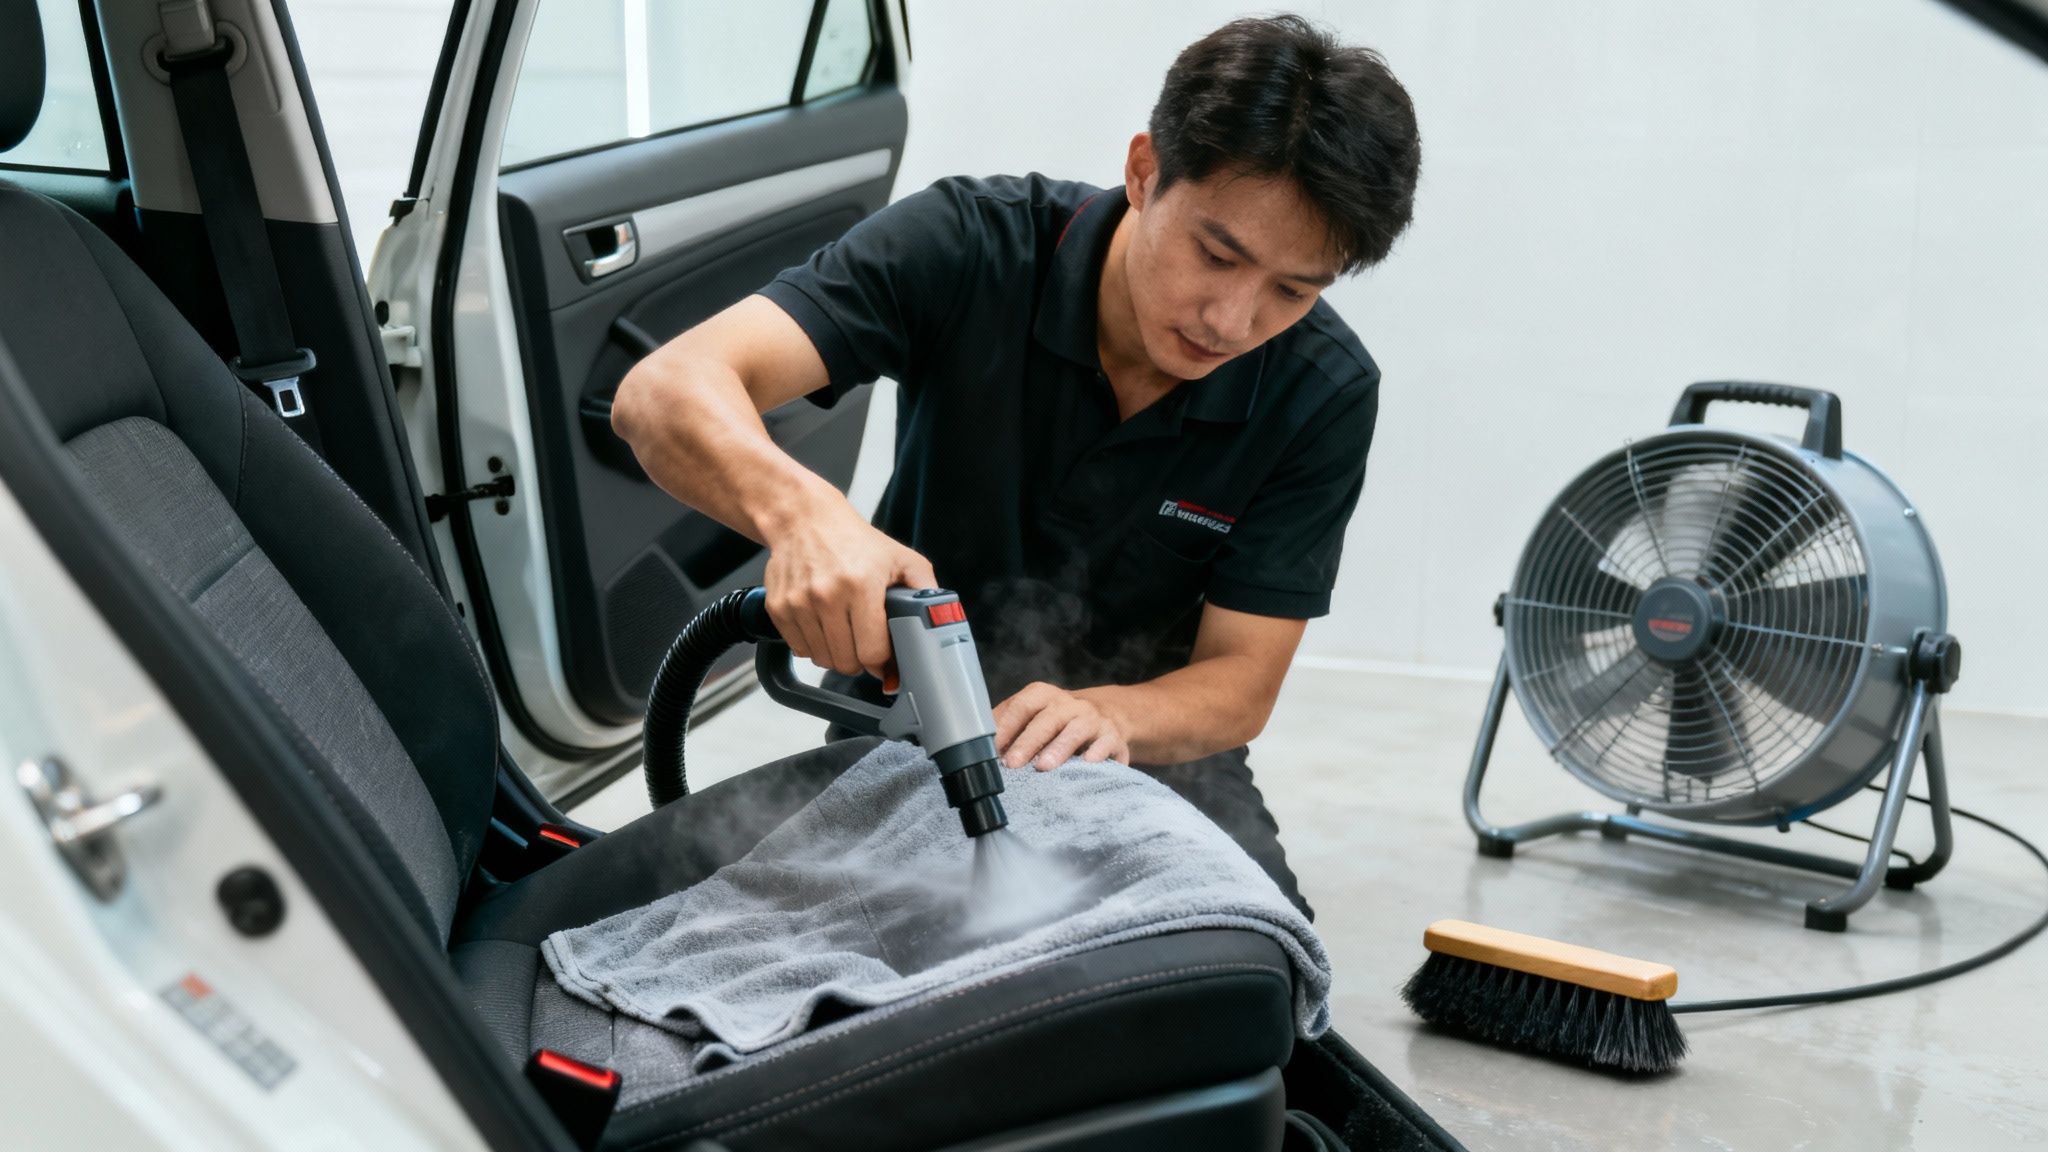
Other Tools in Our Arsenal
For really stubborn jobs, delicate fabrics, or when sanitation is a priority, we'll often break out a professional-grade steam cleaner. Steam is incredible because it uses high-temperature vapor to dissolve grime and kill bacteria with very little moisture, making it both effective and safe.
This methodical approach is the core of our interior shampoo service. It’s all about using the right tools and techniques to clean deeply, safely, and efficiently—without the risks that come with DIY attempts. Our mobile team brings this entire professional setup right to you. You can see what our clients think of the results on our Google Business Profile!
A Pro's Playbook for Stubborn Stains
Alright, you've vacuumed and prepped the seats. Now it's time to face the real villains: those stubborn, set-in stains that haunt your daily commute.
We've all been there. The rogue coffee splash, the ink pen that exploded on a hot day, or the mystery smudge from last week’s drive-thru run. These are the spots where a generic, all-purpose cleaner just isn't going to cut it.
This is exactly where a professional detailer's strategy differs from a typical DIY attempt. We don’t just spray and pray. Instead, we play detective, identifying the type of stain first so we can choose the right tool for the job.
Matching the Cleaner to the Crime
From our experience, not all stains are created equal, and using the wrong cleaner can actually set a stain permanently. As pros, we have a whole arsenal of specialized spot treatments, but the logic can be broken down into two main categories.
- Enzyme-Based Cleaners: For organic stains like food, coffee, vomit, or blood, an enzyme cleaner is the secret weapon. These formulas work on a microscopic level to break down the proteins in the stain, effectively "eating" it away from the fabric fibers.
- Solvent-Based Cleaners: When we're up against oil, grease, or ink, it's time to bring in a solvent-based cleaner. These are designed to dissolve oily and synthetic compounds that water-based cleaners can't touch.
Before going all-in with any treatment, always test the cleaner on a small, hidden area of the seat first—think under the cushion or on a back flap. This simple check ensures it won't bleach or damage your specific fabric. It’s a crucial step that prevents a small spot from becoming a giant, permanent problem.
The Right Technique for Stain Removal
Once you've got the right cleaner, your technique is just as important. The biggest mistake we see people make is frantically scrubbing a stain. This only grinds the spot deeper into the fabric and the seat foam below, making it nearly impossible to ever get out completely.
The professional mantra is simple: blot, never rub. Apply the cleaner, then gently blot the stain with a clean microfiber towel. Start at the outside edge of the stain and work your way inward. This contains the spot and lifts it out of the fabric instead of spreading it around.
For those truly nightmare spills, our specialized stain removal services combine these targeted treatments with powerful hot water extraction equipment. This process flushes both the stain and the cleaning agent out of the seat completely, leaving zero residue behind. It’s this methodical approach that lets us get rid of the stain without creating an even bigger mess.
Drying and Finishing: The Final Step to Perfection
You’ve done the heavy lifting—the vacuuming, the stain fighting, and the shampooing. But don't celebrate just yet. This last part, the drying and finishing, is what truly separates a decent job from a professional detail. Rushing this stage is the quickest way to end up with a car that smells musty.
Leaving your seats even slightly damp is an open invitation for mold, mildew, and that funky odor that just loves to linger. After we’ve deep cleaned the fabric, our next move is to extract every last drop of moisture possible with a powerful hot water extractor or a high-suction wet/dry vac. It's always a little shocking, and satisfying, to see the color of the water we pull from seats that looked only slightly damp.
Getting Them Bone-Dry
The secret to proper drying is maximum airflow. In our mobile setup, we use high-velocity fans aimed directly at the seats to circulate air. When doing it yourself, the best thing you can do is park your car in a safe, well-ventilated area like an open garage and leave all the doors open for several hours. Your goal isn’t just "mostly dry"—you're aiming for 100% bone-dry.
This isn't just about avoiding a bad smell; it’s about protecting your car's interior. Industry studies show that moisture-related problems affect a surprising 18-22% of vehicles, and it only takes 24-48 hours for mold to start growing on damp fabric. The professional benchmark is to get the fabric’s moisture level below 15% to stop any potential fungal growth. You can read more about the risks of moisture in car seats and why a thorough job is crucial for a healthy car.
One of the biggest mistakes we see is people closing up the car too early. The surface of the seat might feel dry to the touch, but the thick foam underneath can still hold a ton of water. When in doubt, give it more time.
Adding the Finishing Touches
Once you’re absolutely certain the seats are dry, it’s time for the final touches that really make the job pop. We start by taking a soft-bristled brush and gently running it over the fabric. This little step helps "fluff up" the fibers, getting rid of any stiffness from the cleaning products and restoring that soft, uniform look.
The very last thing we do is apply a professional-grade fabric protectant. Think of it as an invisible shield for your seats. It coats the fibers and helps repel future spills, making them bead up on the surface instead of soaking in and creating a new stain. It’s a small step that makes a huge difference in keeping that "just detailed" look for months to come.
Getting a perfect, dry, and protected finish without professional equipment can be a real challenge. If you want to skip the hassle and the risk of a mildewy mess, our team is here to help.
Know When to Throw in the Towel (and Call Us)
We love the spirit of a good DIY project. But sometimes, you get to a point where a stain or smell is just out of your league. Recognizing when to call in a professional is key—it can save you from accidentally turning a small spot into a permanent, faded mess.
If you're dealing with deeply ground-in stains that have been there for months, a stubborn odor from smoke or pets, or the aftermath of a serious spill, it’s probably time to call a pro. The same goes for delicate or vintage fabrics; the risk of causing irreversible damage is just too high.
What We Bring to the Fight
As professional detailers, we have some serious tools in our arsenal that you just can't find at the local auto parts store.
- Hot Water Extractors: These machines are the real deal. They don't just push dirt around; they powerfully flush out grime from deep within the seat foam and suck it all away for good.
- Ozone Generators: For those truly stubborn smells, an ozone treatment is a game-changer. It gets to the root of the problem by safely neutralizing the odor-causing molecules, not just masking them.
Your time is valuable. For a guaranteed, like-new finish without the headache, investing in a professional service is often the smartest move. When you need more than a surface touch-up, exploring the benefits of a full interior car detailing service can make all the difference.
Trying to tackle a major stain or smell without the right gear can easily lead to damaged fabric, oversaturation, and even mildew growth—which will cost you a lot more to fix in the long run.
If you want to see the kind of results we deliver for our clients every single day, check out our work on our Google Business Profile and reach out for a quick quote. We bring our expertise and equipment right to your location, making it easy to get a professional-quality clean.
Your Car Seat Cleaning Questions, Answered
Over the years, we've heard just about every question you can imagine when it comes to cleaning cloth seats. Let's tackle a few of the ones that pop up most often.
How Often Should I Really Get My Seats Cleaned?
For most people, a good, deep professional cleaning once a year is a great rule of thumb. It keeps the fabric looking fresh and prevents that slow, dull buildup of dirt.
But, if your car is more like a family shuttle—think kids with snacks, a furry co-pilot, or the occasional dashboard dining—you'll want to bump that up. Scheduling a cleaning every six months is a smart move to stop grime from settling in and becoming a real headache to remove later.
Is That Fabric Protectant Stuff a Gimmick?
Not at all. In fact, it’s one of the smartest things you can do for your car's interior. Think of a high-quality fabric protectant as an invisible shield for your upholstery. It gives you precious extra seconds to wipe up a spill before it soaks in and becomes a permanent, ugly stain.
It makes future cleanups so much easier and keeps that "just detailed" look lasting for months. We've seen it save countless seats, and the results our clients get speak for themselves over on our Google Business Profile.
A quality fabric protectant is one of the best investments you can make after a deep clean. It's the difference between a spill being a minor inconvenience and a permanent stain.
What's the Secret to Getting Rid of Really Bad Smells?
Masking an odor with an air freshener is just a temporary fix. To truly kill a bad smell from something like spilled milk, a pet accident, or lingering smoke, you have to eliminate the source.
That’s where professional-grade enzymatic cleaners come in. They don't just cover up the smell; they actually break down and destroy the organic bacteria causing it. For the most stubborn, set-in odors, we sometimes bring out the heavy artillery: an ozone generator, which permanently neutralizes any odor molecules left hiding deep in the foam.
When your best efforts just aren't cutting it, that's where we come in. The Mobile Buff brings the right tools and years of experience right to your door for a finish you can't get with household products.
Ready to get your car's interior looking and smelling new again? Contact The Mobile Buff today for a free quote!
