
Hello there! If you've got a car with a stunning white leather interior, you already know the sophisticated, luxurious vibe it creates. It makes the whole cabin feel brighter and more spacious. But, as you've probably figured out, keeping that brilliant white looking showroom-fresh takes a bit of professional know-how.

The biggest challenge isn't that white leather is harder to clean; it's that it's more honest. It shows everything. Because it's a porous material, it easily soaks up the daily grime that might go unnoticed on darker seats.
A few usual suspects are constantly trying to ruin the look:
- Body Oils: The natural oils from your skin are a primary culprit. Over time, they can leave behind a yellowish tint if you're not cleaning the seats regularly.
- Dirt and Grime: Tiny particles of dirt get trapped deep in the leather's grain, which is what causes that dull, dingy appearance.
- Dye Transfer: This is the big one. That brand-new pair of dark denim jeans? They're notorious for leaving behind blue or black streaks that are a real headache to remove.
Why Grabbing Just Any Cleaner is a Big Mistake
When you see a smudge, it's tempting to reach for an all-purpose cleaner or one of those "magic" eraser sponges. As professionals, we have to advise against this. We’ve seen the aftermath, and it’s not pretty. These products are usually far too alkaline or abrasive for the delicate finish on modern leather.
This isn't just our opinion; it's a lesson the industry learned the hard way. A few years back, reports showed that improper cleaning methods accounted for over 45% of white leather seat complaints in luxury cars. That problem directly led to the boom in pH-balanced, leather-specific products that now make up a huge chunk of the $1.2 billion car care market. You can dive deeper into the science behind these products on the Chemical Guys' blog.
Using the right tools isn't just about getting a better clean; it’s about preventing irreversible damage. Harsh cleaners can strip the protective topcoat right off your leather, leading to cracking, fading, and permanent stains.
Before you start, it’s worth understanding the risks. Using the wrong product can turn a simple cleaning job into an expensive repair.
Professional vs DIY Cleaning Risks for White Leather
This table really highlights why professional-grade supplies are non-negotiable for preserving that high-end look and feel.
At The Mobile Buff, we’ve built our entire process around using the right chemistry for the job. We understand how to lift stains without damaging the material underneath. If you're in the Harrisburg area and want to make sure the job is done right, you can always check us out on our Google Business Profile. We'd love to show you what we can do!
Getting Your Cleaning Kit Ready
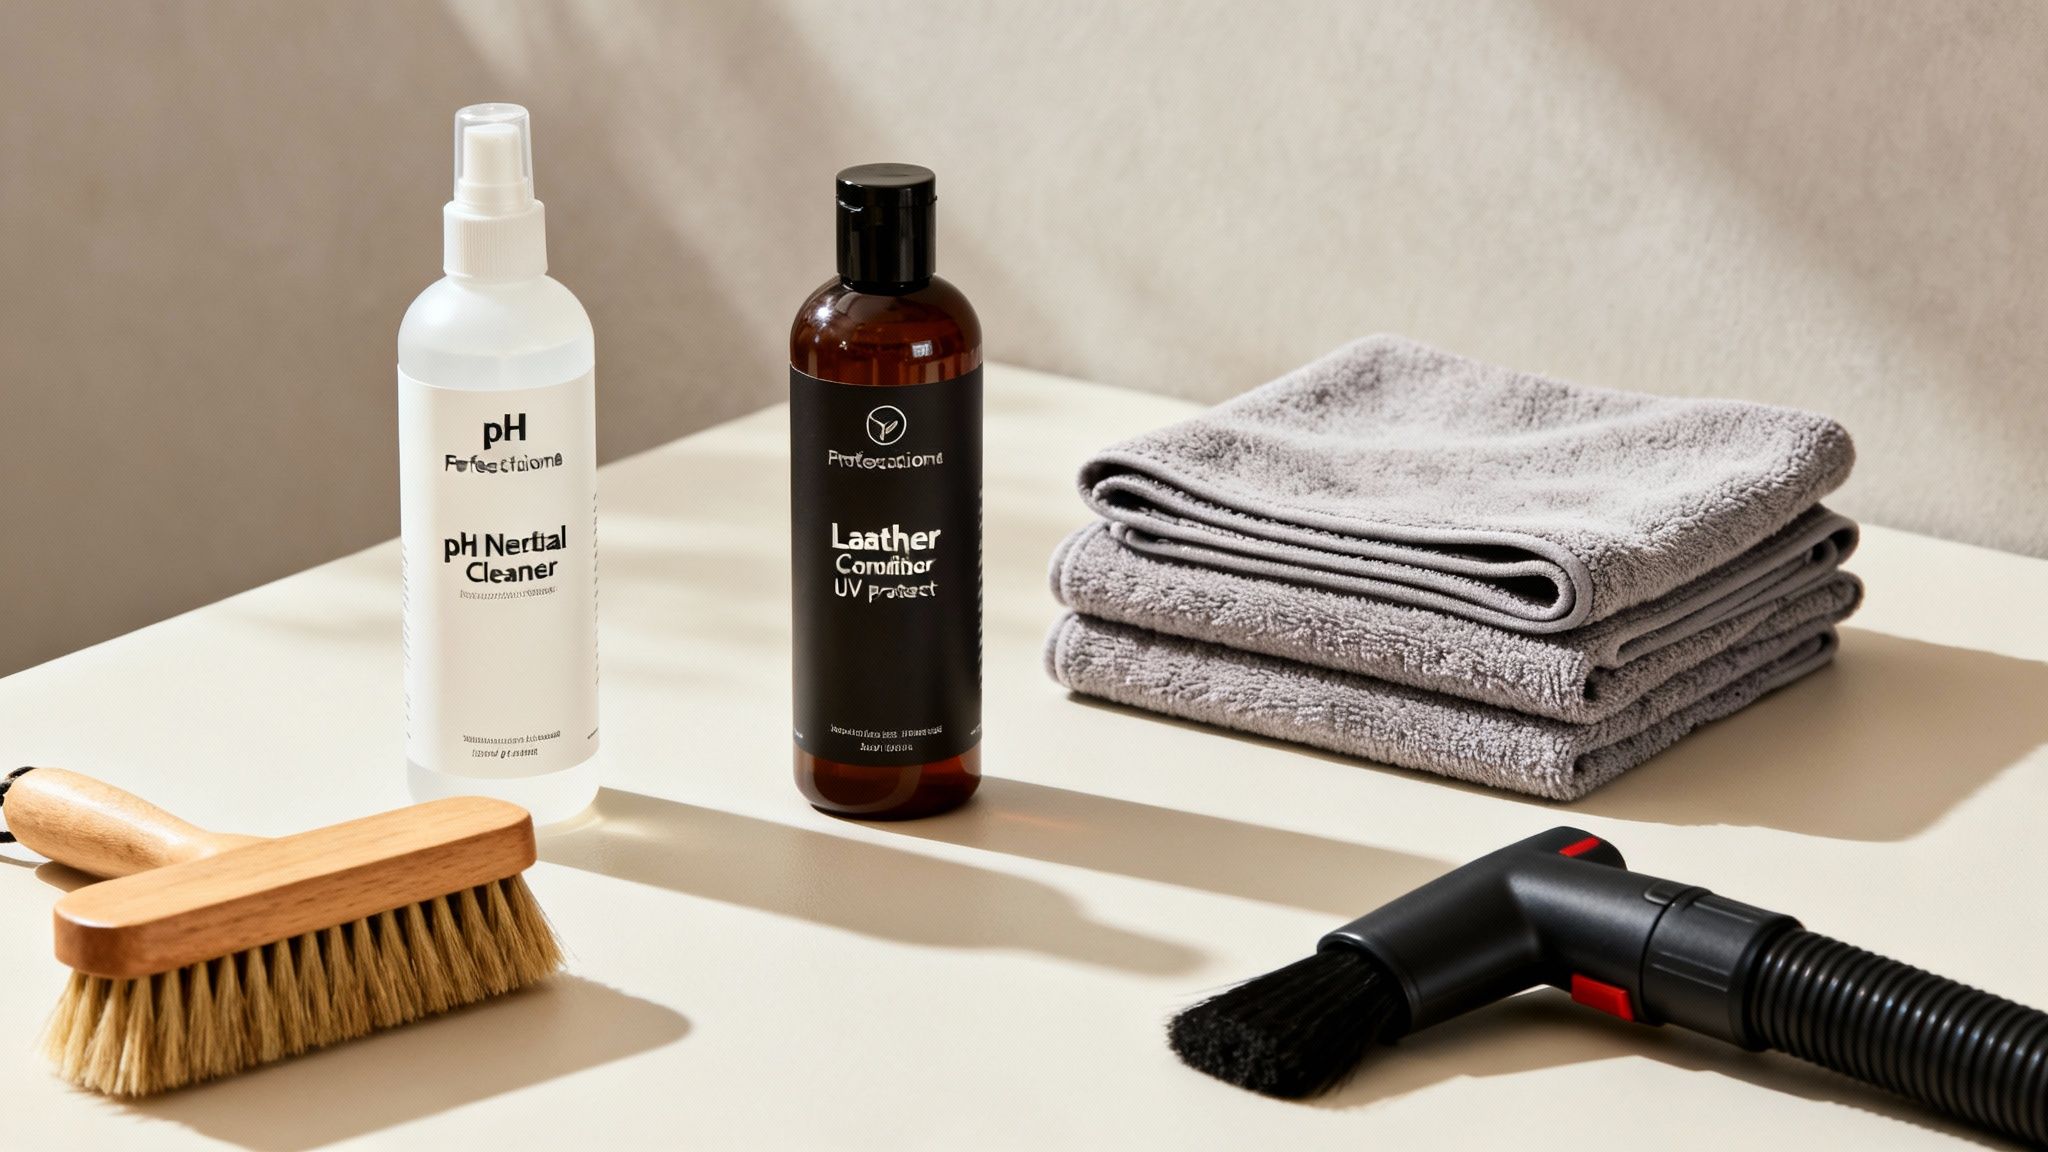
Before you dive into cleaning your white leather seats, you’ve got to get your tools in order. Trust me, getting those pro-level results is all about using pro-level supplies. This is not the time to reach for that all-purpose cleaner under the sink—that's a one-way ticket to faded, cracked, or discolored leather.
Think of it this way: you're making a small investment to protect a much larger one. The right products are built to clean deeply while being gentle on the leather's delicate finish.
Your Must-Have Cleaning Kit
Here's the rundown of what we at The Mobile Buff consider non-negotiable for any leather cleaning job. Each tool has a specific role, and when they work together, you get that showroom-fresh look.
- A pH-Neutral Leather Cleaner: This is your MVP. A cleaner with a balanced pH (around 7) is critical because it won't dry out the leather by stripping its natural oils. Anything too harsh will just accelerate aging and cracking.
- A Soft Horsehair Brush: Don't even think about using a stiff-bristled scrub brush. Horsehair is the perfect middle ground—soft enough to prevent scratches but just firm enough to work its way into the leather grain to lift out that stubborn, embedded grime.
- High-Quality Microfiber Towels: You'll want a small stack of these. A good microfiber towel is super absorbent and won't leave lint or tiny scratches behind. Old rags or paper towels are a definite no-go here.
- A Quality Leather Conditioner (with UV protection!): Cleaning is only half the job. A good water-based conditioner restores moisture to keep the leather soft and supple. Even better, one with UV protection will help prevent that dreaded sun fading and damage down the line.
- Vacuum with a Soft Brush Attachment: Always start by getting rid of the loose stuff. A decent vacuum with a soft brush head lets you clear out crumbs and dust from seams and crevices without scuffing the leather.
Why Using Pro-Grade Stuff Actually Matters
You might be tempted to cut a few corners, but based on years of experience, we can tell you it's a bad idea. Every professional product is designed for a reason. For instance, a dedicated leather cleaner has specific ingredients that lift dirt without eating away at the protective topcoat.
The real difference between a DIY job and a professional detail often boils down to the quality of the tools. Investing in the right supplies is the first, and most important, step to cleaning white leather seats safely.
When you have this kit on hand, you're ready for routine cleanups and can tackle spills without panicking and grabbing something that will make it worse. By using what the pros use, you’re not just cleaning your seats—you’re protecting your car's value.
Now, let's put these tools to work. But if hunting down supplies and spending your Saturday scrubbing seats doesn't sound like your idea of fun, just remember The Mobile Buff is always here to help. We bring the entire professional setup right to your door.
The Pro's Method for Cleaning White Leather Seats
Alright, you've got your gear ready to go. Now, let’s get down to the nitty-gritty and put it all to work. We're going to walk you through the exact method we use at The Mobile Buff to bring that brilliant, factory-fresh look back to white leather seats. This isn't just a list of steps; think of it as a fluid process we've perfected to be both incredibly effective and totally safe for your car's interior.

Here's the secret: it's not about scrubbing harder, it's about working smarter. Following this approach lifts away the grime, oils, and dye transfer without causing the micro-scratches or chemical damage that can permanently ruin your beautiful white leather.
Start with a Meticulous Vacuum
Before a single drop of cleaner even thinks about touching the leather, you need to vacuum. And we don’t mean a quick once-over. This is a critical prep stage that, frankly, most people rush. Think of it like this: you wouldn't polish a sandy table, right? You'd be grinding the sand right into the finish.
Loose dirt, sand, and crumbs are abrasive. Start scrubbing with that stuff still on the surface, and you’re essentially sanding your leather’s topcoat. That's what creates those tiny scratches that make seats look dull and worn out over time.
We use a vacuum with a soft brush attachment to get deep into every seam, stitch line, and crevice. Pro tip: pay special attention to that canyon where the seatback meets the bottom cushion. It's a black hole for crumbs and debris.
The Gentle Agitation Technique
Now for the main event. A huge mistake we see all the time is people spraying cleaner directly onto the seat. This is a recipe for disaster. It oversaturates the leather, letting the cleaner soak into perforations and seams, which can lead to ugly spotting or even damage the foam underneath.
Instead, we have a very specific, controlled technique:
- Apply Cleaner to Your Brush: First, lightly mist your pH-neutral leather cleaner directly onto the bristles of your soft horsehair brush. This gives you total control.
- Work in Small Sections: Don't try to tackle the whole seat at once. Focus on one manageable area, like a single side bolster or a panel on the headrest. This is key to preventing the cleaner from drying out before you can work it in and wipe it away.
- Use Gentle, Overlapping Circles: Let the brush and the cleaner do the work. Agitate the surface with light, circular motions. You'll see a light foam form—that's the magic happening. It’s gently lifting the embedded dirt and oils right out of the leather’s grain.
This careful process is what prevents damage and gives you that consistent, even clean across the entire seat. It's central to our entire process, which you can read more about in our general guide on how to clean leather car seats.
Wiping Away the Grime
Once you've agitated a section, the next step is just as crucial: getting that dirt-filled residue off the seat. Grab a clean, dry microfiber towel and gently wipe the area. The microfiber is super absorbent and will pull all that lifted grime and excess cleaner right off the surface.
Pro Tip: Keep folding your microfiber towel to a fresh, clean side. If you keep wiping with a dirty part of the towel, you're just smearing the grime you worked so hard to lift. We always keep a small stack of clean towels right next to us for this very reason.
You should literally see the dirt transferring from the seat to your towel. That’s your proof that the process is working. Just continue this—agitate and wipe, section by section—until the entire seat is spotless.
Why Professional Products Are a Must
The move away from all-purpose cleaners isn't just some detailing trend; it's a direct response to seeing too many expensive mistakes. Back in 2023, automotive detailing surveys saw a 30% surge in car owners ditching household cleaners for specialized leather care kits. Why? Because people learned the hard way that harsh chemicals strip leather's natural oils, leading to inevitable (and premature) cracking and fading. You can learn more about this shift in car care over at RevivnDriveDetailing.com.
The All-Important Finishing Touch: Conditioner
Cleaning leather without conditioning it is like washing your hair and skipping the conditioner. It leaves the surface clean, but also stripped and vulnerable. Once the leather is completely clean and dry to the touch, it's time to nourish and protect it.
Apply a small, pea-sized amount of a high-quality, water-based leather conditioner onto a separate, clean microfiber applicator. Gently massage it into the leather using circular motions, making sure you get even coverage.
A quality conditioner is a non-negotiable final step. It does three critical things:
- Restores Moisture: It puts back the essential moisture that keeps leather soft and flexible.
- Provides UV Protection: It acts like sunscreen for your seats, creating a barrier against the sun's rays that cause fading and cracking.
- Adds a Protective Layer: This final coat helps repel future spills and makes your next cleaning session much easier.
Let the conditioner soak in for a few minutes, then take one last clean microfiber towel and lightly buff off any excess. The goal is a rich, satin finish—not a greasy, shiny mess. If your seats look overly glossy, you've probably used a bit too much product.
This professional method might seem detailed, but the incredible results and long-term protection are more than worth the effort. Of course, life gets busy. If you’re in Central Pennsylvania and would rather have experts handle it, the team at The Mobile Buff is always ready to bring this exact process right to your driveway.
How to Tackle Those Stubborn Stains on White Leather
Even when you're super careful, life happens. An ink pen leaks, a new pair of jeans leaves its mark, or a greasy french fry tumbles between the seats. Suddenly, your perfect white leather has an ugly spot. Your first thought might be to panic and grab the strongest cleaner you can find, but take it from us—that's the absolute worst thing you can do.
Let's walk through the right way to handle these common messes without making things worse.
Here’s a golden rule we live by in the detailing world: always start with the least aggressive method first. Seriously. Before you even think about a specialized stain remover, give your trusted pH-neutral leather cleaner and a soft brush another shot. You’d be amazed at how often that simple combo does the trick, especially if you catch the spill right away.
Dealing with Dye Transfer from Clothing
Ah, the dreaded blue jean stain. This is, without a doubt, the most common headache for anyone with white leather. Dye transfer is exactly what it sounds like—pigment from dark clothing, usually new denim, rubs off onto your seat. It can be so subtle at first that you don't notice until a distinct blue haze has formed on the side bolsters.
Your first line of defense is that same gentle approach we talked about. A good pH-neutral cleaner and a horsehair brush can often lift fresh or light dye transfer. But if that stain has been sitting for a while, you’ll probably need to bring out the big guns: a product made specifically for removing dye transfer. These are designed to break down the dye without stripping the leather's protective topcoat.
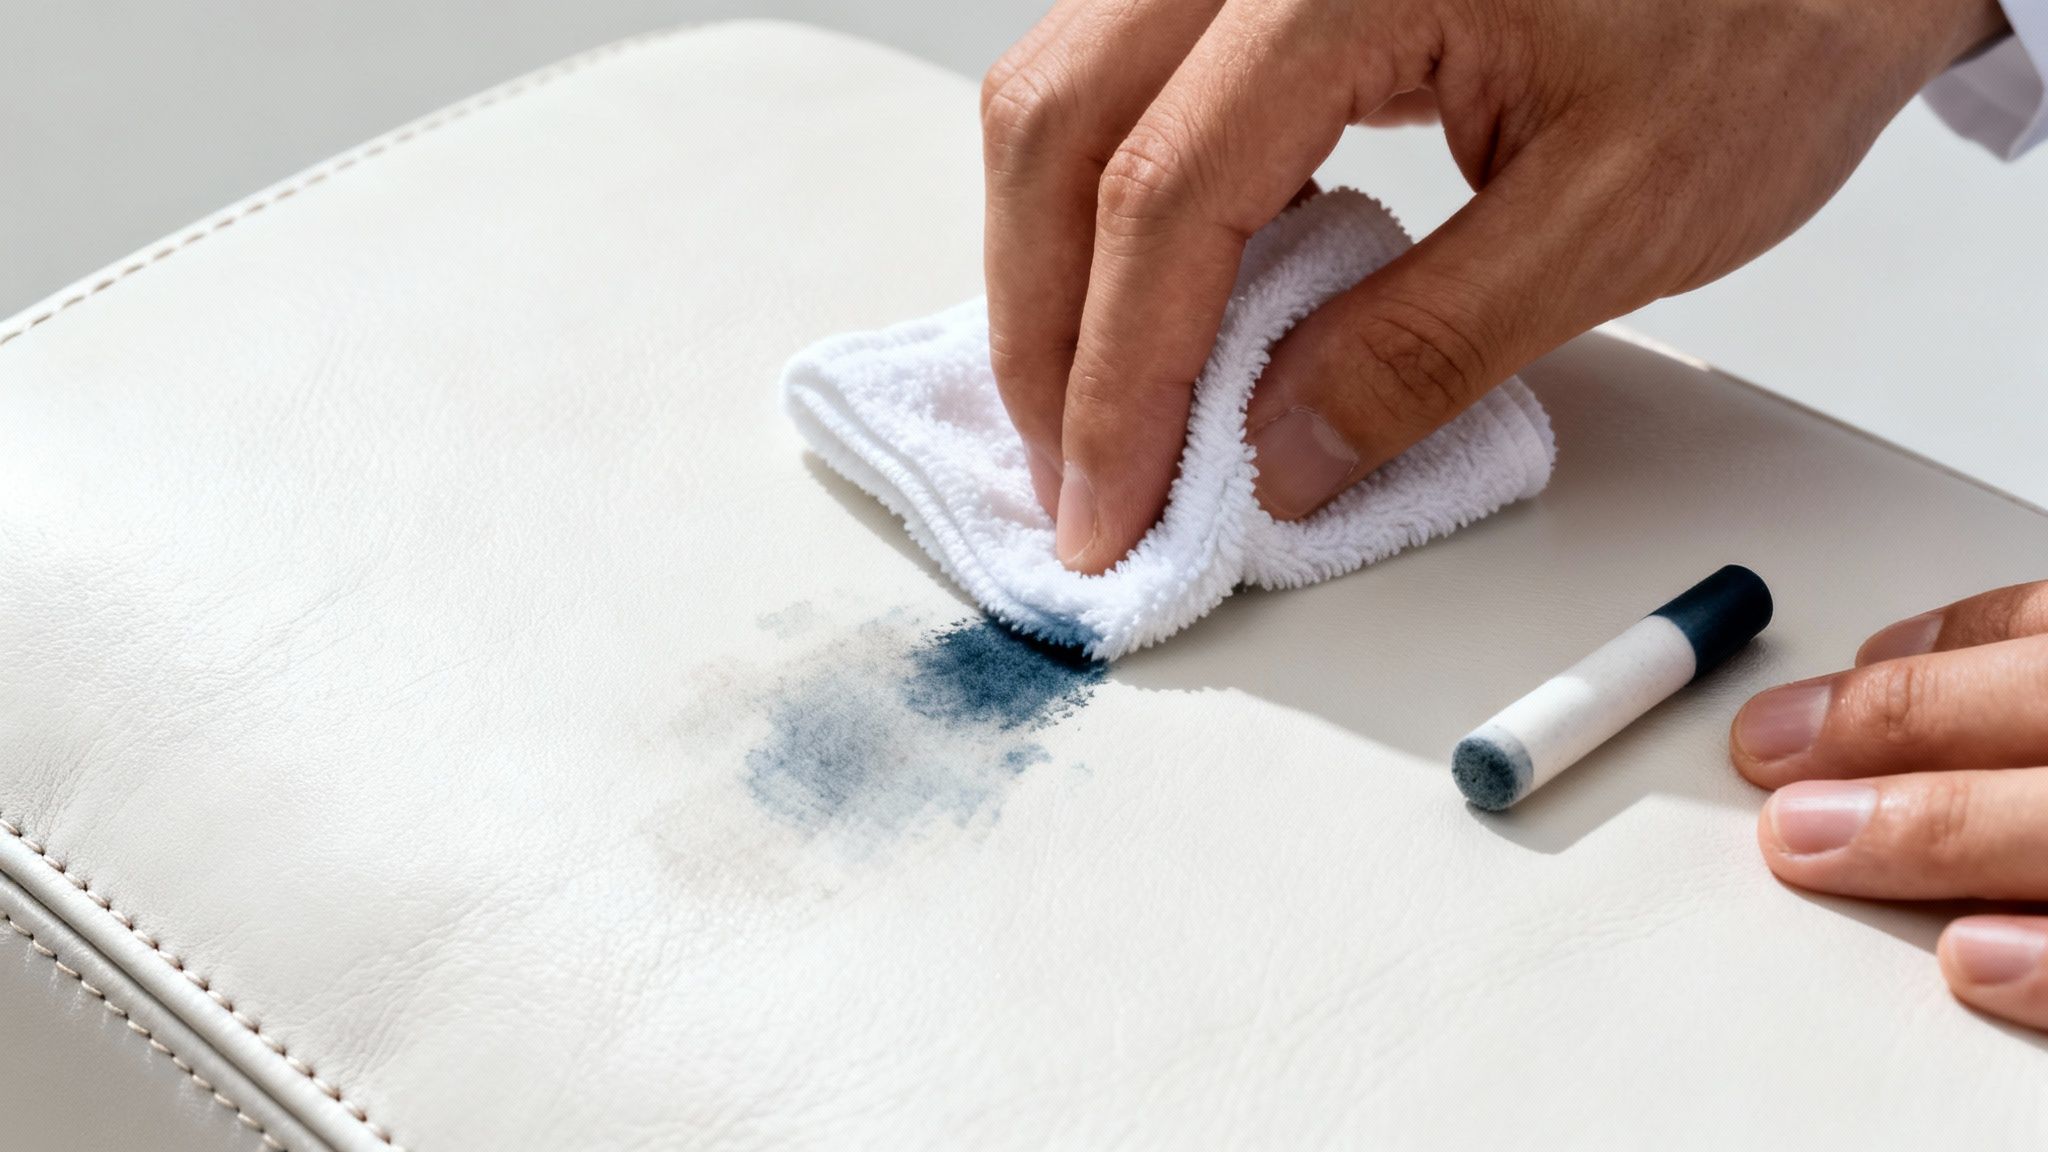
Erasing Ink Marks and Pen Streaks
An accidental pen mark can feel like a total disaster, but it’s usually fixable if you act fast. The go-to tool for this in our van is a dedicated leather ink remover stick. These little magic wands are formulated to dissolve the specific pigments found in ink.
It’s all about the technique, though:
- Blot, Don't Rub: Never, ever rub an ink stain. You'll just smear it and push it deeper into the leather's grain. Instead, apply the remover to a clean microfiber cloth or a cotton swab and gently blot the mark.
- Work from the Outside In: Start blotting at the very edge of the stain and work your way toward the middle. This keeps the ink contained and stops it from spreading.
- Patience is a Virtue: This isn't a 10-second fix. It might take a few rounds of blotting to fully lift the mark. Just take your time and let the product do its work.
Crucial Safety Tip: Always, always test a new cleaner or stain remover on a hidden spot first. The underside of a headrest or a flap of leather tucked under the seat trim are perfect test areas. This quick check ensures the product won't cause discoloration before you use it front and center.
Handling Grease and Oil Stains
Grease from fast food or even hand lotion can leave a dark, ugly blotch. Since oil soaks into leather incredibly fast, your best bet is to act immediately. Your everyday leather cleaner won't be much help here; you need a specialized leather degreaser.
These products work by emulsifying the oil, essentially lifting it out of the leather’s pores so you can wipe it away. You’ll apply it, let it sit for the recommended time, and then gently clean the area. For older, set-in oil stains, you might need to repeat the process. We sometimes even use absorbent powders along with a degreaser to help pull stubborn oils to the surface.
Neutralizing Pet Stains and Odors
If you’ve got a furry co-pilot, you know that accidents are always a possibility. With organic pet stains, you’re fighting two battles: the visible spot and the odor that comes with it. The solution is an enzymatic cleaner. These cleaners use beneficial bacteria that literally "eat" the organic matter in the stain, eliminating both the spot and the source of the smell.
Look, sometimes you’ll come across a stain that just refuses to leave. If you've tried the safe methods and it's not budging, it’s time to call for backup. Pushing too hard or using the wrong chemical can turn a small problem into permanent damage. Our team at The Mobile Buff has seen it all, and we have the pro-grade tools and experience to tackle what DIY methods can't. If you’re in our neck of the woods, check out our Google Business Profile to see how we can restore your seats.
Common Mistakes That Can Ruin Your White Leather
Over the years, we've seen it all. A well-meaning car owner tries to tackle a small spot on their beautiful white leather seats, and before they know it, they've caused permanent damage. It's a truly gut-wrenching moment. Our goal is to help you sidestep those common pitfalls and keep your interior looking absolutely pristine.
Honestly, knowing what not to do is just as critical as knowing the right way to clean. In professional detailing, our first rule is always: do no harm.
Using the Wrong Cleaners
This is the big one. The number one mistake we see is people grabbing an all-purpose cleaner, dish soap, or some other random household chemical from under the sink. These products are absolute poison for leather because their pH level is way too high. They aggressively strip the leather's natural oils and its protective topcoat, which inevitably leads to cracking, brittleness, and ugly discoloration.
Always, always stick to a dedicated, pH-neutral leather cleaner. It's designed specifically to lift dirt and grime without destroying the delicate finish. You wouldn't wash a cashmere sweater with harsh laundry detergent, right? It's the exact same principle.
Scrubbing Way Too Aggressively
When you’re faced with a stubborn stain, it's so tempting to just put some muscle into it. But trust us, scrubbing aggressively on leather does more harm than good. You’re essentially grinding dirt and other abrasive particles into the leather's grain and physically scratching away the protective finish.
This is why we always use a soft horsehair brush. It has just enough stiffness to get into the grain and lift the dirt out, but it’s gentle enough not to cause scratches. Slow, circular motions are all you need.
The absolute worst offender here is the magic eraser. It seems like a miracle product for scuffs on walls, but on leather, it's a complete nightmare. A magic eraser is a micro-abrasive—think of it as incredibly fine sandpaper. It will literally sand the finish right off your leather, leaving a dull, damaged patch that can't be fixed.
Soaking the Leather
When it comes to leather cleaner, more is definitely not better. Drenching your seats in cleaning solution is a recipe for disaster. All that excess liquid seeps into the seams and perforations, leading to water stains, mildew growing in the foam cushion underneath, and can even make the leather turn hard and stiff as it dries.
The pro tip is to spray the cleaner onto your brush or microfiber towel, never directly onto the seat. This simple change gives you total control over the moisture and prevents a soggy mess.
Skipping the Conditioner
Cleaning leather without following up with a conditioner is leaving the job half-done. The cleaning process, even when done perfectly, strips away some of the leather's essential moisture. When you skip conditioning, you leave the leather clean but totally exposed and vulnerable.
Think of it like washing your hands over and over without using any lotion—they get dry, tight, and start to crack. A quality leather conditioner puts that moisture back, restores flexibility, and adds a crucial layer of UV protection to fight off fading from the sun.
Making a mistake can be frustrating and expensive. If you’re feeling unsure or just want the peace of mind that comes with a professional touch, our team at The Mobile Buff is ready to help. You can easily find our mobile detailing service in the Harrisburg area to see what we can do for you.
A Simple Maintenance Plan for Pristine White Leather
The real secret to keeping white leather seats looking brand new isn't about spending hours on marathon cleaning sessions. Not at all. It’s about creating a simple, consistent routine. A little bit of regular attention prevents the daily grind of dirt and body oils from building up, which makes those occasional deep cleans so much easier.
Think of it as preventative care for your car. This approach saves a ton of elbow grease and frustration down the road. Since white leather interiors went mainstream with cars like the BMW 7 Series back in 2008, simple maintenance mistakes have led to a shocking 28% rise in seat replacement claims. Those little errors add up, costing insurers an estimated $500 million annually. It just goes to show how much of a difference proper, regular care really makes.
Your Realistic Weekly and Monthly Routine
The best maintenance plan is one you’ll actually stick to. Here’s a super simple schedule that gets the job done without eating up your entire weekend.
The Weekly Dust-Off: Once a week, grab a clean, dry microfiber cloth and give the seats a quick wipe. This literally takes five minutes and gets rid of all that surface dust and lint before it can get ground into the leather.
The Monthly Spot-Check: At least once a month, inspect your seats with a lightly dampened microfiber cloth. This is your chance to catch any minor smudges or fresh spots before they decide to move in permanently.
Just a few minutes each week is all it takes to stop grime from getting a serious foothold. This one small habit makes the bigger cleaning jobs faster and way more effective.
The Quarterly Deep Clean and Condition
Every three months or so, it's time for a proper deep clean and conditioning treatment. This is when you'll follow the full process we outlined earlier—using a pH-neutral cleaner and a soft brush to lift out embedded dirt from the grain. Afterwards, you'll apply a high-quality conditioner to feed the leather and restore its UV protection.
This quarterly reset is absolutely vital for keeping the leather healthy, supple, and brilliantly white. If you're looking for more ways to keep your entire cabin looking its best, check out our guide on car interior cleaning tips.
Of course, life gets hectic, and we get it. If even this simple schedule feels like too much, The Mobile Buff has your back. We offer professional maintenance plans built to protect your investment, so you don't have to lift a finger. Let us do the hard work for you.
Got Questions About Your White Leather? We've Got Answers.
You've read the guide, but a few specific questions are probably still nagging at you. It's totally normal. In fact, we hear these all the time from our clients, so let's jump right into the most common ones.
How Often Should I Really Deep Clean These Seats?
For a car you drive every day, we've found the sweet spot is a professional-grade deep clean and conditioning every 3 to 4 months. This isn't just about looks; it's about getting rid of the gradual buildup of body oils and grime that a simple wipe-down just can't touch.
More importantly, regular conditioning keeps the leather’s protective UV coating in top shape, preventing the sun from doing its worst. If you’re often shuttling kids, pets, or are a fan of dark-wash jeans, you'll want to stay on top of light cleanings even more frequently.
Is It Okay to Use Baby Wipes in a Pinch?
We know it’s tempting—they seem so gentle! But please, put the baby wipes down. This is a hard "no" from us as professionals.
Most wipes are loaded with chemicals, lotions, and scents that are totally wrong for automotive leather. They aren't pH-balanced for it and tend to leave behind a sticky film that becomes a magnet for more dirt. Over time, that residue can actually eat away at the leather’s protective finish. Stick with a real, dedicated leather cleaner.
Here's the bottom line: Products made for human skin are not made for your car's interior. Using the wrong tool for the job, even with the best intentions, can cause some seriously expensive damage down the road.
Does Vegan Leather Need a Different Cleaning Method?
You'd be surprised how similar the process is, especially with the high-quality vegan leather used in today's cars. Both genuine and vegan leather respond best to a pH-neutral cleaner and a light touch with a soft brush.
The biggest difference is in the conditioning step. Since vegan leather isn't porous like real leather, you aren't "nourishing" it. Instead, the conditioner acts as a protective topcoat, creating a barrier that helps repel future stains and blocks out those damaging UV rays. So yes, the pro methods we've covered here work beautifully and safely for both.
Feeling a little out of your depth or just want that flawless, factory-fresh look without the hassle? The crew at The Mobile Buff can bring the professional tools and expertise right to your home. Book your mobile detailing service today, and let us handle the hard work for you.
