


You're probably looking at a dashboard that's lost its color, a set of door panels that feel a little grimy, or a center console that no longer looks like the car you bought. That's usually when car interior cleaning wax is sought, with the expectation that one product will make everything look fresh again. In practice, the pro answer is more precise than that. Interior care works best when you clean first, protect second, and choose products that match the material instead of forcing one shiny product onto every surface.
Beyond the Shine What Is Interior Wax Anyway
The term car interior cleaning wax sounds straightforward, but that's part of the problem. Most mainstream interior-detailing guides don't clearly define an “interior wax” category, and a one-product approach is often too blunt for modern cabins that combine glossy displays, piano-black trim, and touch surfaces that show streaks and residues easily, as noted in CNET's interior cleaning guidance. What many users seek is a protectant or dressing that restores a clean finish and helps slow down daily wear.

The real job is protection, not shine alone
A glossy dashboard can look impressive for a day and still be the wrong result. On modern interiors, the better goal is a uniform, low-residue finish that doesn't streak the screen, smear onto soft-touch plastics, or leave the steering wheel slick. That's why professionals usually think in terms of surface-specific care, not a single miracle product.
Practical rule: if a product makes everything look wet, it's probably doing too much on at least one surface.
That matters in mixed-material cabins. You'll often find leather, vinyl, hard plastic, gloss trim, and screens all within arm's reach of each other. Each one reacts differently to residue, friction, and excess product, so a heavy application can solve one problem and create three others.
A cleaner cabin needs a cleaner definition
Once you treat “wax” as shorthand for interior protectants and dressings, the process gets smarter. You're no longer trying to “wax” a screen or force shine onto textured plastic. You're choosing a product that can leave a controlled finish on the exact surface in front of you, which is the foundation of a pro result.
For owners who want to preserve leather specifically, this guide to maintaining leather car seats is a useful companion because leather care deserves its own approach. The same logic applies across the cabin. A dashboard dressing, a leather conditioner, and a glass-safe cleaner all solve different problems, and calling them all “wax” only causes confusion.
The broader market backs up that ongoing demand for maintenance products. The global car care products market was valued at USD 13.82 billion in 2026 and is projected to reach USD 18.38 billion by 2034, with a 3.63% CAGR, according to Fortune Business Insights. That growth reflects steady spending on upkeep, not one-time fixes, and interior protection is part of that everyday maintenance mindset.
Choosing the Right Protectant for Your Interior
A good interior protectant starts with the surface, not the bottle. Vinyl, hard plastic, and leather all need different handling, and the best product is the one that leaves the right finish without residue, glare, or unwanted slickness. If you're buying on instinct and chasing shine, you'll usually end up with dust attraction and a cabin that looks good for an hour, then starts to feel greasy.
Match the formula to the material
For vinyl and hard plastics, the goal is usually a clean, even dressing with UV support and a non-sticky feel. Those surfaces are common on dashboards, door cards, and console trim, so they need protection that won't migrate into seams or catch dust. A satin or low-sheen finish is usually easier to live with than a glossy one because it looks closer to a maintained factory surface.
For leather, the priority shifts. Leather needs a product that supports condition and finish without saturating the grain or leaving slippery residue. That's why leather care often gets its own product line rather than a generic interior wax. Heavy gloss on leather usually looks wrong fast, and it can make the surface feel odd in daily use.
For modern vehicles with intense sun exposure, a sun shade can help reduce cabin heat and slow visual wear. A practical option is branded sun shades for campaigns, especially if your vehicle spends a lot of time parked outside. It won't replace proper detailing, but it can support the work you do afterward.
What good protectants usually have in common
Professionally chosen products usually share a few traits:
- Controlled finish: not overly shiny, not greasy, and not tacky to the touch.
- Material fit: intended for vinyl, plastic, leather, or glass, not everything at once.
- Sensible cleanup: they buff off without leaving white marks in seams or around buttons.
- UV-focused use: especially on dashboards and trim that face the windshield.
The wrong product often looks impressive at first because it adds instant shine. That's the trap. If it leaves a film that attracts dust, creates glare on the dash, or transfers onto clothing, it does not help the cabin age better. For mixed-material interiors, the safest habit is to use dedicated cleaners on the dirty surface first, then choose a protectant that belongs on that exact material.
Cleaners remove the film. Protectants preserve the finish. Mixing those jobs usually causes the mess people try to fix later.
The Pro Detailing Prep and Application Method
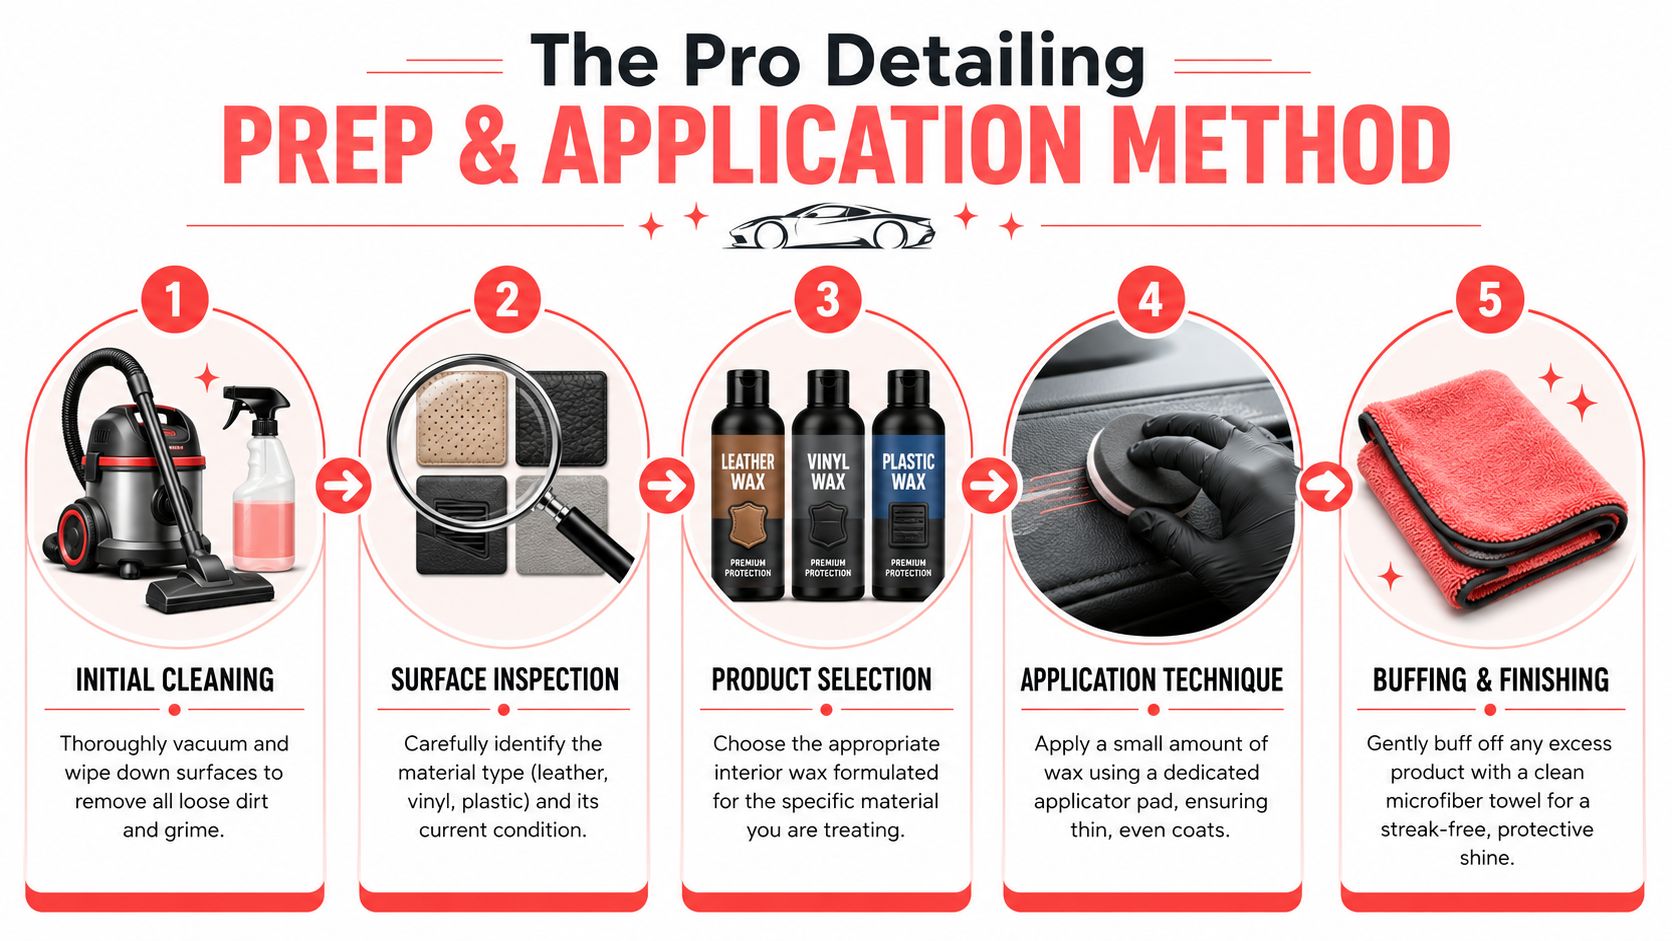
The cleanest interior finishes come from discipline, not product hype. Professional work starts with removal of loose debris and old residue, because protectant won't bond or level properly over oils, dust, and grime. That's why a proper car interior cleaning wax routine is really a prep-plus-protect routine.
Start with full prep, not spot treatment
Vacuum the seats, floor, cracks, and console edges first. Dust the trim before anything touches it, then clean the dirty surfaces with a quality APC or a product approved for that material. The order matters because wiping protectant over grit just drags contamination across the cabin and leaves faint trails that show up in sunlight.
A professional workflow also includes vents and hard-to-reach areas. Compressed air helps move dust out of louvers and seams before you finish the visible surfaces. Once those areas are clean, you're no longer trapping debris under the protectant layer.
A common pitfall in many DIY jobs arises when people spray the product first because it looks fast, then wipe afterward and wonder why the dash still feels tacky. The residue wasn't the solution, it was the symptom.
Apply small sections and keep the product controlled
The next step is simple, but it has to be done carefully. Put a small amount of protectant on a microfiber applicator, then work one small section at a time. Don't spray straight onto the dash unless the product label specifically allows it, because overspray can land on glass, buttons, and textured trim where it's harder to remove.
Professional habit: fold the microfiber often and switch to a clean side before residue builds up.
For a reference point on tool selection and kit organization, this car interior cleaning kit guide is a practical companion to a pro workflow. The actual technique still matters more than the shopping list. A quality towel and a careful hand will outperform a sloppy application every time.
Buff until the finish is even
Once the protectant has been spread thinly, buff off the excess with a clean, dry microfiber towel. The goal isn't a wet shine. The goal is a uniform finish with no smears in the grain, no buildup around switches, and no haze on nearby glass. If residue shows up in seams, the product was over-applied or the towel was already loaded.
A lot of the industry guidance lines up on this point. Professional interior detailing involves vacuuming and dusting all trim first, then applying protectant in small sections with a microfiber applicator, followed by a final wipe-down, because that order reduces recontamination and streaking, according to this detailing workflow guide. That defines the difference between a quick wipe and a finish that holds up.
Key Dos and Donts for a Flawless Finish
Good interior work looks effortless because the mistakes were prevented early. The biggest problems come from heat, over-application, and the wrong towel choice. If you follow the pro rules, the result stays cleaner longer and feels closer to factory fresh.
Do the basics the right way
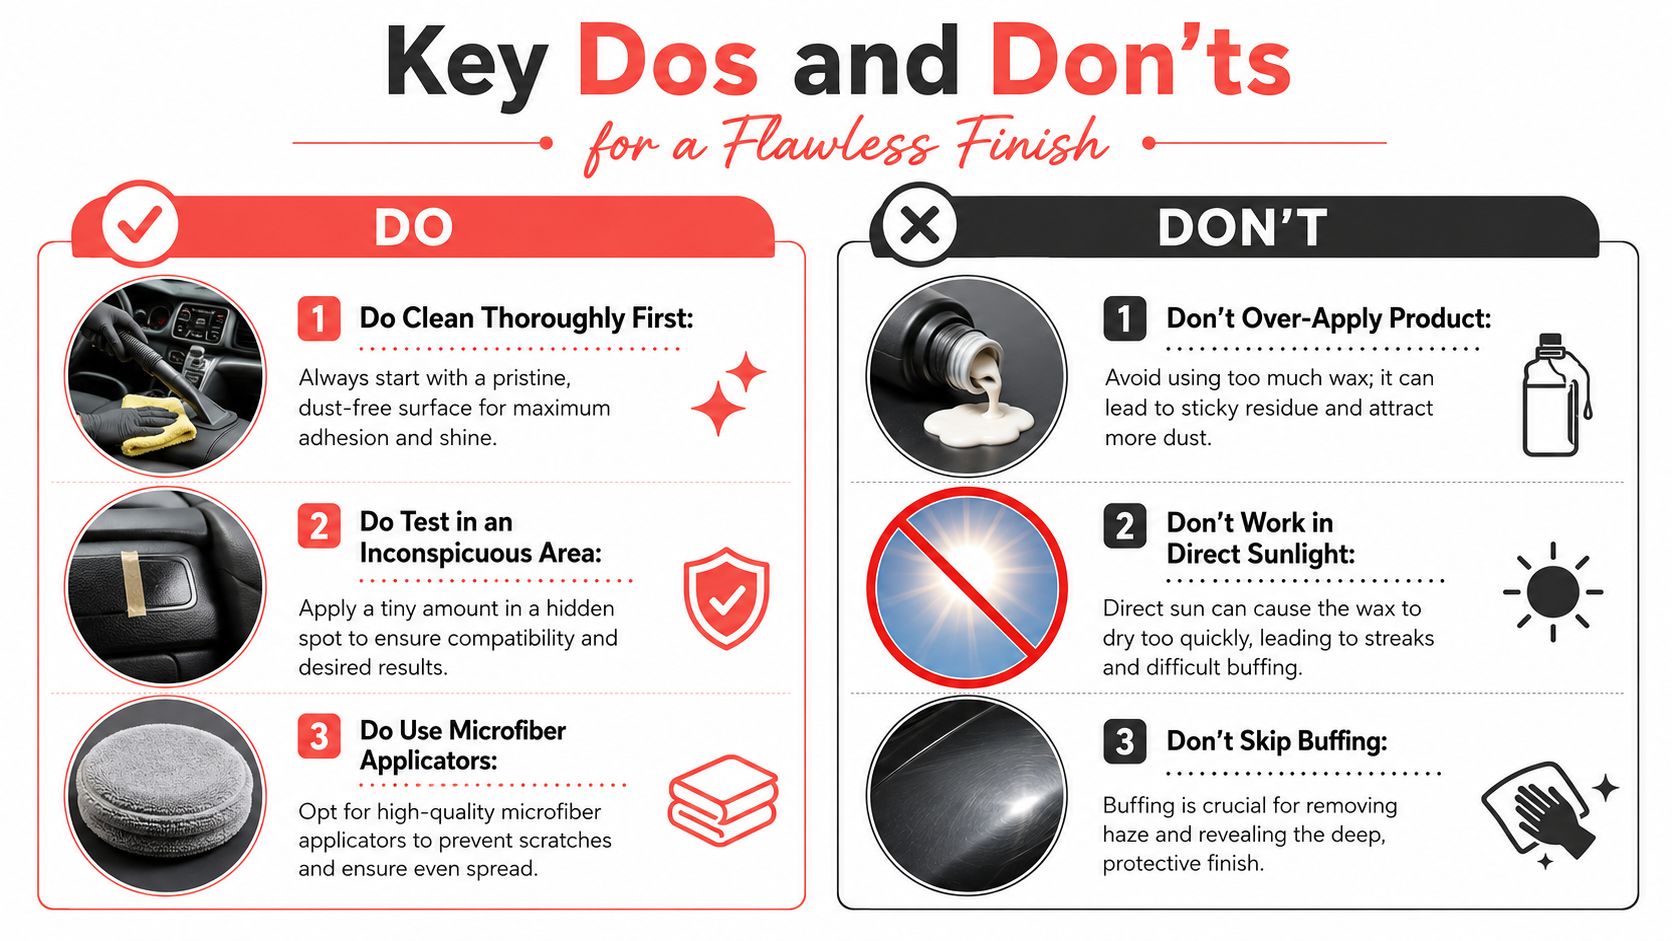
- Do work in a cool, shaded area: heat makes products flash too fast and leaves streaks that are harder to level.
- Do test in a hidden spot first: a small patch behind a seat or under trim tells you if the finish is too glossy or too grabby.
- Do use clean microfiber applicators and towels: fresh fiber spreads product evenly and lowers the chance of scratching.
- Do keep the coating thin: a light coat is easier to control and easier to remove cleanly.
AAA's car-care guidance is blunt on this point, a vehicle should never be waxed in direct sunlight or high temperatures, and a light coat is just as effective as a heavy one while being far easier to remove, according to AAA's detailing guidance. That advice fits interiors just as well as exteriors because heat changes how quickly residue sets.
Don't make the common DIY mistakes
- Don't apply product to steering wheels, pedals, or screens: those areas need specific cleaning, not a slick dressing that can interfere with grip or visibility.
- Don't use household cleaners as a shortcut: they're not built for mixed automotive materials and can leave dulling residue.
- Don't overdo silicone-heavy products: they may look shiny, but they often leave a film that grabs dust and can feel greasy.
- Don't skip buffing: if the towel never comes back through, the leftover product is what you'll see later.
The safest routine is still the least dramatic one. Clean first, apply sparingly, and finish with a towel that removes every trace of haze. That sequence protects the surface and keeps the cabin comfortable to touch every day.
Troubleshooting Streaks and Long Term Care
Streaks usually mean the product sat on top of dirt, was applied too thickly, or got spread with a towel that was already loaded with residue. A greasy feel points to the same problem. The fix is usually not a stronger product, it's a cleaner towel, lighter application, and better prep before the protectant goes down.
Fix the finish before you add more product
If the surface looks uneven, buff it again with a clean, dry microfiber towel. If it still feels oily, wipe it back lightly with a damp microfiber cloth and re-buff after the area dries. That simple correction often solves what people assume is a “bad wax” problem.
Long-term care is less predictable because interiors live different lives. A family SUV with kids, snacks, pets, and daily sun exposure ages differently than a weekend coupe parked indoors. The right protectant can help restore shine and shield from sun damage, but its real-world performance over time against heat and staining in high-use vehicles is rarely quantified, so consistent reapplication matters, as noted by Edmunds' interior detailing overview.
Keep the schedule realistic
The best schedule depends on use, not ego. If the cabin gets touched constantly, the finish will wear faster. If the vehicle bakes in strong sun, the protection will need attention sooner. The point isn't to chase a perfect showroom feel every week, it's to keep the interior clean, safe, and presentable without building up residue.
A pro shop solves this by repeating a controlled method every time. That consistency is hard to match at home when the car is also your daily driver, lunchroom, and family shuttle.
When DIY Is Not Enough Trust The Mobile Buff
A clean interior starts with the right hands and the right order. If you have the time, good towels, and patience for the cleanup, basic interior care at home can work well. The trouble starts when the cabin is heavily soiled, stains keep returning, or the dashboard and trim have built up layers of residue from years of quick wipes. At that point, a professional detailer saves time and avoids the kind of trial-and-error that usually leaves the finish uneven.
Why a pro visit makes the difference
Professional interior work is not just about shine. It means using the right cleaner on the right surface, removing residue instead of spreading it around, and finishing the cabin so it feels thoroughly clean. That matters for busy drivers, parents, pet owners, and anyone who does not want to spend a Saturday chasing streaks on black trim.
The key difference shows up in the details. Screens, soft-touch plastics, piano-black trim, and textured panels all react differently to protectants and dressings, so a one-product approach often creates haze, slip, or an oily look that is hard to correct later. A trained detailer reads the surface first, cleans it properly, then applies protection in a controlled way so the result looks even across the whole cabin.
That approach is what sets professional work apart from a quick wipe-down. If you want the cabin cleaned, protected, and finished without guessing at product choice, The Mobile Buff's interior detail service is built for that kind of job.
Book the service that matches the vehicle
If your interior needs a deeper reset, or you want the final result to look consistent from dash to door panels, let a detailer handle the prep and the finish. You can also find the business quickly through The Mobile Buff's Google Business Profile. For cleaner surfaces, better protection, and a finish that holds up longer than a quick wipe, schedule your appointment with The Mobile Buff today.

