
You wash the car, step back, and there they are. Chalky little spots on the hood, ghost rings on the glass, crust around trim that somehow looks worse in sunlight than it did when the car was dirty.
That's the part that frustrates people most. Hard water stains make a clean car look neglected, and they often survive a normal wash because they aren't normal grime. If you've been searching for how to remove hard water stains without making things worse, the first thing to know is this: on a vehicle, the safest process is different from what you'd do on a sink, shower door, or faucet.
Cars demand a lighter touch, tighter product control, and a clear line between what's safe to try and what should be left to a professional. That line matters more than most DIY guides admit.
Those Annoying Spots What Are Hard Water Stains Anyway
Most drivers first notice water spots after doing everything right. You rinse well, use clean towels, maybe even wash in decent weather, and the paint still dries with cloudy marks. On dark paint, they stand out immediately. On glass, they look like a film that won't quite wipe away.
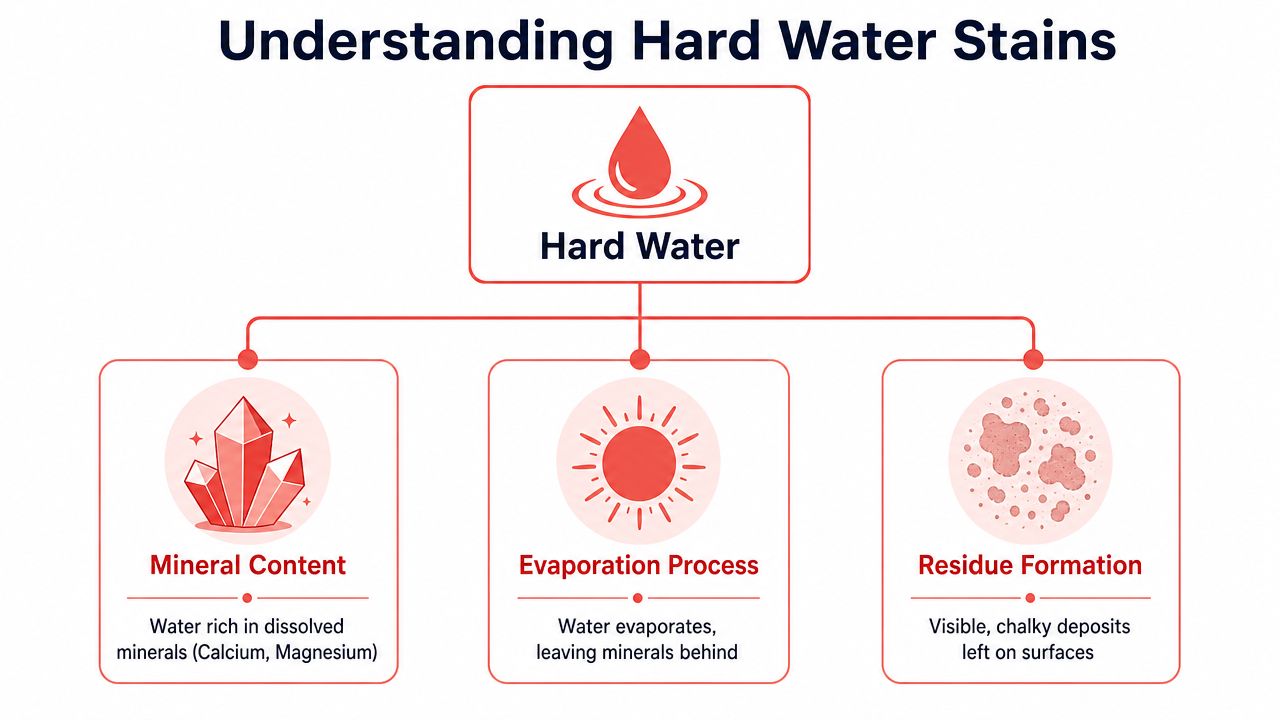
That's because hard water stains are mineral deposits, not leftover dirt. Water evaporates, but the dissolved minerals stay behind. Once they dry on the surface, you're no longer dealing with something a regular car shampoo can lift.
Why Washing Alone Usually Fails
The chemistry matters here. Guidance on hard-water stain removal points out that the classic household fix, vinegar, works because its acetic acid is commonly about 5% acidity, and that weak acid helps dissolve calcium carbonate scale rather than just wiping at it with friction alone, as explained in Aquasana's hard water stain guide.
That principle is useful. The surface choice is where people get into trouble.
A bathroom fixture can tolerate methods that a vehicle finish can't. Paint, clear coat, exterior trim, polished metal, and coated automotive glass all react differently. That's why broad household advice often leaves out the most important question for car owners: safe for what surface?
Practical rule: If the stain is mineral-based, the answer isn't “scrub harder.” It's choosing a surface-safe chemical approach, then using gentle mechanical action only after the deposit starts to break down.
For a non-automotive example of how mineral buildup behaves on glass, this expert window cleaning advice gives good context on why these spots become stubborn over time.
On vehicles, the same basic cause applies, but the margin for error is smaller. If you want a deeper look at where spots come from in the first place, this breakdown of what causes water spots on cars is worth reading before you touch the finish.
What You're Really Looking At on the Car
There are usually two possibilities:
- Fresh mineral residue that still sits on top of the surface
- Older damage where the spot has started affecting the finish itself
The first type often responds to the right dedicated product and careful technique. The second type is where people overdo it, use the wrong chemistry, or start rubbing aggressively and create a bigger correction job than they started with.
The Professional Toolkit for Safe Water Spot Removal
A safe result starts before any product touches the panel. Pros don't reach for old bath towels, dish soap, or whatever cleaner is under the sink. The tool choice is part of the correction.
What Actually Belongs in the Kit
For vehicle-safe hard water stain removal, the basic setup usually includes:
- A dedicated water spot remover: Automotive finishes require a product designed for paint, trim, or glass, not a generic household descaler.
- Multiple clean plush microfiber towels: One dirty or low-quality towel can drag grit across the surface and leave scratches that are harder to fix than the spots.
- Foam or microfiber applicator pads: Controlled application beats spraying product all over a panel.
- Clay media for bonded contamination: Not for every job, but useful when fallout and surface contamination are mixed in with spotting.
- Good lighting: If you can't inspect the panel clearly, you can't tell whether you removed a deposit or just smeared residue.
If you want to compare the kind of tools detailers rely on for safe paint work, this overview of mobile car detailing supplies gives a solid baseline.
Timing Matters More Than Force
One of the biggest mistakes in DIY work is assuming stronger results come from longer soaking or harder scrubbing. In reality, stain removal is usually a staged process. Guidance on hard-water cleaning notes that effective acidic treatments often work with short dwell times, and repeating the process can be safer than letting a stronger product sit too long, as described in The Maids guide to removing hard water stains.
That same logic applies even more strongly on automotive surfaces.
Let the product work first. Pressure comes second, and only if the surface and product call for it.
Deposits Versus Damage
A professional setup also reflects an important distinction: some spots are deposits, some are etching. If the material is sitting on top, a remover may handle it. If the finish has already been marked, the kit changes from chemical removal to paint correction tools and experience.
That's why the right toolkit isn't just about products. It's about knowing which problem you have before you start.
A Surface by Surface Guide to Removing Water Spots
Cars aren't one material. They're a collection of delicate finishes that happen to sit next to each other. Paint, glass, chrome, textured trim, piano black plastic, and headlight lenses all demand different treatment. That's the part most household-style guides miss.

A useful starting point is simple: begin with the least aggressive, vehicle-safe method, work a small test spot first, and inspect under good light before moving on.
Paint and Clear Coat
Paint is where DIY mistakes get expensive. The biggest problem with generic online advice is that it often borrows methods from household cleaning. That's risky. Existing guidance warns that methods like vinegar or baking soda may be acceptable on household surfaces, but the wrong abrasive or acid choice on a vehicle can etch clear coat, dull paint, or damage chrome, as noted in this discussion of hard water methods and surface risks.
For paint and clear coat, the safe order looks like this:
- Wash and dry the area first. You need loose dirt off the panel before addressing spots.
- Use a dedicated automotive water spot remover. Apply it to an applicator, not blindly across the whole panel.
- Work a small section. A test spot tells you how the finish is reacting.
- Use light, even pressure. You're encouraging product contact, not grinding into the paint.
- Wipe residue with a clean microfiber towel and inspect.
- Repeat if needed. If the outline remains unchanged, stop assuming it's removable residue.
Some readers in Central PA who want the service done on-site choose a mobile detailer for this exact step. For example, The Mobile Buff's water spot removal article discusses the paint-specific side of the job in more detail.
If a spot looks lighter but still leaves a sharp ring after a careful second pass, there's a good chance you're no longer dealing with a simple deposit.
Glass and Windshields
Automotive glass gives you a little more room to work, but not unlimited room. Glass can handle products that paint cannot, yet technique still matters. Dedicated automotive glass cleaners won't usually remove mineral buildup on their own, so this is one place where a purpose-made water spot remover or professional glass-safe decontamination product makes sense.
Use this sequence:
- Clean the glass first: Remove film, bug residue, and road grime.
- Apply a glass-safe remover to an applicator pad: Keep the process controlled.
- Work in overlapping passes: Don't attack random circles all over the windshield.
- Buff off completely: Residue can mimic remaining spots.
- Check from multiple angles: Some deposits disappear straight-on but remain obvious in side light.
This walkthrough shows the kind of careful, controlled process that matters when spotting gets stubborn:
If the glass still has a shadow or crater-like look after proper cleaning, you may be dealing with etched glass rather than removable scale.
Chrome and Plastic Trim
These surfaces catch overspray and hard water runoff constantly, especially around mirrors, grilles, and lower trim pieces.
Chrome usually tolerates targeted mineral-removal work better than paint, but it can still haze if you choose the wrong product or get too aggressive. Textured plastic is even trickier because residue can lodge in the texture and make the piece look worse.
A few rules keep these areas safe:
- Mask sensitive edges if needed: Especially where trim meets paint.
- Use trim-safe or metal-safe products only: Product labels matter here.
- Avoid abrasive pastes and household scrub pads: They leave visible marring fast.
- Use a soft detailing brush only when the surface calls for it: Good for texture, bad if overloaded with pressure.
- Wipe dry completely: Leaving dissolved mineral slurry in seams just restarts the problem.
A careful hand beats brute force every time. On cars, “stronger” isn't the same as “better.”
When to Stop DIY and Call a Professional Detailer
The hardest part of this job isn't removal. It's judgment.
A lot of people know how to try a cleaner. Fewer know when to stop. That matters because older, stubborn spots don't always sit on top of the surface. Practitioner discussions around severe hard-water buildup show that some stains require escalation to mechanical polishing, and even aggressive methods can be inadequate when the damage is no longer just a deposit, as described in this practitioner conversation about stubborn hard water staining.
Signs You're Past the Safe DIY Stage
Watch for these clues:
- The spot outline remains after careful chemical treatment
- The surface feels clean but still looks cloudy
- The mark changes in appearance depending on viewing angle
- Repeated wiping improves nothing
- The stain has been there long enough that you're unsure whether it's mineral residue or etching
Those are warning signs. They don't always mean the finish is permanently damaged, but they do mean guessing can make it worse.
Stop when progress stalls. Repeating a safe step is one thing. Escalating without knowing the surface condition is where damage happens.
Why Etching Changes the Job
Once a spot has affected the clear coat or glass itself, removal shifts into correction. That may mean machine polishing, compounding, or surface-specific restoration. In untrained hands, that opens the door to haze, uneven gloss, trim staining, or removing more material than necessary.
This is also where generic home articles become a problem. If you want to compare common beginner approaches first, these DIY hard water removal fixes are helpful as a contrast, but vehicle finishes often need a more controlled standard than household glass or fixtures.
The Smart Move for Stubborn Spots
If you've tested a proper automotive remover, worked a small section, and the spot still leaves a visible trace, it's time for a trained eye. That's when having a local mobile detailer inspect the finish saves time and can prevent a much bigger correction job.
If you're in Central Pennsylvania and want a direct path to help, you can check The Mobile Buff on Google to see local service info and request a detail.
The Best Offense a Good Defense Against Future Spots
Once you've dealt with water spots, prevention gets a lot more interesting. It's understandable to want to avoid fighting the same battle twice, and the good news is that prevention is simpler than correction.
The biggest habit change is also the least glamorous. Dry the vehicle completely. Guidance for hard-water cleanup consistently emphasizes rinsing and drying after treatment because leaving water behind is what allows fresh mineral deposits to form in the first place, as noted in Lowe's guidance on removing hard water stains.
Habits That Keep Spots From Returning

A few practices make a real difference:
- Dry immediately: Use clean microfiber drying towels or forced air so water doesn't sit and evaporate on the surface.
- Wash in shade: Direct sun speeds evaporation and leaves minerals behind before you can finish.
- Keep protection on the vehicle: Wax, sealant, or ceramic protection helps water release more easily and reduces how tightly deposits cling.
- Maintain glass and trim too: These areas often get ignored until spotting becomes obvious.
- Clean up sprinkler exposure quickly: Repeated hard-water contact is rough on parked vehicles.
Why Protection Helps
A protected surface doesn't make minerals disappear. It changes how long water sits and how hard deposits bond. That makes maintenance easier and lowers the odds that a routine rinse turns into a correction job.
For readers interested in the broader water-quality side of the problem, this guide to removing hard water gives useful background on the source issue itself.
Prevention is cheaper in effort than correction. Once water spots age on a vehicle, every step afterward gets more technical.
Get Flawless Results The Mobile Buff Is Here to Help
Hard water stains look simple until they aren't. A fresh deposit on exterior glass is one thing. A baked-on spot on black paint or a ring that has already affected the clear coat is something else entirely.
That's the difference most DIY advice glosses over. A showerhead can survive methods that a vehicle finish should never see. One household example often shown for heavy mineral buildup is an overnight vinegar and baking soda soak, but that kind of bathroom fix doesn't translate safely to automotive paint or clear coat, as shown in this hard-water showerhead cleaning example.
Why Professional Precision Matters
When a detailer handles water spots correctly, the process is controlled from the start:
- Surface inspection first: figuring out whether it's residue or etching
- Product matching: using the right remover for paint, glass, trim, or metal
- Measured correction: stopping before unnecessary damage happens
- Protection afterward: helping reduce repeat spotting
That's especially valuable when you're busy, the car sits outside, or you don't want to gamble with the finish. Mobile detailing also removes the hassle of arranging shop drop-off just to solve a problem that usually starts in your driveway anyway.
If you're dealing with stubborn spots on paint, glass, trim, or headlights in Central Pennsylvania, the safest move is often the most efficient one. Let a pro inspect the surface, remove what's removable, and tell you when correction is needed.
If you want clean paint, clear glass, and no guesswork, book a service with The Mobile Buff. We bring professional detailing to your driveway across Central PA and handle water spot removal with the care automotive surfaces require.
