
You spot the mark when you're loading groceries, buckling in a kid, or grabbing your laptop bag off the passenger seat. A pen leaked. A marker rolled under the console. Now there's a dark ink stain on your car upholstery, and every online search seems to tell you to grab whatever's in the bathroom cabinet and start scrubbing.
That's where people get into trouble.
If you're trying to figure out how to remove ink stains from car upholstery, the right answer depends on what the seat is made of, how fresh the stain is, and what product touches it first. Ink isn't like a simple drink spill. It spreads fast, grabs hold, and reacts differently on cloth, leather, vinyl, and the mixed materials found in many newer vehicles.
A lot of DIY advice skips that part. That's a problem, because a 2025 J.D. Power study found 68% of new cars feature hybrid fabric-leather or microfiber upholstery, and common DIY solvents like alcohol can bleach or degrade those materials when used the wrong way (supporting reference). One cleaner that helps on one panel can stain the next one.
That Sinking Feeling An Ink Stain on Your Car Seat
Ink stains create a different kind of panic than most interior messes. Coffee looks bad, but people understand what to do with it. Ink feels riskier because it is. It can sit on the surface for a moment, then start moving into stitching, grain, weave, and padding before you’ve even decided what towel to grab.

The mistake I see most often is simple. People assume an ink stain is just an ink stain. They search for one fix, try the first trick they find, and hope the seat material cooperates.
Why generic advice fails
That one-size-fits-all approach doesn't match how modern interiors are built.
Many vehicles now combine materials across one seat. You might have cloth centers, synthetic side bolsters, coated leather trim, and contrast stitching that reacts differently than the panel around it. That’s why random internet advice can turn a removable stain into a finish problem.
Practical rule: Before you treat the ink, identify the material. If you can't confidently name it, don't guess with a strong solvent.
A cloth seat can absorb ink deep into the weave. A finished leather surface may hold ink closer to the top layer for a short time. A synthetic insert may react badly to products that people casually recommend online. The stain looks similar across all three, but the cleanup method should not.
What makes ink different
Ink contains dyes, pigments, and solvents. Once it lands on upholstery, it doesn't wait around politely. It starts bonding, spreading, and sinking.
That’s why people get poor results when they go straight to rubbing. Scrubbing feels active, but it usually pushes the color farther out and deeper in. On some seats, the damage from the cleanup attempt becomes harder to reverse than the original mark.
A better approach is controlled, material-specific, and patient. The first response matters. The product choice matters. The motion matters. Even how wet you make the area matters.
The real trade-off
DIY removal can work when the stain is fresh, the material is straightforward, and the process stays disciplined. But there’s a narrow window where that’s true. Miss it, or use the wrong product, and the balance changes quickly.
The challenge isn't just lifting the ink. It's lifting the ink without leaving behind a bleached patch, a dried-out leather finish, a fuzzy cloth spot, or a larger stain ring.
That’s the part most articles leave out. A professional detailer doesn't just ask, "What removes ink?" We ask, "What removes this ink from this exact surface with the least risk?"
Your Immediate Ink Stain Action Plan
If the ink just happened, speed helps more than force. Immediate action within the first 60 seconds boosts removal success rates to over 90% for fresh stains on fabric. Once dried, success drops to 40-50%, often requiring professional-grade tools and chemicals (henrysautodetail.com).
That doesn't mean you should panic. It means you should act carefully and stop the stain from spreading.
What to do in the first minute
Start with the least aggressive move possible.
Grab a clean dry cloth or paper towel.
Use white or light-colored material if possible so you can see whether ink is transferring.Blot the stain gently.
Press down. Lift. Move to a clean section. Repeat. Don't wipe back and forth.Work from the outside toward the center.
That helps keep the stain from expanding into clean upholstery.Remove the leaking pen or source of the ink.
It sounds obvious, but people often keep working the stain while the pen is still sitting there.Pause before adding any liquid.
If you don't know whether you're dealing with cloth, coated leather, vinyl, suede-like microfiber, or a mixed panel, don't start pouring on cleaner.
What not to do
The wrong move in the first few minutes can lock in more work later.
- Don't rub aggressively. Friction spreads wet ink.
- Don't soak the area. Too much liquid can drive the stain deeper.
- Don't use heat. Warm air and heated drying can set what remains.
- Don't stack products. Mixing cleaners creates residue and makes troubleshooting harder.
- Don't use a colored towel. Dye transfer is a real risk.
If you're in a parking lot with limited supplies, a dry blot done correctly is better than a rushed chemical attack with the wrong product.
Your five-minute triage decision
After the first blotting pass, stop and assess what you're looking at.
| Situation | Best next move |
|---|---|
| Fresh stain on obvious cloth | Continue gentle blotting and prepare for a controlled alcohol dab later |
| Fresh stain on finished leather | Blot only, then use a leather-safe cleaner or very controlled alcohol application after a spot test |
| Unknown or mixed material | Stop after blotting and avoid guessing with solvents |
| Large spill or exploded pen | Limit spread, blot, and move straight to professional help |
Restraint pays off here. People often think they failed if the mark doesn't disappear immediately. That's not failure. In the first few minutes, your goal is to contain, not fully restore.
Keep the stain stable
If you can't treat it properly right away, leave it alone after blotting. A seat that has been blotted and left stable is usually in better shape than one that has been rubbed, sprayed, scrubbed, and half-rinsed with random cleaners.
The first phase is triage. Save the seat first. Deep cleaning comes second.
Choosing Your Weapon Professional-Approved Solvents
Product choice matters because ink removal is chemistry, not luck. Alcohol-based solutions dissolve ink through molecular disruption, which is why they remain part of professional stain removal protocols. But the details matter. The same source notes that products like hairspray can sometimes work because they contain isopropyl alcohol, yet they're risky because of their other additives. Professional protocol demands pure, controlled agents to avoid collateral damage to the upholstery (seatcoversolutions.com).

That’s the line between professional-approved and internet-random. A detailer wants a cleaner with known behavior, predictable strength, and minimal residue.
What belongs on the short list
For safe at-home attempts, keep the toolkit narrow.
- 70% isopropyl alcohol works for many ink stains because it breaks down the dye components in a controlled way.
- Dedicated leather cleaner is the first choice on leather when the finish is in good shape and you want the least risk.
- Clean cotton swabs or white microfiber towels give you precision and help you monitor transfer.
- Cold water is useful for rinsing residue on cloth after the ink is lifted.
If you want a broader overview of fabric-safe products, this guide on best stain remover for car upholstery is a helpful companion.
What I wouldn't trust on a car seat
A lot of so-called hacks get clicks because they use items people already own. That doesn't make them smart choices for automotive interiors.
I don't recommend reaching for:
- Hairspray
- Toothpaste
- Vinegar-cornstarch paste
- Nail polish remover
- Mystery household degreasers
Some of those show up in DIY content because they can affect ink in some situations. The problem is the side effects. Additives, abrasives, fragrance oils, whitening agents, and uncontrolled solvent strength create too many variables.
On a bathroom sink or an old T-shirt, maybe you take that gamble. On a stitched seat panel, a leather bolster, or a synthetic insert, that gamble gets expensive.
Cleaners that "sort of work" are often the ones that create the biggest correction jobs later.
Why pure products win
A professional detailer needs repeatability. That's why pure isopropyl alcohol and purpose-built upholstery or leather cleaners stay in the rotation. You know what they are. You know how much to use. You know when to stop.
That matters because oversaturation is one of the quiet ways people damage interiors. Too much liquid on leather can affect the finish. Too little on cloth may fail to break down the ink at all. Product control is part of the skill.
A quick visual can help if you're comparing options before you touch the seat:
The trade-off people miss
Stronger isn't always better. A more aggressive solvent may remove more ink, but it can also remove dye, flatten texture, dry out the surface, or leave behind a shiny patch. In detailing, that’s not a win.
A mild but appropriate product used with the right technique usually beats a harsh cleaner used out of frustration. That's especially true once you move beyond simple cloth seats and into newer mixed-material interiors.
If you're deciding what to use, choose the product with the most predictable behavior, not the one with the most dramatic online claims.
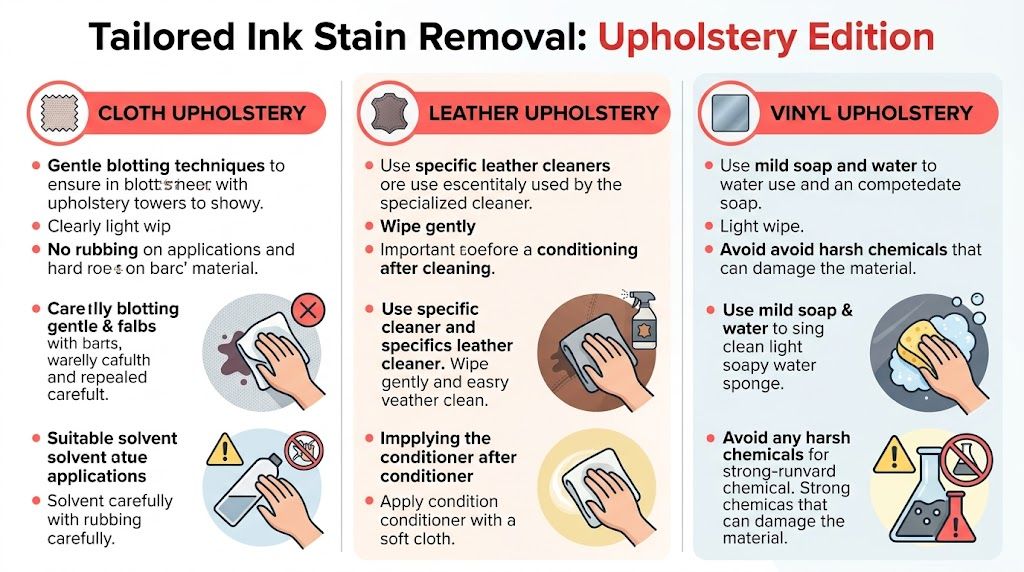
The Right Removal Technique for Your Upholstery
The same ink stain needs a different hand depending on what it landed on. That is the part a lot of quick online guides skip. Modern interiors often combine cloth, coated leather, vinyl, perforated panels, contrast stitching, and synthetic inserts on the same seat. Use one generic method across all of it, and stain removal can turn into color loss, finish damage, or a ring that is harder to fix than the original mark.
That’s why cloth technique should stay on cloth, and leather technique should stay on leather or other finished surfaces.
Start with a spot test
Test first. Always.
Pick a hidden area near the seat base, under an edge, or along the rear lower section. Put a very small amount of product on a white cotton swab or clean towel, blot once or twice, then inspect the area after a short wait.
You’re checking for:
- Color transfer
- Surface dulling
- Texture change
- Sticky residue
- Finish softening
That minute of caution can save you from turning a removable stain into a repair job.
Cloth upholstery
Cloth is where patience matters most. Ink tends to wick into the fibers, and aggressive scrubbing pushes it farther and spreads it wider.
How to treat cloth correctly
Blot dry ink first until transfer slows.
Lift what you can before adding any solvent.Dampen a towel or swab with 70% isopropyl alcohol.
Keep it controlled. Do not pour product onto the fabric.Dab the stain gently.
Press and lift. Shift to a clean part of the towel often so you are not putting ink back into the seat.Work from the outside toward the center.
That helps contain the stain.Repeat in short passes.
Stop between passes and check whether the ink is lifting.Lightly blot with cold water on a separate clean cloth.
This removes leftover solvent and loosened residue.Blot dry and let the seat air dry.
Heat can set residue and change how the area dries.
Flooding fabric is one of the most common DIY mistakes I see in Central PA. The top looks cleaner for a few minutes, then the ink or dissolved residue creeps back as the seat dries. Seams and foam-backed sections make that even more likely.
If you want broader maintenance basics beyond ink work, this guide on how to clean your car seats effectively is a solid general reference.
Leather upholstery
Leather requires restraint. Fresh ink often sits closer to the surface on finished leather, but the protective coating can also react badly to too much solvent, too much pressure, or too many passes.
Best method for leather
Use a cotton swab or a tightly folded white microfiber.
- Apply a small amount of leather cleaner first if the mark is fresh and light.
- Move to 70% isopropyl alcohol only if needed, and only after a spot test.
- Dab with small, controlled motions.
- Keep product confined to the stained area.
- Stop immediately if you see color transfer, dulling, dryness, or a change in sheen.
Older leather, worn bolsters, light-colored seats, and previously repaired areas are less forgiving. So are perforated sections. Once liquid gets into those holes, cleanup gets much harder and the finish can change unevenly.
After cleaning, wipe the area dry with a clean towel. If the surface feels dry after it fully airs out, apply an appropriate leather conditioner.
Vinyl and coated synthetic surfaces
Vinyl usually cleans up faster than cloth, but it still has its own risks. The biggest one is surface change. A cleaner can remove the stain and leave haze, tackiness, or a shiny patch that catches light differently than the rest of the panel.
For vinyl or coated synthetic trim:
- Start with a mild interior cleaner or a lightly damp microfiber.
- If the stain remains, use a small amount of isopropyl alcohol on a cloth, not directly on the surface.
- Wipe gently, then follow right away with a clean damp cloth.
- Dry the area fully.
Skip magic erasers, acetone, hairspray, and random household stain removers. Those shortcuts are responsible for a lot of the interior correction work professionals end up fixing.
A quick comparison
| Upholstery type | Main challenge | Safer first choice | Biggest mistake |
|---|---|---|---|
| Cloth | Ink sinks into fibers | Controlled dabbing with 70% isopropyl alcohol | Oversaturating and scrubbing |
| Leather | Finish can dry or discolor | Leather cleaner, then spot-tested alcohol if needed | Using too much liquid |
| Vinyl | Surface haze or sheen change | Mild interior cleaner, then limited alcohol if needed | Harsh solvent use |
When technique stops being DIY-safe
If a few careful passes have stopped producing transfer, the remaining stain may be below the visible surface or locked into a finish layer. At that point, more effort usually means more risk.
That is where extraction tools, material-specific cleaners, and professional upholstery cleaning judgment matter. On mixed-material seats, stitched panels, or anything with perforations, calling a pro is often the cheaper move than fixing a DIY attempt that went too far.
Troubleshooting Stubborn Stains and Preventing Future Messes
Old ink stains are where confidence gets people in trouble. A faint shadow remains, so they keep hitting it with more cleaner, more pressure, and more passes. That often leads to distortion, residue, or a brighter clean spot around a darker center.

The smarter approach is to decide whether the stain is still responding or whether you're just reworking the same area.
If the stain is still there
You can make one final careful attempt, but keep it narrow.
For cloth, that means another short dab-and-blot cycle with a clean towel and controlled alcohol use. For leather, it means a very limited second or third pass at most, followed by a close inspection of the surface. If the area starts looking dry, shiny, rough, or lighter than the surrounding material, stop.
A stain that's improving is one thing. A surface that's changing is another.
Signs to stop trying at home
- The color isn't lifting anymore
- The seat texture looks different
- A ring is forming around the stain
- The leather finish looks dull or patchy
- The area feels sticky after drying
- The stain sits on a seam, perforation, or mixed-material transition
Those are all signs that the safe DIY window is closing.
A partially improved stain is usually recoverable. A chemically damaged seat is much harder to put right.
Why old ink is different
Fresh ink is a removal job. Old ink is often a correction job.
Once the stain dries and settles, you're no longer just lifting liquid from the surface. You're dealing with dye that has bonded into fibers, texture, or grain. That takes more than repetition. It takes better chemistry, better extraction, and good judgment about when the seat material is reaching its limit.
That’s also why leather owners should spend time learning material care in general, not just stain response. A useful overview on how to clean leather upholstery can help you understand the bigger maintenance picture.
Prevention is easier than removal
A few habits reduce the odds of doing this whole exercise again.
- Check pens before they ride in the car. Click pens, cracked barrels, and loose caps cause a lot of unnecessary mess.
- Empty work bags and backpacks carefully. Office supplies and kids' markers are frequent culprits.
- Use dedicated storage. Keep pens in a console organizer, not loose on the seat.
- Inspect pockets before long drives. Heat and pressure inside a vehicle aren't kind to cheap pens.
- Protect high-risk vehicles. Family vehicles, rideshare vehicles, and work trucks benefit from regular interior maintenance and protective products.
Prevention isn't glamorous, but it saves far more upholstery than miracle cleaners ever will.
When to Call the Pros The Smart Choice for Your Car
Some ink stains are good DIY candidates. Many are not.
If the upholstery is mixed, delicate, light-colored, perforated, already worn, or expensive to replace, the risk changes fast. The same goes for stains that dried before you found them, marks that spread into stitching, and spots that have already been hit with several household products.
That’s where professional help stops being a luxury and starts being the sensible option.
What a pro brings to the job
A trained detailer doesn't walk up to the stain and start guessing. The process starts with identifying the material, checking finish condition, testing a hidden area, and choosing the least aggressive method likely to work.
That matters because modern interiors aren't simple. One seat may include multiple surfaces, each with a different tolerance for solvent, moisture, agitation, and dwell time. A professional works through those trade-offs before committing to a treatment plan.
Professional stain service also means access to better tools and dedicated products, not just stronger chemicals. The goal is controlled removal with minimal side effects.
Good reasons to make the call
You should strongly consider professional help if any of these apply:
- The stain is old or mostly dry
- You've already tried one or more products
- The seat uses mixed materials
- The ink sits on leather, microfiber, Alcantara-style material, or a seam
- The stain came from a pen explosion rather than a small mark
- You don't know what the upholstery is
Those are the situations where DIY often gets expensive.
If you're in Central Pennsylvania and the mark needs more than a cautious home response, a dedicated stain removal service is the safer next step than another round of trial and error.
Why convenience matters too
Busy car owners usually don't have the time to sit in a driveway doing repeated spot tests, blot cycles, rinse checks, and dry checks. Parents, commuters, pet owners, and anyone using their vehicle for work need a fix that protects the car and doesn't eat half the day.
Mobile detailing solves that part of the problem. You don't have to rearrange your schedule around a shop visit just to deal with one ugly seat stain.
For drivers around Harrisburg, Mechanicsburg, Carlisle, Newport, and surrounding parts of Dauphin and Perry counties, getting an experienced detailer to the vehicle is often the smartest move. It saves time, lowers the chance of upholstery damage, and gives the stain a better shot at proper removal before more DIY attempts make it worse.
The best time to call is early. Not after the fourth cleaner. Not after the scrub brush. Not after the stain has spread and the leather has dried out.
If you want the shortest path between "there's ink on my seat" and "this is handled," professional service is usually it.
If you've got an ink stain on your seat and don't want to gamble with the wrong cleaner, let The Mobile Buff handle it the right way. We provide mobile detailing across Central PA and can come to your home or workplace to treat interior stains safely and professionally. You can also check out our Google Business Profile to see reviews, service details, and get in touch for scheduling.
