
You've probably seen it happen in a parking lot or at a gas station. One car looks deeper, darker, and glossier than everything around it. Water slides off it. The paint looks crisp even in bad light. Then you start wondering whether a ceramic coating application is something you can handle yourself, or if the videos make it look easier than it really is.
That question matters because this isn't the same as wiping on a spray wax and calling it done. A ceramic coating is a protection system, and the result depends less on confidence than on preparation, lighting, timing, and control. If you get those right, the finish can look outstanding. If you get them wrong, the coating can highlight flaws you didn't notice and lock them into the paint.
More Than Just a Shiny Finish
A lot of people start with the gloss. That makes sense. The shine is what you notice first.
But ceramic coating application isn't really about shine alone. It's about putting a bonded layer of protection onto properly prepared paint. Modern true nano-ceramic coatings based on silicon dioxide (SiO₂) began appearing in the late 2000s and grew out of industrial uses before becoming a staple in automotive paint protection, and unlike waxes that sit on the surface, they form a chemical bond with the clear coat, which is why prep matters so much for longevity, as noted in this overview of the evolution of ceramic coatings.
If you're still getting familiar with the basics, this guide to what ceramic coating is is a good starting point.
What a coating does and what it doesn't
A ceramic coating can improve how the paint looks, how it sheds water, and how easy it is to wash. It can also add a more finished, glassy look when the paint underneath is already in excellent condition.
What it will not do is fix neglected paint on its own.
That's the part DIY tutorials often skip. The bottle gets the attention. The prep does the heavy lifting.
Practical rule: The coating layer is only as good as the paint under it.
If the paint has wash marring, oxidation, haze, leftover contamination, or polishing oils still sitting on the surface, the coating won't magically overcome any of that. It will bond over whatever is there.
Why the process is more technical than it looks
On the surface, the application step seems simple. Wipe product on, level it off, let it cure. In practice, a clean result depends on:
- Surface condition. Any defect left in the paint stays visible.
- Chemical cleanliness. Residue interferes with bonding.
- Section control. Coatings need to be worked in small areas.
- Visual inspection. You need the right lighting to catch excess material before it cures.
That's why professionals treat ceramic coating application more like a finishing process than a cosmetic add-on. The shine is the reward. The process is the job.
The Foundation of a Flawless Ceramic Coating
Ceramic coatings are unforgiving. They don't blur defects. They sharpen whatever is already there.
That's why the prep stage decides whether the final result looks professional or disappointing. Many consumer guides gloss over this, but paint correction is not optional before a ceramic coating application if you want a quality result. The coating itself does not remove swirl marks or oxidation. It will seal them in. Skipping proper surface preparation is the number one reason for disappointing DIY outcomes, as explained in this detailing guide on common coating mistakes.
If you want a clearer breakdown of the difference between polishing for gloss and correcting defects, this comparison of paint correction vs polish helps frame the decision.
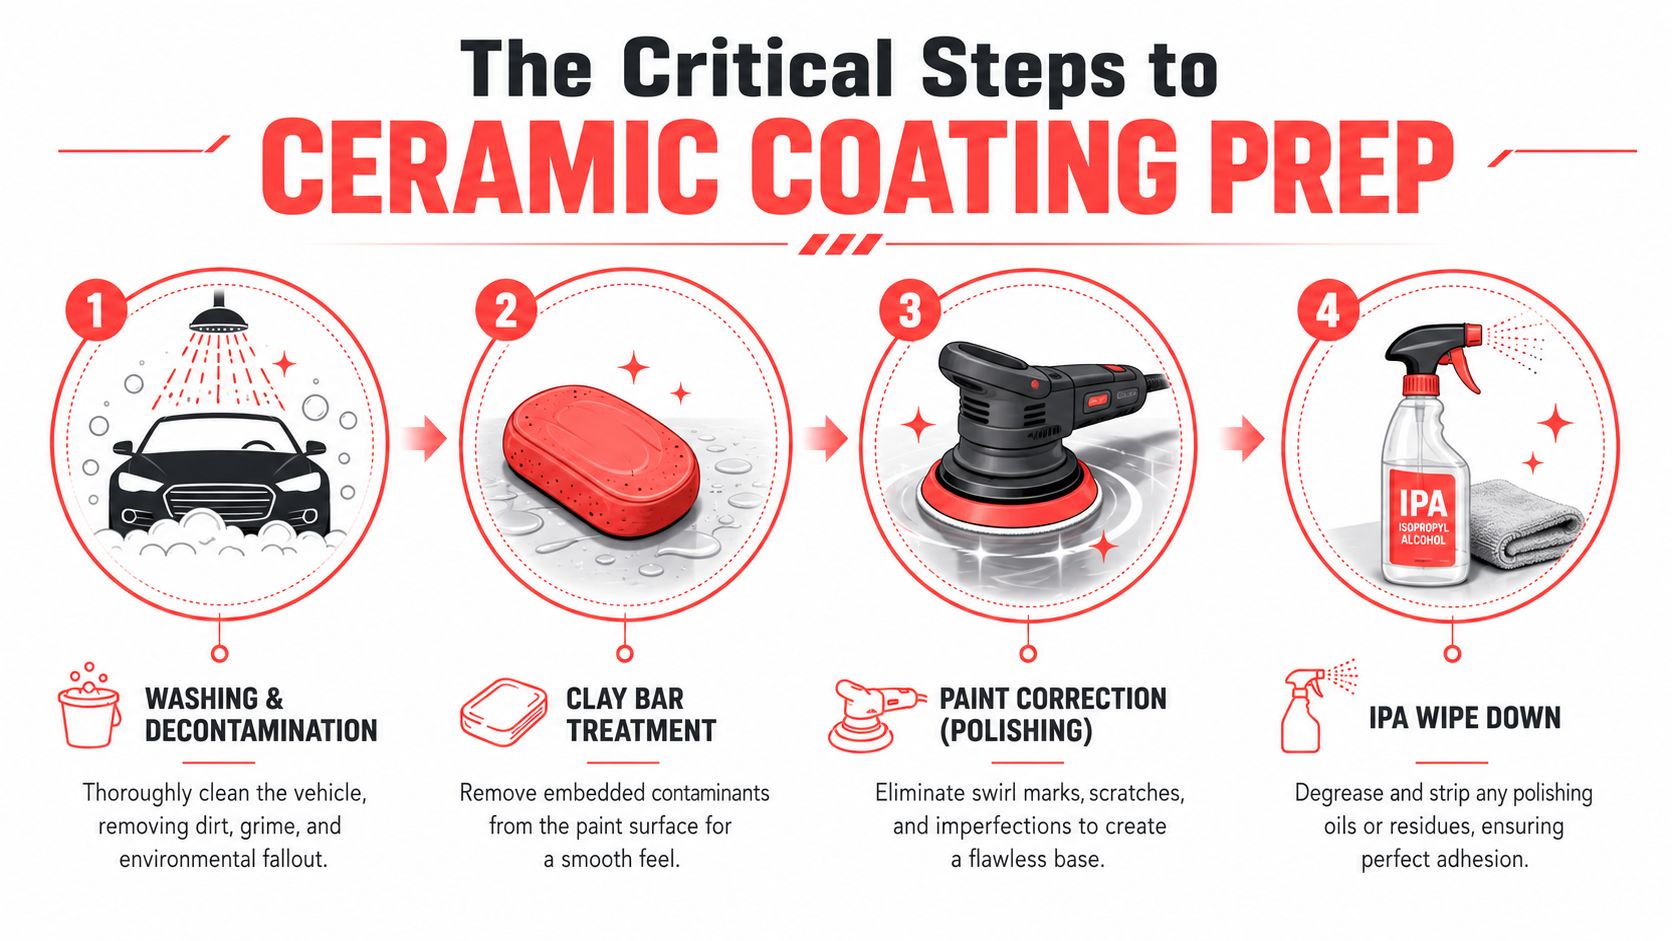
The prep stages that can't be skipped
A proper coating prep usually includes several separate jobs, not one wash and a quick wipe-down.
- Thorough wash. The vehicle needs a careful hand wash that removes loose dirt, traffic film, and road grime without adding fresh marring.
- Chemical decontamination. Iron fallout, tar, and bonded contaminants need dedicated removers. If they stay on the paint, they interfere with polishing and can remain trapped under the coating.
- Mechanical decontamination. A clay bar or clay mitt removes what washing and chemicals leave behind. The goal is paint that feels smooth, not gritty.
- Machine polishing. Swirl marks, haze, and light defects are corrected so the finish deserves to be coated.
- Panel prep wipe. Any polishing oils or residue must be stripped so the coating bonds to bare, properly prepared clear coat.
A lot of DIY jobs fall apart right here because the car looks clean, so the owner assumes it's ready. Clean and ready are not the same thing.
The real trade-off with paint correction
People hesitate, because correction takes time, tools, pad selection, product knowledge, and patience. It also takes judgment. You're balancing cut, finish, paint hardness, defect depth, and the owner's expectations.
If you skip correction, you save effort up front but accept a weaker visual result.
If you rush correction, you can leave haze, inconsistent gloss, or missed defects that become more obvious once the coating goes on.
A coating amplifies good prep and exposes lazy prep.
That's why pros spend so much time inspecting paint in direct and angled light before the coating bottle even comes out. The best coating job often looks easy because the hard work happened earlier.
What works and what doesn't
Here's the practical version:
| Approach | What happens |
|---|---|
| Wash only, then coat | Paint may be clean, but defects and bonded contamination remain visible |
| Wash and clay, no polish | Surface feels smoother, but swirls and oxidation still show through |
| Quick polish with residue left behind | Gloss may improve, but bonding can suffer |
| Full prep and proper wipe-down | Coating has a clean, corrected surface to bond to |
That last row is what gives you the finish people want when they ask about ceramic coating application.
Your Workspace and Arsenal of Tools
Most failed DIY coating jobs don't fail because the owner bought the wrong bottle. They fail because the setup wasn't professional enough for the process.
The workspace matters just as much as the product. High spots and other application failures are often caused by environmental factors, not just bad technique. The ideal working range is typically around 60–80°F with relative humidity below 60%. Applying a coating in direct sun, high humidity, or without angled lighting to check for excess product is a primary cause of failure, even with a high-quality coating, according to this breakdown of how high spots form.
The tools people underestimate
A proper ceramic coating application setup includes much more than the coating kit itself.
You need clean wash tools, decontamination chemicals, clay media, a machine polisher, pads matched to the paint, panel prep spray, multiple fresh microfiber towels, nitrile gloves, and reliable lighting that reveals streaks and high spots from different angles. Old towels, mixed-use towels, and poor lighting create problems fast.
If you're building out a serious detailing kit, it helps to review dependable mobile car detailing supplies before buying piecemeal.
For polishing equipment, some detailers looking for a budget-conscious machine start by comparing pro-grade Ryobi tools for contractors. A machine like that can be useful for entry-level correction work, but the important point is matching the tool to the paint and using proper pads and process, not assuming any polisher automatically makes the job safe.
The one tool that changes everything
Lighting.
That's the missing piece in a lot of home garages. Overhead bulbs make the car look fine even when it isn't. Angled inspection lighting reveals the truth. High spots, smeared residue, uneven leveling, and leftover haze usually show up under focused light long before they show up to the naked eye outside.
Without that lighting, you're working half-blind.
Good lighting doesn't make the coating better. It lets you catch mistakes while they can still be fixed.
A realistic setup check
Before tackling a coating job yourself, ask whether your space can support it:
- Temperature control. Can you keep the vehicle in the recommended working range?
- Humidity management. Is the area dry enough for predictable flash behavior?
- Shade and shelter. Can you keep the car out of direct sun and away from windborne dust?
- Inspection lighting. Do you have bright, angled lighting for every panel and edge?
- Storage discipline. Can you keep towels, pads, and applicators clean and separated?
If the answer to several of those is no, the odds of a frustrating result go up quickly. Ceramic coating application rewards control, not improvisation.
The Ceramic Coating Application Process
By the time the coating is ready to go on, the hard part should already be done. The paint should be washed, decontaminated, corrected, and wiped down so there's nothing left to hide and nothing left to interfere with bonding.
A professional workflow follows a clear sequence. 3M's application SOP specifies wash → decontaminate → paint correct → IPA/prep wipe → apply in small sections → level high spots → cure, with the vehicle worked from the roof downward, each section limited to about 2' x 3', a cross-hatch pattern, and leveling after a 2–5 minute dwell. If a second coat is desired, 3M notes 30–60 minutes between coats in its ceramic coating application SOP.
How pros actually work the coating
The process sounds simple until you do it panel by panel.
First comes the final prep wipe. That removes polishing oils and fingerprints so you're applying onto a surgically clean surface. Then the coating goes onto an applicator, and the product is spread in a controlled cross-hatch pattern. That means overlapping passes in one direction and then the other for even coverage.
Small sections matter. Large sections make the flash unpredictable, especially when temperature, panel shape, and humidity shift across the vehicle.
After the product sits for its flash window, it has to be leveled carefully with clean microfiber towels. This is the point where experience matters most. Wipe too early and you may remove too much product. Wait too long and the excess starts curing into visible high spots.
Where DIY jobs usually go wrong
The common problems are boring, repeatable, and expensive to fix:
- Working too large an area. The coating flashes unevenly before you get back to it.
- Using tired towels. Saturated towels smear product instead of leveling it.
- Missing edges and body lines. Excess product likes to collect there.
- Poor section tracking. You lose your place and either miss panels or double-load them.
- Weak inspection habits. The coating looks fine until it cures and the streaks become obvious.
Here's a useful parallel. If you care about surface protection beyond automotive paint, the same maintenance mindset shows up in other niches, including maintaining your bass boat's finish. Different surface, same principle: the product matters, but prep and process matter more.
After the coating is leveled, inspection should happen immediately under angled light. Then again from another angle. Then again around trim lines, mirrors, pillars, and lower panels where residue loves to hide.
A quick visual reference can help if you want to see how installers talk through timing, leveling, and panel control in real time:
What a disciplined application looks like
A strong ceramic coating application has a rhythm to it.
| Stage | What the installer is watching for |
|---|---|
| Panel wipe | No residue, no missed polishing oils |
| Cross-hatch application | Even coverage, no dry gaps |
| Flash period | Visual change that signals the coating is ready to level |
| Initial leveling | Removal of excess without disturbing uniform coverage |
| Final inspection | High spots, smears, edge buildup, towel marks |
That's why professionals move methodically. Not slowly for the sake of it. Carefully enough that nothing has to be corrected after cure.
Curing, Common Pitfalls, and Long-Term Care
The coating isn't finished when the last towel leaves the paint. That's only the end of application. The next phase decides whether the finish settles cleanly or develops problems after the fact.
This technology has a deep background. Ceramic coating roots trace back to early clay-based coatings used in China more than 4,000 years ago, with later industrial development and eventual modern automotive use, which is why today's products should be thought of as refined protective materials rather than just a styling trend, as described in this history of ceramic coating.
The curing period needs discipline
Freshly coated paint needs stable conditions. Water exposure, contamination, and unnecessary touching during early cure can compromise the result.
Good installers plan for the cure before they start the job. That means looking at weather, parking conditions, and whether the vehicle can stay protected after application. A perfect install can still become a headache if the car gets caught in rain too soon or is handled carelessly right after service.
The coating may look done to the owner, but chemically it still needs time.
That's one reason professional service often produces more consistent results. The process includes aftercare discipline, not just product application.
The problem everyone talks about
If you spend any time around coatings, you'll hear the term high spots. These are areas where excess coating wasn't fully leveled before curing. They often show up as darker smears, uneven patches, or streak-like marks that become more noticeable in sunlight or inspection lighting.
They're frustrating because they usually happen from small lapses:
- Too much product on the applicator
- Poor visibility during leveling
- Letting one section sit longer than the next
- Not checking edges, creases, and tight contours
- Trying to work through changing environmental conditions
Sometimes a fresh high spot can be re-leveled if it's caught early enough. Once it cures hard, correction often means polishing that area back down and reapplying.
Caring for the finish after installation
A coated car is easier to maintain, but it still needs proper washing and reasonable habits. It isn't a force field.
The owners who get the best long-term results usually do a few simple things well:
- Use careful wash methods. Dirty mitts, automatic brushes, and rushed drying still mar paint.
- Remove contamination early. Bird droppings, bug residue, and grime shouldn't sit on the surface.
- Use clean towels and safe chemicals. Maintenance should support the coating, not strip or scratch around it.
- Treat the coating like protected paint, not indestructible paint. That mindset alone prevents a lot of avoidable damage.
That's the bigger lesson with ceramic coatings. The chemistry is advanced, but the finish still rewards careful ownership.
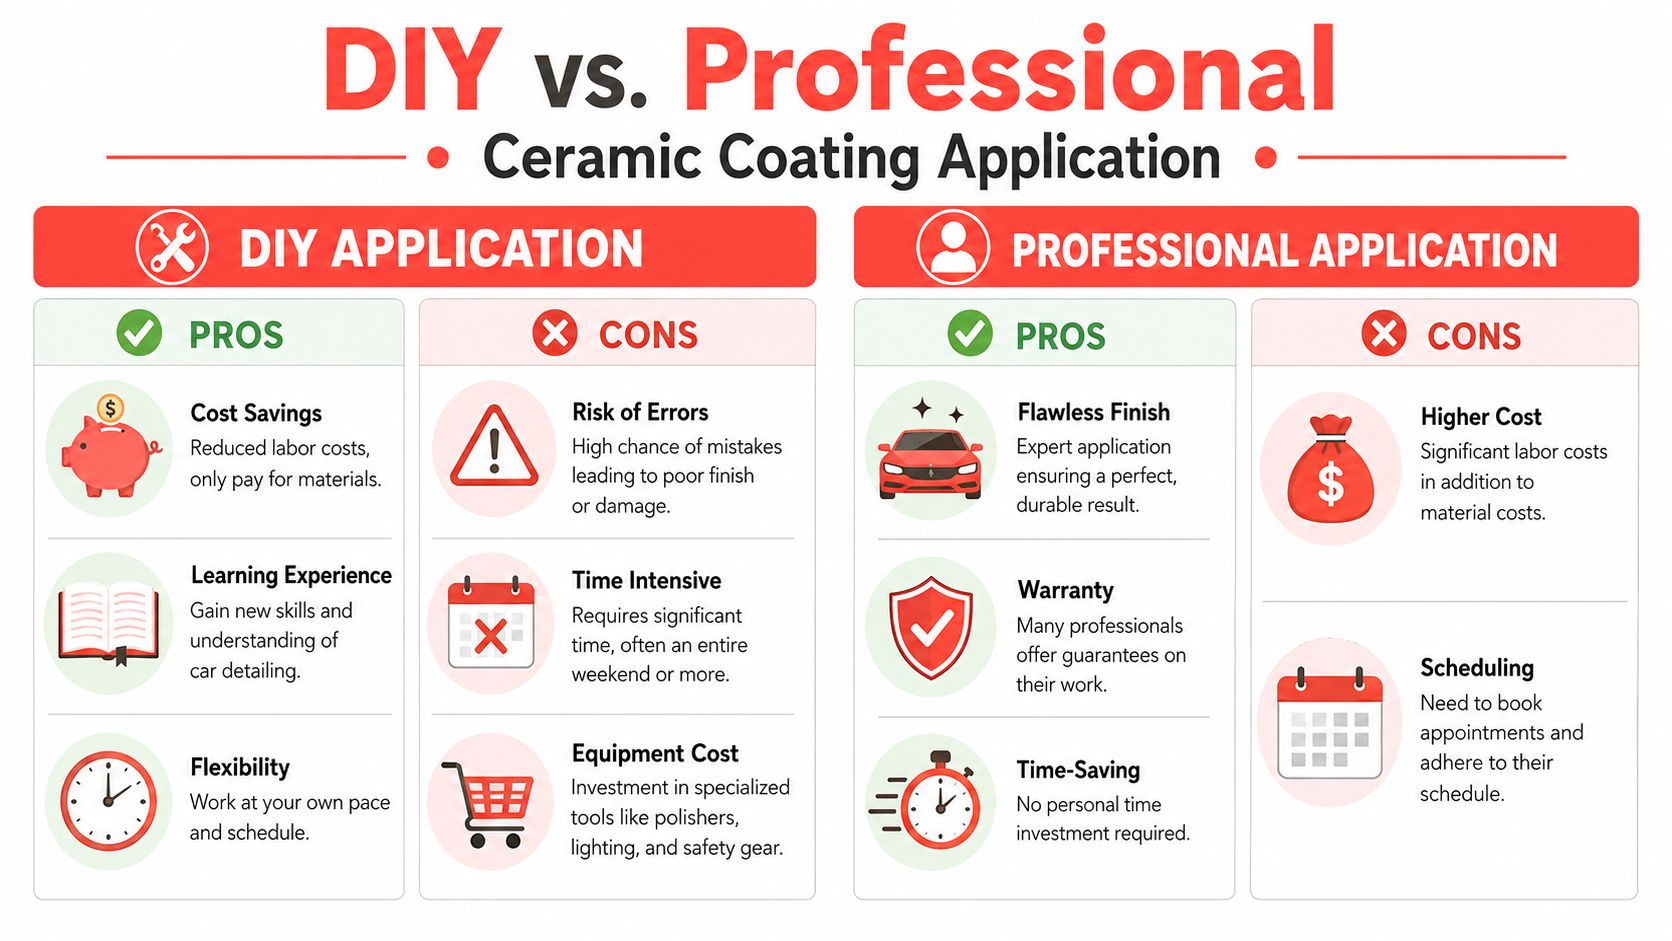
The DIY Challenge vs Professional Precision
As understanding of a proper ceramic coating application grows, the choice becomes clearer.
DIY can work. But “can work” and “likely to look excellent” aren't the same standard.
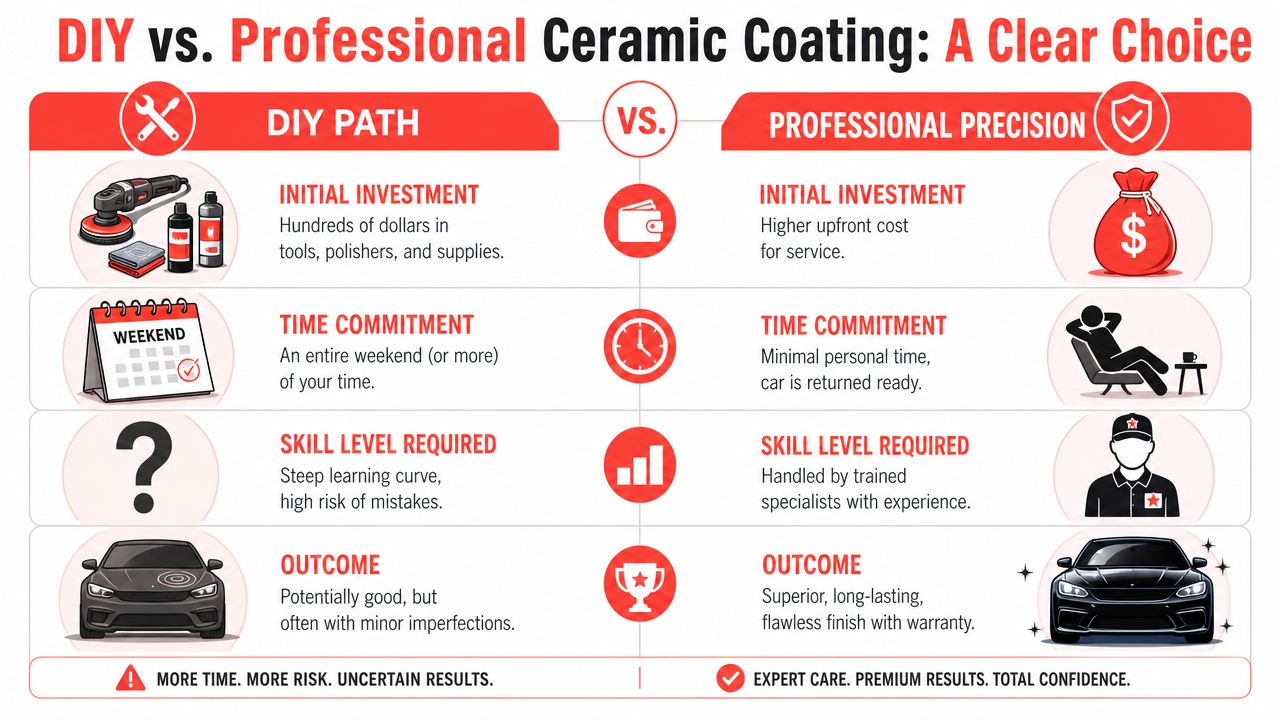
What the DIY route really asks from you
The home route sounds appealing because you control the schedule and avoid labor charges. But you also take on every risk in the process.
You need to source the tools, prep chemicals, towels, applicators, lighting, and polishing equipment. You need to evaluate the paint correctly. You need a workspace that supports the job. Then you have to execute every step without sealing in defects or leaving behind cured excess.
That's a lot to ask from one weekend project.
Here's the cleaner comparison:
| DIY path | Professional service |
|---|---|
| You buy the tools and supplies | The service arrives with a complete setup |
| You diagnose the paint yourself | An experienced installer evaluates the surface |
| Your space has to be suitable | The process is managed with proper workflow and control |
| Mistakes are yours to fix | The result is handled by someone who does this repeatedly |
Why professional work is usually the better value
Professional application isn't just about convenience. It reduces uncertainty.
Value comes from consistent prep, controlled product use, proper lighting, and the judgment that comes from seeing the same failure points over and over. That's what helps avoid locked-in swirls, uneven gloss, streaking, missed residue, and preventable rework.
For busy vehicle owners, that peace of mind matters. So does not having to learn paint correction, towel management, flash timing, and cure protection on your own car.
You're not only paying for the coating. You're paying to avoid the correction bill that comes from a bad coating job.
If you want a local read on how customers evaluate professional detailing experience, convenience, and finished results, you can look through The Mobile Buff Google Business Profile reviews.
The smart decision for most owners
If you enjoy the craft, already own the tools, and have a controlled space, DIY may be worth the challenge.
If you want the finish to come out right the first time, professional service is usually the safer investment. That's especially true when the vehicle matters to you, the paint is dark or soft, or you don't have time to troubleshoot your own mistakes.
Ready for a Flawless, Lasting Shine?
A ceramic coating makes the most sense when the paint is properly prepared and the application is handled with patience and control. That's why professional installation usually delivers the best-looking and longest-lasting result. You avoid the guesswork, the tool investment, and the risk of locking mistakes into your finish. If protecting your vehicle matters and you'd rather skip the trial-and-error, having the job done right the first time is the better move.
If you want expert ceramic coating and mobile detailing brought right to your driveway in Central Pennsylvania, contact The Mobile Buff. We'll help you protect your paint, save your time, and get the clean, glossy finish your vehicle deserves.
