
Hey there! When you see that hazy film creeping across your headlights, it's easy to dismiss it as just a cosmetic problem. But the real issue isn't what's on the surface—it's what's getting inside.
So, what does it mean to reseal headlights? It’s a meticulous, professional process. We start by carefully removing the headlight assembly, separating the lens from the housing, and then completely cleaning out the old, failed factory sealant from the channels. Then, we apply a new, professional-grade butyl rubber sealant to create a permanent, waterproof bond. The whole point is to lock out the moisture that causes that internal fog and kills your nighttime visibility for good.
Why Resealing Headlights Is So Critical for Your Safety
That fog you see trapped inside the lens isn't just an eyesore; it's a serious safety hazard that gets worse with every nighttime drive. When a headlight's factory seal fails, it’s an open invitation for moisture, dirt, and humidity to wander right in. This is what creates that dreaded condensation that no amount of exterior polishing will ever fix.
For us drivers here in Central Pennsylvania, this problem gets a lot worse, and fast. The foggy mornings, combined with the salt and grime covering our roads all winter in places like Harrisburg and Carlisle, create the perfect storm for headlight seal failure. Those constant temperature swings and abrasive materials just eat away at the seals.
The Real Danger of Dim Headlights
You might not even notice the brightness fading over time, but the danger is very real. Foggy, yellowed headlights can slash your nighttime visibility by up to 80%. It’s a scary thought, right?
Worse yet, vehicles with degraded headlights are a factor in over 500,000 accidents annually in the U.S. alone. A proper reseal can change that completely, boosting light output by 200% or more. This isn't just about making your car look new again. It’s about shifting your mindset from "my headlights look bad" to "my family's safety depends on this."
The moment you spot condensation inside the lens, the problem has moved way beyond a simple polish. That trapped moisture is a blaring signal that your headlight's protective seal is broken, putting your visibility and sensitive internal electronics at risk.
From Annoyance to Urgency
Understanding what causes foggy headlights is the first step, but it’s realizing the safety risk that really matters. A compromised seal directly weakens your light output, scattering the beam and giving you precious less time to react to deer, pedestrians, or debris on a dark road.
A professional reseal isn't just a simple fix; it's a full restoration of your car's most important safety feature for night driving. It ensures your lights shine bright and clear, just like they were designed to, protecting you and everyone else on the road. Don't wait for a close call to finally take action.
If you’re seeing that tell-tale moisture inside your headlights or you've noticed your night visibility just isn't what it used to be, it’s time to address the root cause. You can see the level of care we provide by checking out our Google Business Profile.
How the Pros Get a Flawless Headlight Reseal
Ever wonder how a professional gets that perfect, factory-fresh seal that lasts for years? It’s not magic. It’s a meticulous process that takes patience, the right tools, and a bit of experience. At The Mobile Buff, we’ve perfected this down to a science, because a good seal is all about durability and a crystal-clear finish.
Let's pull back the curtain and show you how the pros do it. This isn't about slapping on some silicone from a hardware store; it’s about careful preparation and using industry-approved materials. Cutting corners is a surefire way to see moisture creep back in.
Getting the Headlight Prepped for Surgery
First things first, the headlight assembly has to come off the car. On some vehicles, it's a simple job with just a few bolts. On others, especially newer models, it can mean carefully removing the entire front bumper just to get access. This part requires care and precision.
Once the headlight is on our workbench, the real work begins. The lens needs to be separated from the main housing. To do this, we use a special oven or a professional-grade heat gun to gently and evenly soften the old, failed sealant. This is where you have to be incredibly careful—too much heat in one spot can easily warp the plastic housing or even crack the lens.
After the lens is off, we get to the most important step: cleaning out the old gunk. We meticulously scrape, pick, and clean every last bit of that old sealant out of the channel in the housing. It has to be spotless. Any residue left behind will create a tiny gap, compromising the new seal and letting moisture right back in. This step alone is what separates a true professional job from a temporary fix.
Applying the New Seal and Putting It All Back Together
This is where true craftsmanship comes into play. We only use a dedicated automotive-grade butyl rubber sealant. It’s specifically designed to stay flexible through hot summers and freezing winters, creating a truly waterproof, long-lasting bond.
Here’s the professional method for a perfect seal:
- First, we gently warm the new butyl rope and stretch it to the perfect thickness. It has to sit perfectly in the bottom of the clean channel.
- Next, we carefully lay the stretched butyl into the channel, pressing it down firmly. We make sure it's a single, continuous bead with no thin spots or gaps.
- With the new sealant in place, we press the lens back onto the housing. The entire headlight goes back into the oven for another controlled heating cycle. This makes the butyl tacky and helps it bond completely to both surfaces.
- As soon as it comes out, we use a series of clamps to hold the lens and housing together tightly while it cools. This pressure ensures a strong, uniform seal all the way around.
This diagram really drives home why keeping your headlights clear isn't just about looks—it's a critical safety issue.
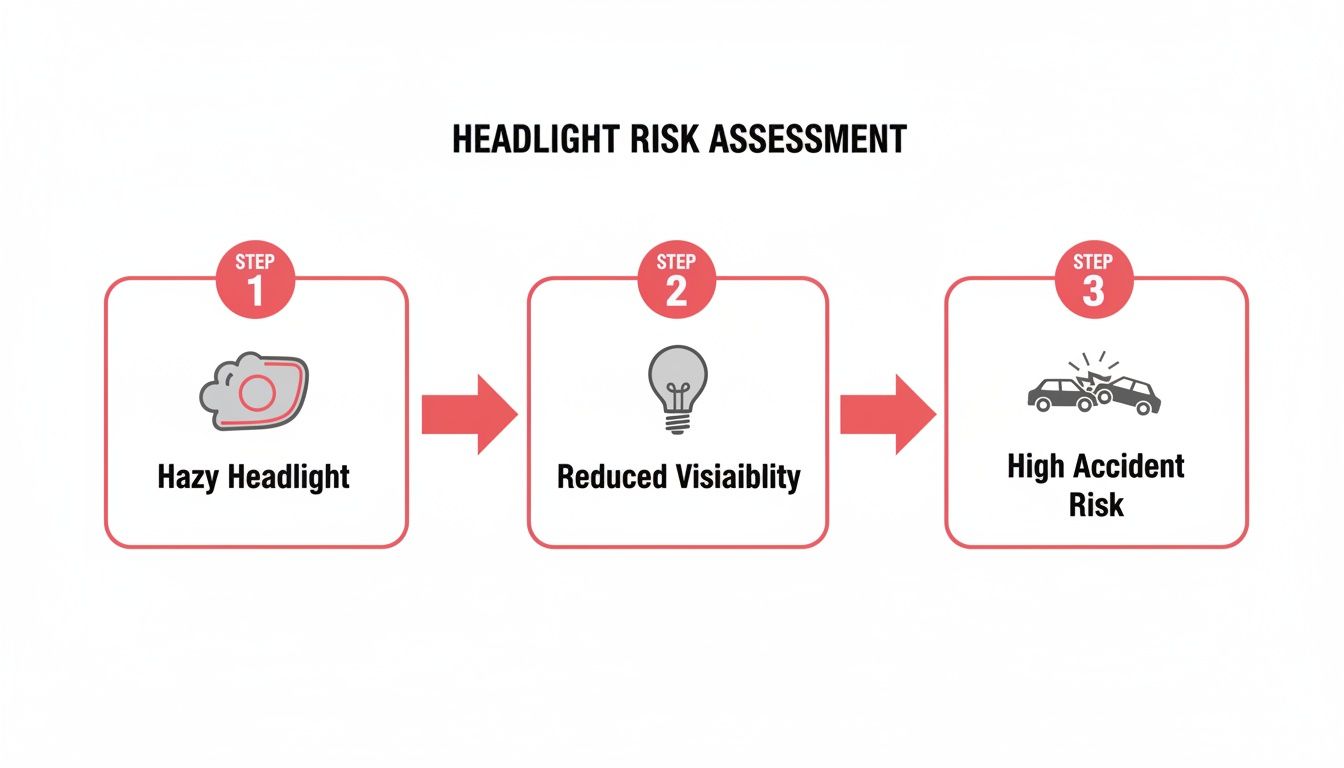
Seeing it laid out like that is a powerful reminder. A hazy headlight directly impacts how well you can see—and be seen—at night.
A professional reseal is less about just knowing the steps and more about executing them with absolute precision. The difference between a seal that lasts 10 years and one that fails in 10 months is all in the details.
Professional vs DIY Headlight Resealing At a Glance
So, what really separates a pro job from a DIY attempt? Here's a quick comparison of the methods, materials, and expected outcomes.
| Aspect | Professional Method (The Mobile Buff) | DIY Home Remedy |
|---|---|---|
| Sealant Type | Automotive-grade butyl rubber rope | General-purpose clear or black silicone |
| Preparation | Full removal of old sealant from a clean channel | Often applied over old, dirty sealant |
| Heating Method | Controlled oven or professional heat gun | Hair dryer or no heat at all |
| Curing Process | Reheating assembly and clamping for a tight bond | Air-drying with inconsistent pressure |
| Longevity | Years of waterproof protection | Months, until the first signs of failure |
| Outcome | A permanent, factory-like waterproof seal | A temporary fix, prone to leaks and fogging |
As you can see, the materials and techniques used make a world of difference in the final result.
This is an intricate job that requires specialized equipment and a whole lot of patience. It’s why so many car owners around Central Pennsylvania trust a professional to get it right the first time. If you’re near Harrisburg and want this level of care for your vehicle, you can see what our customers have to say on Google.
Picking the Right Sealant: The Make-or-Break Decision
When it comes to resealing a headlight, the single most critical choice you’ll make is the sealant itself. Trust us on this one. This isn't the time to grab whatever's on the shelf at the local hardware store. Using the wrong product is a guaranteed way to see all your hard work go down the drain, with foggy lenses reappearing just a few months later.

The difference between a pro-grade sealant and a generic adhesive is night and day. It’s like trying to patch a leaky roof with school glue—it might look sealed for a minute, but it won’t survive the first real storm.
Why the Pros Swear by Butyl Tape
In the professional detailing world, we almost exclusively use automotive-grade butyl rubber sealant. It usually comes in a long rope or tape form and is engineered specifically for this job. Unlike the silicone goop many people reach for, butyl has some incredible properties that make it the only real choice for sealing polycarbonate headlight lenses.
Here’s why it’s the undisputed industry standard:
- Incredible Flexibility: Butyl rubber is designed to stay pliable through wild temperature swings. This is a big deal for us here in Pennsylvania, where a car can bake in the summer heat and then face a freezing winter night. Silicone gets brittle and cracks under that kind of stress, breaking the seal.
- Unbeatable Adhesion: It forms a seriously powerful, waterproof bond to both the polycarbonate lens and the plastic housing. This creates the permanent, airtight seal you need to lock out moisture for good.
- It Never "Cures": This is the magic part. Butyl is a thermoplastic, meaning it never fully hardens like silicone. It stays tacky, which allows it to be heated and perfectly resealed—a key part of getting a truly professional result.
Imagine cutting headlight replacement costs by 90% while extending lens life from 2 years to a decade—that's the magic of proper resealing. Industry benchmarks show a single professional reseal using the right materials can prevent 95% of lens degradation from UV exposure and road grime.
The Big Problem with Silicone Sealants
You'll see silicone adhesives recommended in DIY kits and on internet forums, but we strongly advise against them. Plain and simple, these sealants aren't designed to bond with polycarbonate plastic for the long haul.
Sure, they might hold for a little while. But they just don't have the UV resistance or flexibility needed for this application. Over time, that seal will inevitably degrade, break, and let condensation creep right back inside your headlight. If you're serious about getting durable results, understanding the science behind the best headlight restoration products is a must.
Picking the right material is the first step, but applying it with precision is what truly delivers a lasting fix. If you want to be certain the job is done right with industry-approved materials, it’s always best to call a pro. For a perfect, long-lasting seal, see what our satisfied customers in Central PA say about our work on our Google Business Profile.
Common Headlight Resealing Mistakes (And How to Avoid Them)
As professional detailers, we get calls almost every week to fix a DIY headlight reseal gone wrong. We've seen it all. Our goal here isn’t to discourage you, but to highlight the common pitfalls so you understand why professional service is often the best route.
Knowing how to properly reseal headlights really starts with knowing what not to do.

From grabbing the wrong tube of sealant to getting a little too aggressive with a heat gun, a simple misstep can quickly turn a project into a permanent problem. Here are the top three blunders we run into time and time again.
Rushing the Cleanup Process
This is the big one. The most frequent mistake is not fully removing the old, brittle sealant from the headlight housing channel. It’s tempting to just lay a new bead of sealant over the old stuff, but this is a guaranteed failure.
That old material is hard, cracked, and full of gaps. Smearing new sealant over it creates an uneven surface that will never bond properly, leaving tiny channels for moisture to creep right back in. Getting that channel perfectly clean is tedious, no doubt about it. But it's the only way to give your new sealant a clean slate to create that perfect, watertight seal.
Using the Wrong Sealant
This one is a classic. You’re at the hardware store, and that tube of clear or black silicone seems like the perfect solution. It’s not. In fact, it’s a recipe for disaster.
Standard silicone just isn't built to handle the constant abuse a headlight takes—intense heat, freezing cold, and direct UV exposure. It will get brittle and crack in no time, and you'll be right back where you started.
We once had a client from Carlisle with a beautiful set of expensive LED headlights. He tried resealing them himself with bathroom caulk. A month later, he called us because they were full of condensation. The moisture had already fried one of the internal electronic modules, turning what should have been a simple fix into a $1,200 headlight replacement.
A proper seal is also a safety issue. It ensures your lights function correctly, which is crucial for avoiding DOT lighting violations.
Improper Heating and Clamping
Opening and resealing a headlight housing is a delicate dance with heat. Going too hard with a heat gun or heating the plastic unevenly is the fastest way to warp the housing or, even worse, crack the polycarbonate lens. If that housing gets warped, you’ll never get a perfect seal again.
The clamping process is just as critical. Once you’ve laid your new sealant and reheated the assembly, you can’t just press the lens back on by hand and call it a day. The headlight needs to be clamped down firmly and evenly all the way around while the butyl cools. This is what creates that strong, uniform bond that will last for years.
These stories highlight why some jobs are best left to an expert. If you're in the Harrisburg area and want to make sure the job is done right the first time, check out what our customers are saying on our Google Business Profile. Let The Mobile Buff handle it for you.
When to Skip the DIY and Call a Professional
Look, we get it. There's a certain satisfaction that comes from tackling a car project yourself. But when it comes to resealing headlights, knowing your limits is just as important as knowing the steps.
Sometimes, calling in a professional is the smartest, safest, and most cost-effective move you can make. It can save you from a bigger headache and a much more expensive repair down the road. So, when should you put the tools down and pick up the phone?
Clear Signs You Need an Expert
After years of doing this, we can tell you there are a few dead giveaways that a headlight issue is more than just a simple DIY fix.
The biggest red flag? Moisture or condensation trapped inside the lens. If you're seeing water droplets, fog, or a persistent haze that just won't clear up, the factory seal has already given up. This isn't just a cosmetic problem—that moisture will fry your bulbs and corrode the sensitive electronics inside.
Another major tell is fogginess that keeps coming back, even after you’ve used a restoration kit. If your headlights look great for a few weeks and then cloud over again, it’s a sure sign the real problem—the bad seal—was never fixed.
Finally, get up close and inspect the existing sealant. See any obvious cracks? Is it crumbling or pulling away from the housing? If you spot visible gaps, a simple patch job isn't going to hold. That headlight needs to be carefully opened, thoroughly cleaned, and resealed by a technician who has the right tools and materials.
Headlight haze isn't just ugly; it's a serious safety issue. The NHTSA reports a staggering 23% higher crash risk in low visibility caused by degraded lenses. A professional reseal can restore up to 95% of your light's transparency, which is a massive improvement you can feel on the road.
The Value of Professional Service
Deciding to call a professional isn't giving up; it's making a smart investment in your vehicle's safety and protecting its value. Instead of risking a cracked lens or dealing with another failed seal in a few months, an expert gets the job done right the first time.
Think about what you're really getting when you hire a pro:
- Guaranteed Results: We only use industry-grade butyl sealants and have the specialized equipment to create a perfect, watertight bond that’s built to last for years.
- Total Convenience: Why burn a weekend or take a day off? A mobile service like The Mobile Buff brings the entire professional shop right to your driveway.
- Peace of Mind: You can relax knowing you won't accidentally damage a modern headlight assembly. A replacement can easily run from $300 to over $1,500.
Here in Central PA, from Harrisburg to the edges of Dauphin County, we make it easy to get expert car care without disrupting your life. You don’t have to take our word for it—see what your neighbors are saying on our Google Business Profile.
If you’re seeing any of these warning signs, it’s time to skip the frustration. Our expert headlight restoration service is designed to fix the problem for good.
Answering Your Headlight Resealing Questions
When it comes to resealing headlights, a lot of the same questions pop up. That's completely understandable—it’s a detailed process, and you want to know what you’re getting into. Let's clear up some of the most common ones so you can feel confident about what’s right for your car.
How Long Does a Professional Headlight Reseal Last?
This is the big one, and for good reason. When we do a proper reseal with a high-quality butyl sealant, we're not just providing a temporary patch. This is a long-term fix designed to last for years—often for the rest of the car's life.
A lot of DIY fixes rely on basic silicone, which can break down in a few months under the sun and rain. The professional-grade materials we use create a tough, weatherproof bond that stands up to harsh UV rays, constant car washes, and the wild temperature swings we see here in Pennsylvania.
Can You Reseal a Headlight That Already Has Condensation Inside?
Yes, absolutely. In fact, seeing that foggy moisture inside the lens is the clearest sign that you need a reseal, not just a surface polish. That's the main reason people end up calling us.
A huge part of our service involves carefully opening up the headlight assembly and getting it completely dry inside. We make sure every last drop of moisture is gone before we clean up the channel and lay down a brand-new, perfect seal. This is the only way to stop the fog from coming right back.
Keep in mind, moisture trapped inside your headlight is more than just ugly. It’s a seal failure that can corrode electrical connections and burn out bulbs prematurely. A simple restoration job can't fix that underlying problem.
Is Resealing Worth the Cost Compared to Buying a New Headlight?
For the vast majority of cars on the road today, resealing is a massive value. A professional reseal costs a fraction of what you'd spend on a brand-new headlight assembly from the dealer. This is especially true for modern cars with complex LED or adaptive lighting systems, where a single replacement unit can easily run into the hundreds—or even thousands—of dollars.
Resealing restores both the performance and safety of the headlights you already own. You get that bright, clear light output back, and the sensitive electronics inside are protected from the elements once again. If you're dealing with issues that go beyond a simple reseal, or need help with any vehicle lighting, looking into professional light services is always a smart move.
Ultimately, it’s a smart financial decision that doesn't compromise on safety. Think of it as an investment that pays you back every single time you drive at night.
Ready to get rid of that fog for good and drive safer at night? Give The Mobile Buff a call, and we’ll bring our headlight resealing service right to you. Don't wait for a small issue to become an expensive replacement—schedule your professional headlight reseal today and restore your night vision and peace of mind.
