


You pull into work before sunrise, switch on the headlights, and notice the beam looks weaker than it used to. On a Central Pennsylvania road such as Route 22, that milky film isn't just an appearance problem. A cloudy cover scatters light before it can project cleanly down the road, leaving you with less useful illumination when deer, pedestrians, potholes, and stopped traffic are hardest to see.
The good news is that many foggy lenses don't need complete replacement. The right restoration removes the failed surface, refines the plastic, and replaces the UV protection. The wrong shortcut can leave you with a bright lens for a few weeks and another yellow haze soon afterward. Here's how to restore headlight covers with a process that prioritizes clarity, durability, and an honest decision about when restoration no longer makes sense.
Why Your Headlights Look Foggy in the First Place
Modern headlight covers are usually made from polycarbonate plastic, not glass. That plastic resists impacts and keeps vehicle lighting assemblies lighter, but the factory-applied clear layer has to absorb years of sun, road grit, winter brine, temperature changes, and engine-bay heat.
The damage starts at the protective coating. Ultraviolet exposure breaks down that outer layer, and the surface gradually becomes rough, dull, and discolored. Road debris adds tiny abrasions, while salt and grime work into the weakened finish. Oxidation isn't one dramatic failure. It builds slowly, which is why an owner may notice only a slight dullness at first and then suddenly realize the entire beam looks muted.
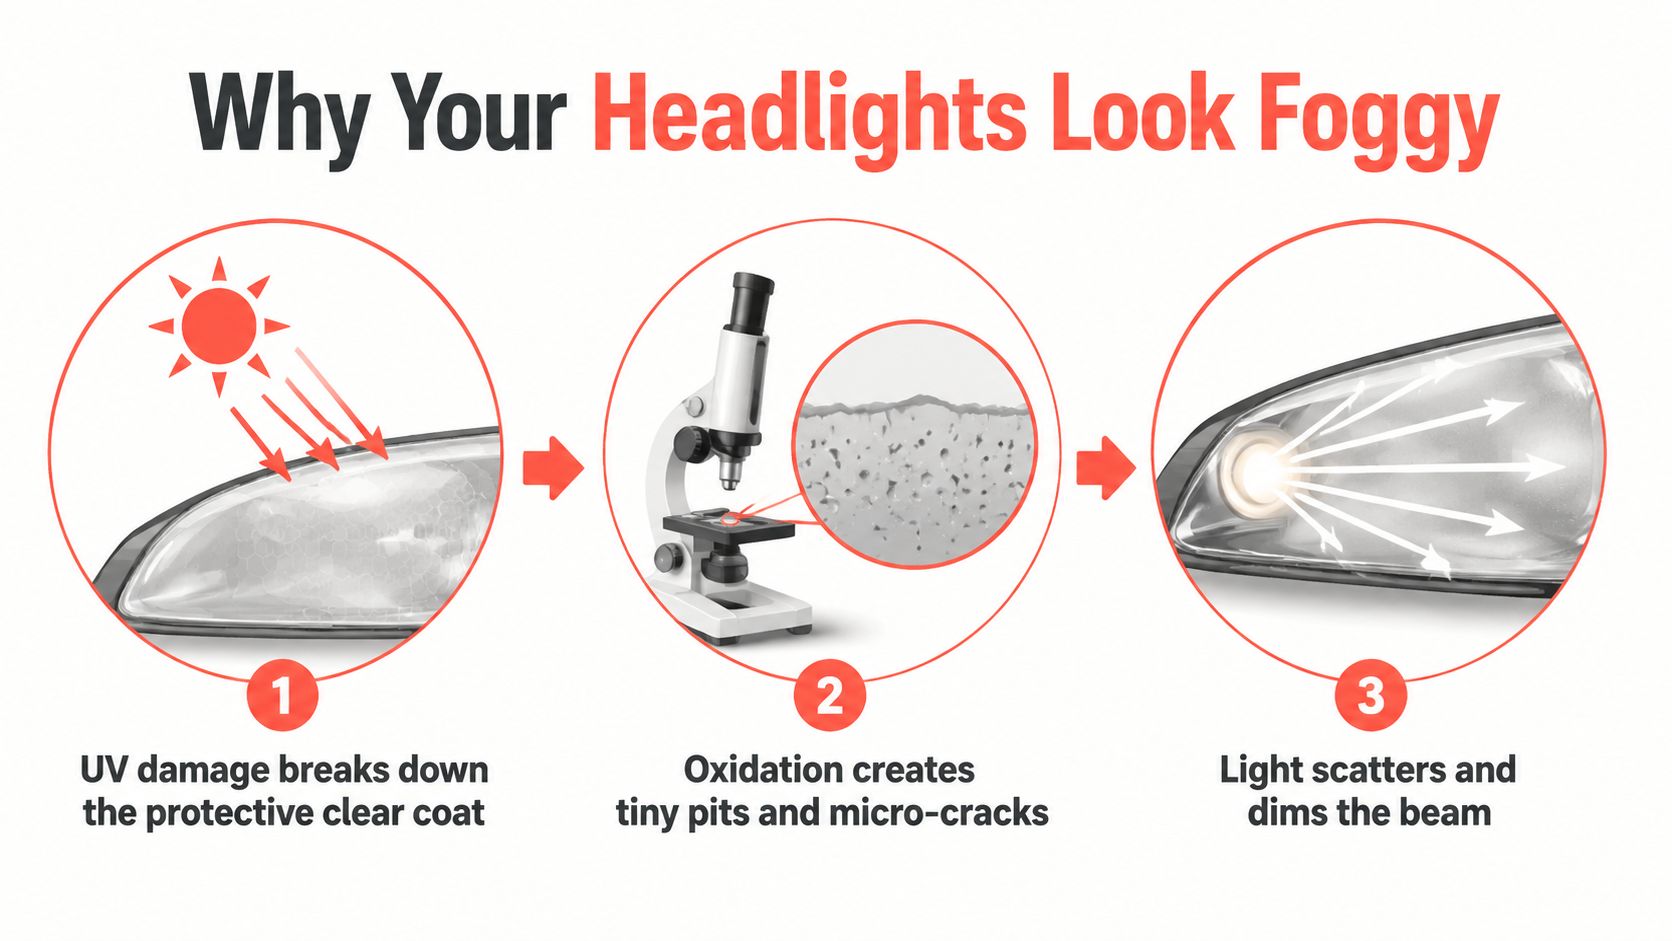
The surface layer is the real target
When oxidation is the only damage, a reputable restoration guide estimates that a lens can recover roughly 85% to 95% of its clarity. That's why restoration became a practical maintenance service as clear plastic lenses replaced older glass covers in many vehicles. The detailer isn't polishing away a stain. The job removes the degraded UV layer and installs a new barrier against sunlight. (Headlight Damage Guide)
That distinction explains why haze returns after a quick polish. Polishing may make the surface look clearer temporarily, but if the damaged coating remains, or if the freshly exposed plastic receives no UV protection, the same cycle starts again.
A rough exterior can also create inspection trouble. If you're trying to understand why a cloudy lamp may become a compliance issue, this resource on explaining headlamp DOT inspection failures provides useful background.
Practical rule: Restoration replaces the failed protection. It doesn't make plastic permanently immune to sunlight.
How Bad Is the Haze, Really
AAA reported that cloudy headlights can reduce light output by about 80%, professional cleaning can restore output to about 70% of new, and full replacement is the only route back to 100%. (AAA visibility coverage) Those figures don't tell you your exact stopping distance, because speed, weather, reaction time, beam aim, and road design all matter. They do show why waiting for a lens to become severely yellowed is a poor safety strategy.
Start with a quick driveway inspection. Run a fingernail lightly across the surface. A rough, chalky feel usually points to exterior oxidation. A smooth lens that still looks milky may have internal moisture, internal damage, or a housing problem, and exterior sanding won't solve that.
| Stage | Visible Signs | Light Loss | Recommended Action |
|---|---|---|---|
| Light surface dullness | Mild veil, little or no yellowing, surface mostly smooth | May be limited, but clarity is declining | Monitor closely and clean properly |
| Visible yellowing | Yellow or brown film across much of the lens | Useful beam clarity is reduced | Restore with an approved polishing and protection system |
| Pitting and micro-cracks | Rough texture, tiny pits, uneven reflections | Light scatters noticeably | Sand progressively, polish, and reseal, preferably with professional equipment |
| Deep delamination | Peeling clear coat, severe flaking, internal haze, or cracks | Restoration may not recover consistent output | Inspect for replacement of the lens or lamp assembly |
The tape test can help with peeling. Place a small piece of automotive masking tape over a clean section, press it down, and remove it carefully. If loose coating lifts with the tape, you're dealing with delamination rather than simple surface dullness. That doesn't automatically rule out restoration, but it signals that a controlled professional assessment is safer than aggressive sanding.
Gathering the Right Tools and Prepping the Vehicle
A lasting restoration starts before the first abrasive touches the lens. Gather automotive masking tape, clean microfiber towels, nitrile gloves, safety eyewear, a spray bottle containing soapy water, plastic polish, foam or microfiber polishing pads, and a dedicated UV-resistant headlight coating. For sanding, use a progressive sequence rather than one aggressive pass. Depending on the damage, professional systems may begin around 400 to 800 grit and refine through 1000, 1500, 2000, and 3000 grit. (Sylvania restoration guide)
A practical setup looks like this:
- Choose the abrasives carefully. Heavier oxidation needs a coarser starting point. A lighter haze can start with a finer abrasive, which removes less material.
- Use wet lubrication. Soapy water carries away loosened coating and keeps the abrasive cutting consistently instead of loading with plastic residue.
- Protect surrounding surfaces. Automotive tape should cover the paint, grille edges, trim, and nearby rubber. Sanding a bumper edge is an expensive way to learn why masking matters.
- Plan the coating step before sanding. Don't strip a lens and then discover the UV product is missing, expired, or intended for a different surface.
Park in shade, let the lenses cool completely, and wash the headlight and nearby panels before taping. Grit left on the surface can create deep scratches that take extra sanding to remove. Inspect for cracks, moisture inside the housing, broken mounting points, or damage that extends beyond the outer coating. Those conditions can change the recommendation from restoration to repair or replacement.
Why the grit sequence matters
Each abrasive stage should remove the scratch pattern from the previous one. The 3M headlight restoration FAQ emphasizes that skipping a grit or failing to erase the earlier scratches leaves haze that polishing can't fully correct.
Manufacturer instructions vary, so follow the kit's process when it differs from a generic sequence. If you're comparing products, this guide to finding the best headlight restoration products can help you evaluate abrasive quality, polish, and the final protective layer together.
Wear gloves and eye protection. Wet sanding produces slurry that can irritate skin and eyes, and UV coatings require careful handling and ventilation according to the product label.
Wet Sanding, Polishing, and Sealing the Lenses
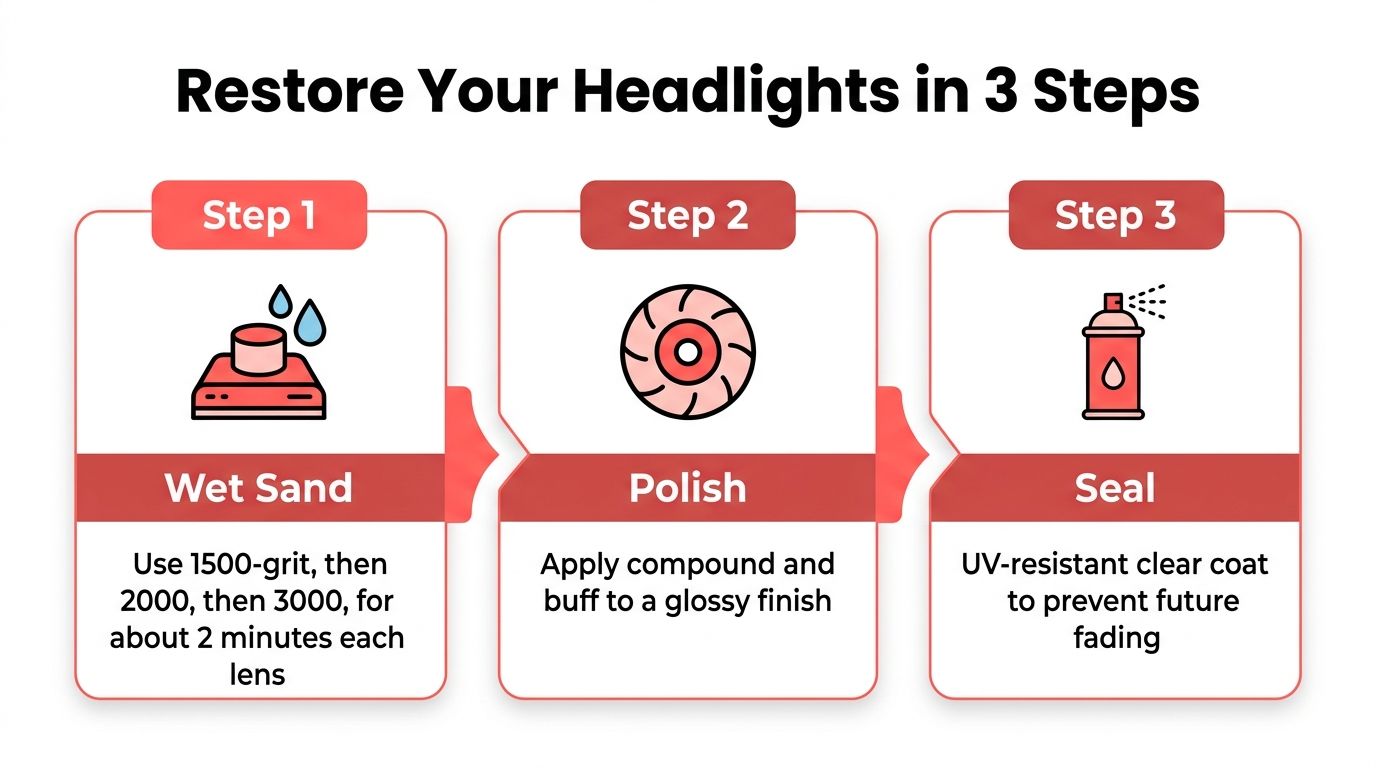
Once the vehicle is clean, cool, and masked, work one lens at a time. For a moderately oxidized cover, begin with 1500-grit wet sanding. Spray the lens and abrasive with soapy water, keep the pad flat, and use straight horizontal strokes for about two minutes per lens. Rinse the pad often, keep the surface wet, and clear accumulated slurry from the edges so debris doesn't drag across the plastic.
The first pass may make the lens look worse. That's expected. You're replacing uneven oxidation with a uniform scratch pattern that the finer abrasives can remove.
Move to 2000 grit, then 3000 grit. Change direction between stages if that helps you see whether the previous marks have disappeared. Don't move on because the surface feels smoother. Move on when the earlier scratch pattern is gone across the entire lens. Professional processes may use a different starting grit, including 400, 500, 600, or 800, when the coating is severely degraded. A professional sanding supply option from Value Tools Co is useful when you need consistent abrasive sheets rather than worn household materials.
Wipe the lens dry with a clean microfiber towel and inspect it under strong light. If you still see coarse lines, return to the appropriate grit instead of trying to bury them with compound.
Polishing restores the reflection
Apply a small bead of plastic polish to a foam or microfiber pad. A dime-sized amount is enough for a controlled section, but the correct quantity depends on the product and pad. Work at low speed with light, even pressure and overlapping passes. Keep the pad moving, especially if you're using a machine, because heat can damage plastic and distort the finish.
When the cloudy reflection gives way to a clear, even surface, wipe the residue away and inspect again. A finer finishing polish can address light swirl marks, but polish isn't a substitute for sanding when deep oxidation remains.
The last step is the one that determines whether the result holds. Apply a UV-resistant clear coat or dedicated headlight sealant in two thin, even passes, allowing a ten-minute flash time between coats when the product instructions call for it. Avoid generic clear spray unless its label specifically approves the product for headlight polycarbonate and UV exposure.
A complete guide to how to reseal headlights is helpful when the lens is clear but the housing seal itself has failed.
Don't rush the cure. Keep the vehicle dry for at least 24 hours after sealing, and follow the coating manufacturer's cure window before washing.
DIY vs Hiring a Mobile Detailer
The right choice comes down to time, cost, and risk, plus how much light the haze is costing you. A DIY kit commonly costs $25 to $60, and the full job can take roughly three to four hours including cure time. A mobile detailer in Central Pennsylvania typically charges $80 to $150 per vehicle and can often finish the restoration in under an hour at your driveway. (Delta Kits restoration guidance)
Those DIY figures leave out the cost of a second kit after a poor first coat, extra pads worn down by over-sanding, and time spent correcting scratches. Older vehicles carry another risk. Thin or already-weakened factory lenses, including some older Hondas and Subarus, can suffer damage when an inexperienced operator keeps cutting after the failed coating is gone.
| Factor | DIY Kit | Mobile Detailer |
|---|---|---|
| Direct cost | $25 to $60 | $80 to $150 per vehicle |
| Time commitment | Roughly three to four hours including cure time | Often under an hour at the driveway |
| Control | You choose the products and pace | The technician controls the process |
| Main risk | Uneven sanding, coating failure, or excess heat | You still need to choose a qualified provider |
| Best fit | Hands-on owner with shade and a flexible Saturday | Busy owner, leased vehicle, or fragile lens |
DIY fits an owner with a shaded work area, patience, and the discipline to follow the abrasive sequence exactly. It also makes sense when the haze is moderate and the lens remains structurally sound. The goal is to recover useful light output without sanding through the remaining plastic.
Do not start in direct sun, use an improvised abrasive, or treat a cracked housing as a cosmetic project. A cracked lens, moisture inside the housing, or severe pitting calls for inspection before restoration.
A leased vehicle deserves extra caution because uneven finish or sanding marks can create an avoidable end-of-lease problem. A tight schedule changes the calculation too. If the car must be ready for commuting the next morning, the cure period matters as much as the sanding.
The middle path works for uncertain owners. Buy a reputable kit, practice on a less important surface only if the manufacturer permits it, and stop before experimenting on a valuable vehicle. If the lens is fragile, the haze is severe, or you cannot protect the coating afterward, use The Mobile Buff's headlight restoration service to have the work completed at your driveway.
Keeping Restored Headlights Clear and Booking a Pro
Restoration quality determines how long the lenses stay clear. An unsealed lens can re-oxidize within one to three months. A spray UV clear coat may last about six to twelve months, while a wipe-on UV sealant may last about eight to fourteen months, according to headlight restoration durability guidance. A properly completed restoration with UV sealant can last one to three years, depending on application and care, but those ranges are not guarantees.
Professional systems often produce results lasting two to three years, while a basic DIY job may last six to twelve months. UV exposure, road salt, application temperature, washing habits, tree sap, and the lens condition all affect service life. The practical decision is simple: if the coating is failing early, the process or aftercare needs attention, not another quick polish.
A simple maintenance rhythm
Wash the lenses with pH-neutral car soap during regular vehicle care. Avoid automatic wash brushes when possible, since stiff contact and contaminated bristles can wear the protective surface. A spray ceramic sealant applied every two months may reinforce the finish when its label approves use on restored headlight coatings.
Central Pennsylvania puts restored lenses through winter salt and brine, summer UV exposure, and spring tree sap. Wipe away sap and road film after storms instead of letting contaminants bake onto the surface. This habit protects the coating and provides an early warning when dullness starts returning.
Check the beam pattern after restoration and again when haze begins to return. If the lenses are clear but the road still looks poorly lit, inspect the bulbs, housing, and aim before sanding again. A small loss of clarity can reduce useful light, but repeated sanding also removes plastic, so restoration should stop when the lens no longer has enough sound material to refine.
When a professional visit is the practical answer
Call a detailer when the lens is severely pitted, peeling, cracked, internally fogged, or fitted to a vehicle you cannot risk damaging. The technician should inspect the surface, explain whether restoration is suitable, mask the surrounding paint, refine the lens progressively, polish the finish, and apply UV protection. Ask which coating is used and what cure instructions apply.
For homeowners in Harrisburg, Mechanicsburg, and Camp Hill, The Mobile Buff brings the service to the driveway. You can request a mobile appointment and choose a package that includes headlight restoration while the vehicle stays at home. Appointments are available seven days a week from 7am to 3pm, payment is handled electronically on completion, and the satisfaction-first policy provides a way to raise concerns after the work.
If the headlights look yellow before the next dark commute, schedule the work before reduced clarity becomes a safety problem. Visit The Mobile Buff to request mobile headlight restoration in Central Pennsylvania, with sanding, polishing, and UV sealing completed at your driveway.

