


Your car probably needs attention right now. There's a coffee ring in the cup holder, sand ground into the floor mats, a few kid smudges on the door panel, and that faint stale smell that never seems to leave once it settles in. A good car interior cleaning solution DIY can handle a lot of that, but only if you stop treating every surface like it's the same material.
The mistake many make is simple. They grab one bottle, spray the whole cabin, and start scrubbing harder when the grime doesn't move. That's how you haze screens, dry out trim, soak seats, and leave residue behind. A cleaner cabin comes from the right order, the right product on the right surface, and a light hand that lets the chemistry do the work.
Why Your Cabin Needs a Smarter DIY Plan
The dirty-car story usually starts the same way. You open the door after a long week, and the cabin tells on you right away. Coffee drips sit in the console, the rear seat shows fingerprints, the cup holders feel sticky, and the smell in the air makes it obvious the mess has been building for a while.
A single spray feels efficient, but it is the wrong move for a modern cabin. Glass, leather, coated plastics, cloth, switches, screens, and wiring all react differently to moisture and cleaner strength. That is why Toyota's interior-care guidance warns against treating rear-window defogger wires, LCD screens, and other sensitive surfaces like they can take the same wipe-down as a door panel. Toyota's interior cleaning guidance
The right mindset beats scrubbing harder
A pro does not start by attacking the dirt. A pro clears loose junk, identifies the surface, and decides what each area can safely handle before any liquid goes down. That order matters because even mild household products can leave residue or require extra drying, and careless use turns a simple cleanup into more work.
Practical rule: If you are unsure about the surface, stop and identify the material first. A dashboard, a screen, and a leather seat all need different treatment.
The job gets easier when you keep three habits in place. Work in the right order, match the cleaner to the surface, and respect dwell time instead of scrubbing harder and hoping friction fixes everything. If you want a cleaner cabin without wrecking sensitive parts, start with the same process laid out in this interior detailing checklist from The Mobile Buff, then use the right product on the right material.
The Pro-Approved Sequence From Top to Bottom
A dirty cabin gets worse fast when you clean it in the wrong order. Loose trash comes out first, then the interior gets sorted by surface and sensitivity, so grit leaves the car instead of getting dragged into seams, switches, and fabric. That matters even more in a modern cabin, where one bad wipe can hit infotainment screens, coated trim, or delicate wiring you did not mean to touch.
Start with the parts that collect the most grit
Pull the floor mats first, shake them out, and vacuum them before washing. Let them dry while you work on the rest of the cabin, because putting damp mats back into a closed car is a good way to trap odor and moisture. Car and Driver recommends starting there for a reason, it keeps dirt from cycling back into the interior and gives the mats time to dry before reinstalling. Car and Driver's interior cleaning guide
Then vacuum the seats, carpet, and all the tight seams. Use a brush attachment and a crevice tool, and do not skip the corners where crumbs and sand settle. Cotton swabs or a soft brush help on seams, but they only do their job if you follow with another vacuum pass to pick up what you loosened. Consumer Reports describes DIY interior cleaning as a multi-step process, and that is exactly right, because one pass never clears everything. Consumer Reports on detailing your car's interior
Glass and high-touch areas come after the debris is gone
Once the loose stuff is out, move to glass and touch points. For interior glass, use two microfiber cloths, one for the cleaner and one for the finish, so you are not smearing residue back across the window. That keeps streaking down and avoids the hazy film that shows up after a rushed wipe.
Clean dry first, then clean wet. If you spray before you vacuum, you just turn dust into mud.
After that, use a simple workflow and stick to it. The car detailing checklist from The Mobile Buff is a solid way to keep your order tight in the driveway, especially when you want to stay methodical instead of bouncing around the cabin.
The same sequence also makes it easier to protect the parts people usually damage on DIY jobs. That includes screens, glossy black trim, and stitched or coated surfaces that do not tolerate the same treatment as carpet. If you want the upholstery side handled with the right approach, see how to deep clean car upholstery for the fabric-specific side of the job.
DIY Cleaning Solutions You Can Mix at Home
The safest DIY mixes are the ones that stay simple. I'd rather see a careful, low-moisture routine with the right dilution than a homemade cocktail that leaves residue, dulls trim, or floods a switch panel. That's the difference between a practical car interior cleaning solution DIY and internet nonsense.
Use light formulas and apply them the right way
For cloth and plastic surfaces, a diluted all-purpose cleaner or vinegar-based mix is the basic home option, but it belongs on a microfiber towel, not sprayed broadly across the panel. Detailers who use this approach also lean on a 50/50 water-to-product dilution for normal interiors, then agitate with a soft brush and wipe immediately with a dry microfiber so the surface doesn't get oversaturated. That low-moisture technique lines up with TheMobileBuff's car interior cleaning kit, which emphasizes towel control and final wipe-downs rather than flooding the cabin.
For high-touch hard surfaces, AutoNation Nissan Miami recommends 70% isopropyl alcohol mixed with distilled water in a spray bottle, then applied with microfiber to steering wheels, door handles, seat belts, cup holders, and shifters. Their guidance also stresses microfiber because it wipes and dries excess liquid while reducing residue. AutoNation Nissan Miami on disinfecting car interiors at home
Use this rule: spray the towel, not the surface, unless the product directions say otherwise.
Choose fabric, leather, and odor tools separately
For fabric spots, baking soda is still a practical option. Consumer guidance says vacuum first, then treat spots, allow dwell time, and extract or blot thoroughly. One major how-to source also recommends leaving baking soda on fabric overnight for odor absorption, which is useful when the smell is trapped in cloth instead of just sitting on top of it. Eufy's guide to cleaning a car interior
Leather is different. Use a pH-balanced leather cleaner, not dish soap. Dish soap is too aggressive for the finish and protective coating on leather, and that's where people do real damage trying to save a few dollars.
For a deeper walkthrough on fabric-specific care, Evo Dyne's guide on how to deep clean car upholstery is useful because it keeps the focus on controlled agitation and careful extraction instead of soaking the seat and hoping for the best.
Matching the Method to Every Surface in Your Cabin
A cabin looks like one job until you start cleaning it and realize every material behaves differently. Leather, vinyl, glass, screens, cloth, and carpet all need a different touch. If you use the wrong product on the wrong surface, you can haze a screen, strip a coating, or leave moisture where it does real damage.
Clean each material the way it was built to be handled
Leather seats need a gentle pH-balanced cleaner on a microfiber towel, then a light wipe and a dry finish. Keep liquid out of the seams and stitching. If the leather has a coating that needs care, condition it after cleaning, but only with a product meant for that finish.
Vinyl and hard plastics handle a diluted all-purpose cleaner best, as long as you put it on the towel first. Use a soft brush for grain, buttons, and tight texture, then come back with a dry microfiber towel so you do not leave slick residue in the creases.
Cloth seats and carpet need vacuuming before anything else, then spot treatment, then blotting or extraction. Consumer Reports says to vacuum first, treat the spot, let the cleaner dwell, and then remove it thoroughly. That same approach keeps you from grinding dirt deeper into the fibers. Consumer Reports detailing guidance
Interior glass needs an ammonia-free glass cleaner and two microfiber cloths. One cloth applies the cleaner, the other finishes the glass so you do not leave streaks behind.
Infotainment screens deserve the most caution. A microfiber cloth lightly dampened with isopropyl alcohol is the safer move, and the screen should be wiped gently instead of sprayed. That keeps liquid out of the electronics and lowers the chance of a cloudy, damaged display. Consumer Reports on cleaning your car's interior
Quick reference for surface-safe cleaning
| Surface | Cleaner | Tool | Safety Note |
|---|---|---|---|
| Leather | pH-balanced leather cleaner | Microfiber towel | Don't soak or use dish soap |
| Vinyl and hard plastics | Diluted all-purpose cleaner | Soft brush, microfiber towel | Apply lightly, then dry wipe |
| Cloth seats and carpet | Upholstery cleaner or spot treatment | Brush, extractor, dry towel | Vacuum first, blot instead of rubbing |
| Interior glass | Ammonia-free glass cleaner | Two microfiber cloths | One cloth applies, one finishes |
| Infotainment screens | Microfiber dampened with isopropyl alcohol | Soft microfiber cloth | Never spray directly |
| Door panels and switches | Low-moisture diluted cleaner | Microfiber towel, soft brush | Keep liquid away from switchgear |
Door panels and switches deserve the same low-moisture approach as the rest of the high-touch trim. Keep the cleaner controlled, work it into the towel first, and stay away from switchgear, seams, and speaker grilles. That is the difference between a clean cabin and a cabin full of sticky buttons and trapped moisture.
Pet Hair, Stains and Stubborn Odors
Pet hair is stubborn because it buries itself in fabric fibers and clings with static. Stains are annoying because people usually rub them, which spreads the spot and drives it deeper. Odors are the worst because the smell often lives below the surface, not on it.
Handle the problem in the right order
For pet hair, start with a rubber glove, a squeegee, or a dampened microfiber towel, then vacuum the lifted hair away. The dampening helps hair clump instead of floating around the cabin. Don't use a dry brush and expect miracles, because that just sends hair into the seat seams.
For stains, blot first and keep your hands off the scrub reflex. If the spot is fabric, a baking soda paste or an enzymatic cleaner can help, then extraction or thorough blotting finishes the job. A stain that has already reached the padding usually stops being a simple DIY project and starts requiring real extraction equipment.
Odor control needs patience. Vacuum the cabin, treat fabric with baking soda, and leave it overnight when the smell is in cloth rather than hard plastic. If the odor survives that, especially when moisture is trapped under a seat or in the padding, the next move is professional-grade treatment, not another round of kitchen chemistry. For a more focused look at pet-related odor problems, J.G. Carpet Cleaning's guide on eliminate stubborn pet urine odors is a useful comparison point because it shows how deep odor sources usually have to be addressed.
If the smell gets stronger when the cabin warms up, the source is probably below the surface.
That's where a good detailer earns the call. A cleaner can cover a smell for an afternoon. Extraction and odor treatment solve the source.
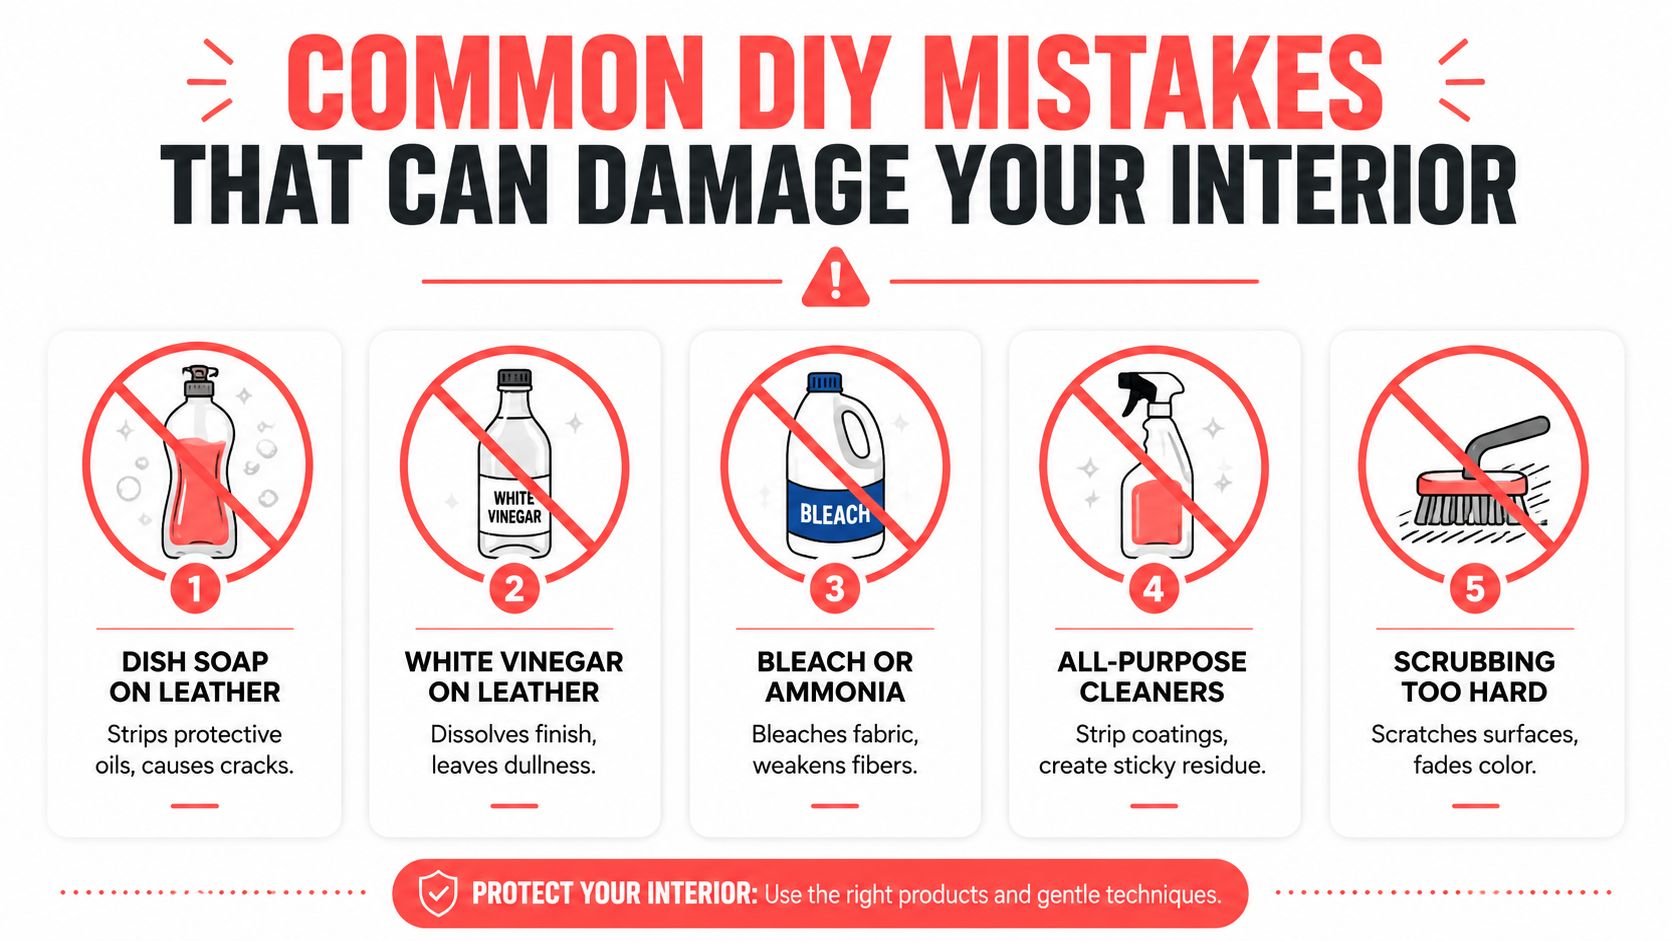
Common DIY Mistakes That Can Damage Your Interior
A lot of interior damage starts with good intentions and the wrong cleaner. Drivers see an “all-purpose” label and assume it's safe for everything inside the cabin, but trim, leather coatings, screens, and wiring all react differently. The safest approach is to match the product to the surface, then keep the application controlled.
The shortcuts that cause the most trouble
Dish soap on leather strips away the protection the surface needs and leaves it dry faster than people expect. Use a dedicated leather cleaner and a soft towel instead.
White vinegar on leather or screens is a bad call because it can haze coatings and leave display surfaces looking dull. If the panel has a factory finish, keep acidic cleaners off it.
Bleach or ammonia can damage fabric, weaken fibers, and cause problems on sensitive materials. Toyota warns against ammonia-based cleaners on rear windows because the defogger heater wires can be damaged. Toyota's car interior cleaning guidance
All-purpose cleaners are where a lot of DIY jobs go sideways. On the wrong surface, they can strip protective coatings or leave a film that grabs dust and makes the cabin look dirty again fast.
Scrubbing too hard is another classic mistake. Force marks trim, scratches soft plastics, and fades color, so use more dwell time, a cleaner that fits the material, or a gentler tool instead of grinding away at the spot.
For a broader look at fixing common cleaning oversights, Star Cleaner Australia's guide on fixing common cleaning oversights is a useful reminder that a rushed wipe-down can create a repair bill if the wrong surface gets hit.
Screens and wires deserve special respect
Infotainment displays and rear defogger wires are the places where sloppy habits cause the fastest regret. Spray the cleaner onto the cloth, not straight at the screen. Keep ammonia off the glass, keep liquid away from switches and vents, and never soak the area around the rear window.
That same caution applies to modern cabins with coated trim, touch surfaces, and delicate electronics. A clean towel and a light hand get the job done. A soaked panel, harsh chemical, or aggressive scrub turns a quick cleanup into damage you can see every time you get in the car.
When DIY Runs Out of Road and a Mobile Detailer Makes Sense
Some cabins are beyond the point where another bottle helps. If baking soda didn't touch the smell, if a spill reached the foam padding, if leather has lost its finish, or if the cabin has pet hair packed into every seam, you're not short on effort, you're short on equipment.
The same goes for families and fleet operators who just don't have the time to do the job properly. A mobile detailer brings extractors, steam, pH-balanced products, odor treatments, and the patience to clean the right way without leaving half-done patches behind. For local drivers who want a driveway visit instead of a shop drop-off, The Mobile Buff outlines its approach in professional car interior cleaning, and that kind of on-site service is often the cleaner answer than buying products you'll barely use again.
The Mobile Buff also offers services in Central Pennsylvania, including interior detailing, stain and pet hair removal, odor elimination with professional-grade Bio Bomb treatments, and headlight restoration through its mobile setup. That matters if you're juggling kid schedules, work trucks, or a car you're trying to get ready for resale without spending your Saturday buried in microfiber towels.
Here's the honest call. If your job needs extraction, odor treatment, or careful work around mixed materials and electronics, a professional is the smarter spend.
If you want the cabin cleaned without guessing at products or risking your screens, book a driveway detail and let a pro handle the mess. The Mobile Buff serves Central Pennsylvania with mobile interior cleaning, stain and odor removal, and headlight restoration, so you can get the job done without turning your weekend into a chemistry experiment.
A CTA for The Mobile Buff.

