


You're standing in a Central Pennsylvania driveway with the hood up, a cup of coffee cooling on the fender, and a layer of dust, salt residue, pollen, and road film covering everything underneath. The engine is cool, but the job still feels risky. One wrong move around a sensor, connector, or alternator can turn a cosmetic cleanup into a repair conversation.
A proper engine bay cleaning brush makes the work more controlled, but the brush is only one part of the process. The sequence matters just as much: remove dry debris first, protect vulnerable components, pair the brush with the right cleaner, control moisture, and dry the bay completely. This is the approach we use on real daily drivers in driveways, not just polished show vehicles.

A Saturday Morning Under the Hood
A customer in the Harrisburg area once opened his hood after several seasons of commuting through winter weather. The bay smelled faintly of coolant and dry road dust. Leaves had collected near the cowl, the battery tray wore a gray film, and the plastic intake tubing looked dull enough to make the entire engine compartment seem older than the vehicle itself.
His first thought was the same one many owners have: use a pressure washer and get it over with. His second thought was better. He didn't want a powerful stream aimed at an alternator, fuse box, or exposed connector, so he reached for a small brush set instead.
That choice reflects how professional detailing has become more specialized. The automotive detailing brush market was valued at $1.2 billion in 2025 and is projected to reach $1.9 billion by 2034, with a projected 5.8% CAGR from 2026 through 2034, according to MarketIntelo's automotive detailing brush market report. Engine bay cleaning represented 12.7% of application share in 2025, which puts engine-bay brushing in the category of established detailing work, not an odd little add-on.
The practical difference: A brush gives you control over where the cleaner goes, how much pressure reaches a surface, and how close you work to electronics.
In my experience, a clean bay doesn't require aggressive tools. It requires patience and the right order of operations. A soft brush removes loose debris without grinding grit into plastics, a medium brush handles stubborn grime on suitable surfaces, and a gentle rinse clears the loosened residue without flooding the compartment.
The job becomes much less frustrating when you stop treating the engine bay as one large surface. Work in zones, keep your brushes clean, and let the cleaner do its share of the work.
Safety and Prep Before the First Stroke
Engine-bay cleaning starts before the brush touches anything. Professional guidance recommends working on a cool engine, protecting electrical connectors, air intakes, wiring, battery terminals, and aftermarket filters, and drying the area after cleaning, as outlined in this engine bay detailing guide from Detailed Image.
Use this preparation routine:
- Let the engine cool fully. After driving, allow the vehicle to sit for 30 to 60 minutes before cleaning. Cool surfaces slow rapid cleaner evaporation and reduce the chance of burns.
- Inspect before covering. Look for cracked intake tubing, loose wiring, damaged insulation, leaking batteries, and aftermarket components that may not have factory protection.
- Protect sensitive areas. Cover the alternator, fuse box, ECU, exposed intake sensors, and open aftermarket filters with plastic covers or bags. Keep coverings secure, but don't trap moisture underneath them.
- Address the battery carefully. Disconnecting the negative terminal can reduce the chance of an electrical short, but follow the vehicle's service information if the car has special battery-management or security requirements. If you don't disconnect it, shield the battery and terminals from direct moisture.
- Match the chemical to the brush. Use a softer brush for plastics, wiring looms, and rubber. Reserve a medium brush and an appropriate degreaser for durable metal areas with embedded grime.
- Wear protection. Nitrile gloves and eye protection help keep cleaner and dirty runoff away from your skin and eyes.
- Control the workspace. Work in shade or a covered area, keep towels and drying tools close, and consider where runoff will go. Don't let contaminated cleaner flow toward storm drains.

A safety bulletin from the National Highway Traffic Safety Administration warns against power washing or steam cleaning near sensitive electrical modules unless the vehicle's service literature specifically permits it. Water intrusion can contribute to corrosion, electrical failure, fire, injury, or property damage.
For a detailed preparation reference, use The Mobile Buff's guide to cleaning an engine bay safely. The central rule is simple: never soak electrical components. A safe brush can't compensate for uncontrolled water or a hot surface.
Choosing the Right Engine Bay Cleaning Brush
The right brush depends on the surface, the contamination, and the chemical being used. Professional detailers commonly carry 15 to 25 different brush types, while average DIY users often have 3 to 5, according to MarketIntelo's detailing brush market report. That difference isn't about collecting tools. It reflects the fact that a fuse-box lid, rubber hose, painted bracket, and narrow sensor mount need different levels of agitation.
Bristles and surface compatibility
Boar hair is gentle and flexible, making it useful on plastic covers, rubber seals, and lightly dusty wiring. Flagged polypropylene is another sensible choice for delicate surfaces because the split ends feel less aggressive than a sharp, unflagged filament.
Stiffer nylon works better on durable metal brackets, battery trays, and unpainted areas carrying baked-on road film. Use it with restraint. A stiff brush can mark plastic, soften a coating through repeated scrubbing, or push grit across a painted surface.
Brass is a specialist option, not a universal upgrade. Keep it away from aluminum, coated components, painted brackets, and anything where a scratch would become a restoration project. Any brush that sheds bristles should be removed from service, especially around belts, connectors, and deep crevices.
| Bristle Type | Best For | Avoid On |
|---|---|---|
| Boar hair | Plastic covers, rubber hoses, light dust, wiring looms | Heavy baked-on deposits where stronger agitation is required |
| Flagged polypropylene | Sensitive plastics, hoses, trim, general maintenance cleaning | Areas needing aggressive removal of hardened grime |
| Nylon | Durable metal brackets, battery trays, selected unpainted surfaces | Soft plastics, painted parts, delicate electrical housings |
| Brass | Limited use on suitable durable metal surfaces | Aluminum, coatings, painted parts, connectors, and plastic |
| Wire or very stiff fibers | Generally unsuitable for engine-bay cosmetic work | Modern plastics, wiring, hoses, painted and coated surfaces |
Shape matters as much as bristle material. A long-reach detail brush reaches valleys between hoses and the firewall. A round wheel-style brush works well around hoses and curved tubing. A flat block brush covers broad panels, while a small toothbrush-style tool reaches sensor mounts and narrow seams.
Salt residue and spring pollen create different problems in Central Pennsylvania. Salt tends to settle into seams and brackets, while pollen forms a fine layer that can become sticky once mixed with cleaner. A long handle helps you reach the rear of the bay without leaning across delicate parts. A flexible stem, protected ferrule, and chemical-resistant handle also matter because repeated degreaser exposure can weaken poorly made tools.
For a broader supply list, Estimatty's cleaning supplies checklist can help you assemble towels, cleaners, gloves, and supporting tools. For engine-bay-specific gear, see The Mobile Buff's engine bay cleaning kit guide.
Washing and Brushing the Engine Bay Step by Step
A controlled engine-bay wash has four passes. The brush should move from dry debris removal to targeted agitation, not straight into a wet, gritty compartment.
Pass one, remove dry debris
Start with a soft detailing brush or gentle air tool. Sweep leaves, grass, pine needles, and loose dirt away from the cowl, intake openings, and deep seams. Work from the back of the bay toward the front, keeping debris from falling into exposed openings.
A dry pass may look minor, but it prevents loose grit from becoming abrasive paste. Don't skip it because the bay “looks like it needs water.” Dry contamination is easier to remove before cleaner binds it to the surface.
Pass two, pre-soak and dwell
Apply an automotive all-purpose cleaner or suitable citrus degreaser to a small section. Use enough product to wet the contamination without flooding the area. Let it dwell for three to five minutes, while watching the surface so the cleaner doesn't dry.
Keep the work sectional. The cleaner should be breaking down oil and road film in the area you're about to agitate, not drying across the opposite side of the engine compartment.
Pass three, agitate with control
Mist the brush or load the bristles with cleaner instead of spraying directly toward sensors, connectors, the alternator, fuse box, or exposed wiring. Use small circular motions with light pressure. Start near the firewall and work forward, or follow the natural sections of the bay so you always know what has been cleaned.
Use the tool according to the surface:
- Intake tubing: Choose a soft or flagged brush and clean around ridges without forcing bristles into openings.
- Valve-cover area: Use a soft brush around seams and labels. Don't scrub polished or coated covers aggressively.
- Battery tray: A medium nylon brush can handle durable grime, but keep liquid controlled around terminals and cables.
- Fuse-box area: Use a soft brush and a damp towel. Avoid direct pressure on the lid, seals, and nearby connectors.
- Wheel-well edges: Use a more durable brush where the surface allows it, while keeping the tool away from painted edges and wiring.
Rinse the brush frequently. Dirty bristles redistribute grime instead of lifting it, which is one of the fastest ways to turn a clean section into a smeared section.
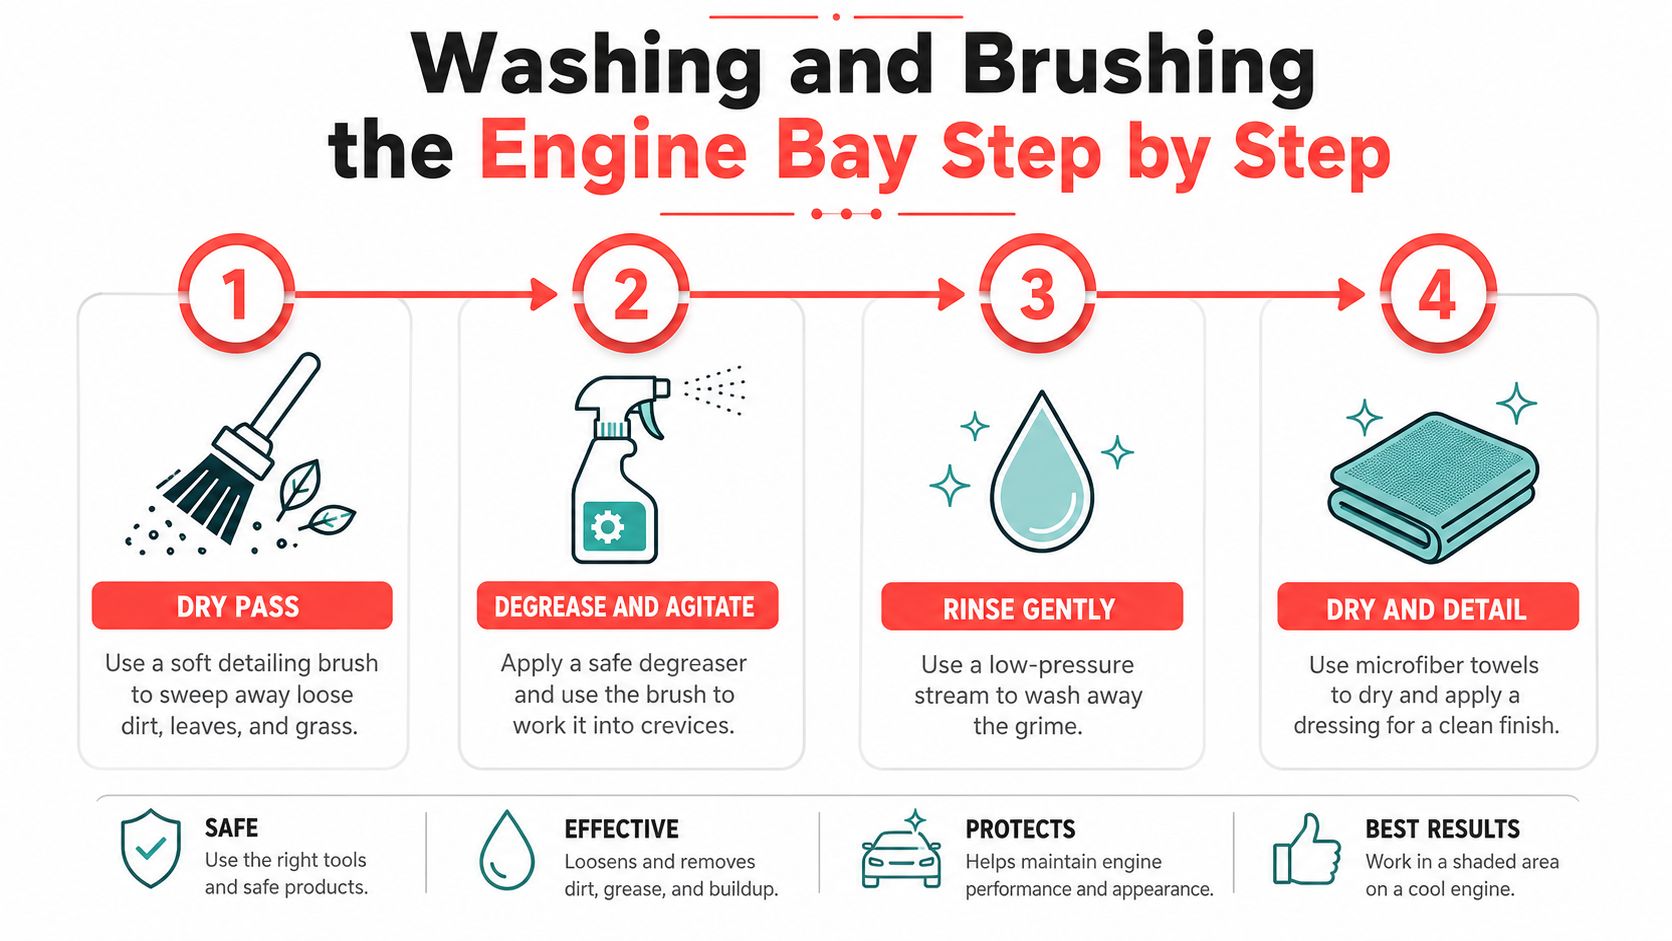
Pass four, rinse and dry
Use a low-pressure rinse from the top downward. A gentle stream or controlled mist is enough to remove loosened cleaner and grime. Avoid aiming water into the alternator, fuse box, air intake, exposed wiring, or electrical modules.
Dry with microfiber towels, a leaf blower, or controlled compressed air. Move air through tight spaces to clear trapped moisture, then follow with a towel on accessible surfaces. Finish with a light dressing designed for plastic and rubber, keeping it away from belts, fans, and moving mechanical parts.
A brush stage can often be completed in about five minutes during detailing demonstrations when several brush sizes are ready, as described in this engine-bay brush workflow. The clock matters less than the sequence. If a section needs more time, give the cleaner another controlled application instead of adding pressure.
Here's a visual demonstration of the brush-and-degreaser approach:
Common Mistakes and How to Avoid Them
One of the more expensive engine-bay corrections I've seen started with a household scrub brush. The owner wanted more bite on the fuse-box lid and ground straps, so he pressed harder. The result was white scratching across the plastic and several hours of restoration work before the lid looked acceptable again.
That brush wasn't defective. It was wrong for the surface. Household tools may also lack chemical resistance, shed fibers, or create electrical concerns, as discussed in this guide to degreaser brushes.
The errors that cause rework
- Spraying directly at the alternator or airbox: Apply cleaner to the brush or a towel, then work around the component with controlled moisture.
- Brushing a warm engine: Stop and let the bay cool. Heat can accelerate evaporation, increase burn risk, and make cleaner behave unpredictably.
- Skipping the dry pass: Remove leaves and loose grit before wet agitation so the brush doesn't grind abrasives into painted brackets.
- Using too much pressure: Let dwell time and bristle movement loosen contamination. Pressing harder usually increases surface risk before it improves cleaning.
- Letting the brush clog with oil: Rinse the bristles frequently and change tools when a brush becomes contaminated. A dirty brush transfers grime.
- Ignoring an exposed filter: Cover aftermarket filters before applying cleaner or water. Replace the cover only after the surrounding area is dry.
- Leaving moisture behind: Blow out seams, wipe accessible surfaces, and inspect around connectors before closing the hood.
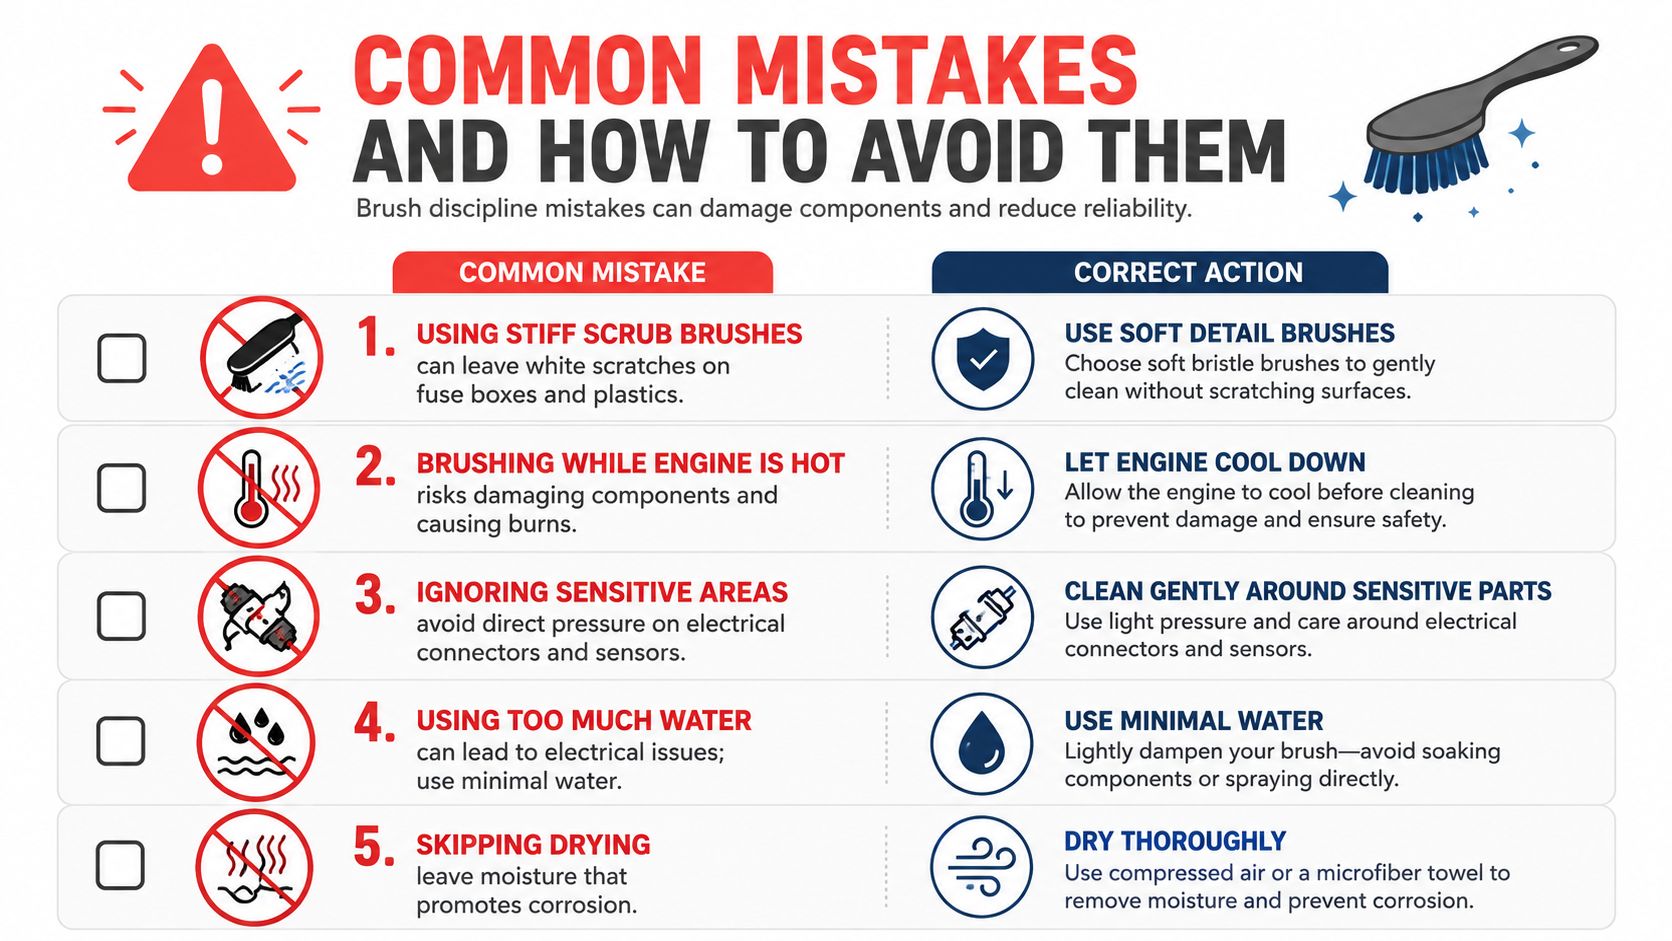
The common thread is poor control, not a lack of cleaning strength. Modern engine compartments may tolerate careful moisture, but they aren't an invitation to pressure-wash every surface. Guidance from Car Tint Laws on engine-bay brush use emphasizes targeted pre-treatment, controlled moisture, and avoiding direct spray toward sensitive components.
Recap and When to Call a Professional
A reliable engine-bay detail follows a straightforward order: cool the engine, inspect the bay, protect sensitive components, remove dry debris, pre-soak small sections, agitate with the correct brush, rinse gently, and dry completely. The brush should help you control the process, not encourage aggressive scrubbing.
Brush care deserves the same attention. Rinse each brush thoroughly after use, especially after alkaline or degreasing products. Let it air-dry upright so trapped chemical residue doesn't remain in the ferrule or base of the bristles. Repeated exposure to strong cleaners can weaken fibers over time, and shedding bristles can leave debris in belts, connectors, or tight crevices.
Replace a brush when the bristles become hardened, distorted, contaminated, or loose. A worn tool can damage surfaces and spread yesterday's oil into today's clean bay. This lifecycle habit also protects the tool itself, which matters when your equipment sees repeated professional use.
A clean brush protects the next vehicle as much as the current vehicle.
Some engine bays shouldn't be a driveway experiment. A cracked airbox, exposed wiring, leaking battery, loose connector, or heavily neglected compartment deserves a professional inspection before cleaning begins. If the vehicle has not been detailed in years, accumulated heavy oil, or includes aftermarket electrical equipment, handing it off is often the safer decision.
The Mobile Buff serves Central Pennsylvania driveways with mobile engine-bay detailing. The service includes protecting sensitive electrical components, applying degreaser, using agitation brushes, rinsing with low pressure, drying thoroughly, and applying appropriate plastic and rubber dressing. If you're comparing service options, this guide to engine bay detailing cost can help you understand what affects the work.
The Mobile Buff brings professional brushes, degreasers, controlled-rinse equipment, and drying tools to driveways across Central Pennsylvania, including Harrisburg, Mechanicsburg, Carlisle, Newport, and nearby areas. Visit The Mobile Buff to request mobile engine bay detailing and avoid taking a hose or pressure washer near your ECU.

