


A coffee cup tips during the school run, a dog comes home muddy, or a child drops a sticky snack into the back seat. By the time you notice the mark, it has already worked into the upholstery. Searching for a car seat stain remover DIY method makes sense, but the first recipe you find can do more harm than the original spill if it ignores the seat material, stain chemistry, or foam underneath.
The practical approach is controlled and low-moisture. Blot first, test in a hidden area, use the least product necessary, and remove residue before the seat dries. That method aligns with current consumer and automotive upholstery guidance, which warns against soaking seat foam because trapped moisture can contribute to mildew odors in the cabin (Capital One's upholstery stain guidance). After cleaning hundreds of family vehicles around Central Pennsylvania, I've found that matching the treatment to both the stain and the upholstery is what separates a genuine improvement from a larger, ring-shaped mess.
Know Your Seat Before You Touch Anything
The safest stain remover depends on what your seat is made of. Passenger vehicles commonly use woven cloth over foam, finished or coated leather, and vinyl or synthetic leatherette. Some interiors also include suede-like microfiber, perforated surfaces, heated-seat elements, or side-airbag seams, all of which change how much moisture and agitation the material can safely handle.
Identify the surface
Start with a quick touch and visual inspection.
- Cloth upholstery feels woven or slightly textured. It absorbs a tiny drop of water rather than holding it on the surface. Look closely at a seam or corner and you'll usually see fabric fibers over padding.
- Finished leather feels smooth, supple, and slightly varied in grain. A small water drop generally beads on the coating. Perforated leather needs extra caution because liquid can pass through the holes into the foam.
- Vinyl or leatherette feels smooth and uniform, often with a more consistent grain and a slightly plastic finish. Water usually beads instead of soaking in.
- Suede or microfiber-style material has a delicate nap. It can show water marks or changes in texture when treated too aggressively.
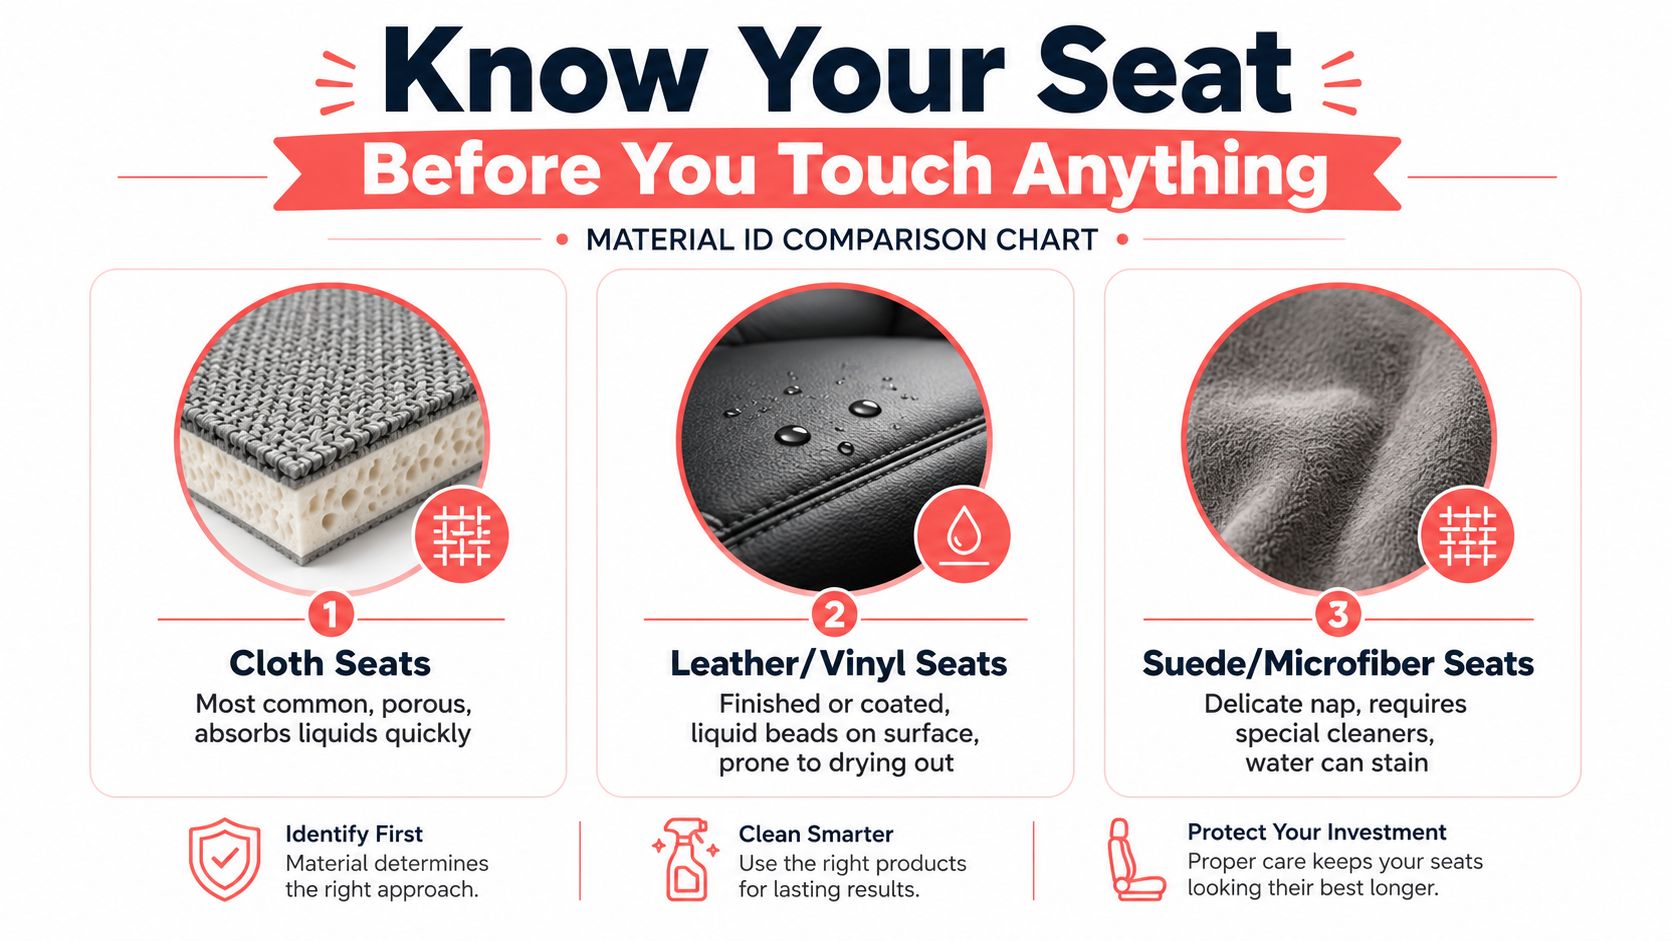
Why the distinction matters
Cloth can accept carefully controlled water-based cleaning, but that doesn't mean it should be saturated. Foam backing can retain liquid, and moisture trapped below the surface may create lingering odors. Sealed leather and vinyl shouldn't receive a soaking treatment because excess liquid can migrate into seams, affect the finish, or leave a dull or uneven sheen.
Check the stitching and nearby seams before applying anything. Heated-seat wiring and side-airbag seams are reasons to avoid saturation, aggressive brushing, and flooding around the seat edges. If the water-bead test or material identification leaves you uncertain, treat the surface as delicate and use a product specifically labeled for that material.
One universal recipe can't safely address a porous cloth cushion, coated leather, and vinyl. The next steps depend on this decision. Cloth stain chemistry allows a different approach from leather care, while synthetic surfaces usually need controlled wiping rather than repeated wet applications.
Tools and Safety Basics for DIY Car Seat Cleaning
A useful DIY kit doesn't need to fill a garage shelf. The essentials are microfiber towels, a soft or medium nylon brush, a spray bottle, a wet/dry vacuum or wet vac, a plastic scraper, and a pH-neutral cleaner matched to the upholstery. Light-colored towels make it easier to see whether color or soil is transferring from the seat.
Vacuum loose grit before using liquid, especially around seams and creases. A plastic scraper can lift dried food or gum without cutting the fabric, while a nylon brush gives you controlled agitation without the harshness of a wire brush. Keep a separate towel for applying solution and another for rinsing or drying.
Products that belong in the kit
For cloth, household ingredients can have a limited role when used carefully. Dish soap can help with greasy residue, white vinegar appears in several upholstery recipes, baking soda can absorb surface grease before vacuuming, and hydrogen peroxide is sometimes recommended for selected cloth stains. These aren't universal products, and peroxide can lighten dark fabric.
A practical starting point is a dedicated, pH-appropriate automotive upholstery cleaner. If you want to compare lower-impact options, review these non-toxic cleaner recommendations, then confirm that any product is suitable for the specific seat material before use. Leather needs leather cleaner and, when appropriate, conditioner. Vinyl needs a compatible interior cleaner, not a solvent intended for unfinished surfaces.
Keep harsh products away
Don't use bleach, acetone, or undiluted degreaser on car upholstery. A magic eraser can dull glossy vinyl or remove more finish than soil, so it doesn't belong on a shiny synthetic surface. Strong household chemicals can cause dye transfer, discoloration, cracking, or a visible change in sheen.
Open the doors or windows, wear gloves, and test every cleaner in a discreet seam or under-seat area. Apply a small amount, blot it with a light towel, and check for color movement or a water mark after the material settles.
Moisture rule: Clean the surface layer, not the foam pad. Use a damp towel or controlled spray, then extract or blot the moisture before it migrates downward.
Match the Solution to the Stain Type
A stain tells you what to use next. Protein residue, sugary drinks, grease, and dye each behave differently, and the seat material limits which treatment is safe. A baking-soda recipe cannot handle all four.
Protein-based stains
Blood, sweat, vomit, and pet accidents call for cold water, especially when blood is present. Heat can set protein residue and make removal harder. On compatible cloth, an enzyme cleaner may break down organic material, but test it first. Fabric formulas do not belong on leather or vinyl.
For selected cloth stains, one upholstery guide describes mixing 1/4 cup hydrogen peroxide in 3 cups of water, allowing 10 minutes of dwell time, then rinsing with 1/4 cup white vinegar to 3/4 cup cold water (Stain Expert's car stain guidance). Treat that formula as a tested-cloth option, not a universal recipe. Peroxide can lighten dark upholstery, so I avoid using it blindly on colored seats.
Pet accidents may penetrate beneath the visible spot and leave odor in the cushion. Background on removing pet stains from carpets can help explain organic residue, but a carpet product is not automatically suitable for automotive upholstery.
Tannin, oil, and dye stains
Coffee, tea, soda, and juice commonly leave sugary or water-soluble residue. For tested cloth, a mixture of 1 cup warm water, 1 tablespoon dish soap, and 1 tablespoon white vinegar is one cited option, followed by light agitation and 5 to 10 minutes of dwell time before blotting. Remove the remaining soap afterward. Keep this approach away from leather and vinyl unless the material's care guidance permits it.
Grease, makeup, sunscreen, and lipstick need surfactant action. Fresh surface oil can be absorbed with baking soda or cornmeal before vacuuming. After that, a small amount of diluted dish soap can address the remaining film. Some greasy cloth stains are treated with a 3:1 baking-soda-to-water paste, left for 30 minutes before vacuuming. Apply water only after the oily residue has been addressed.
Ink, berry juice, mustard, and blue-jean transfer are dye problems. Rubbing can spread the color and permanently change the surrounding fabric. Stop if the mark is uncertain, particularly on light cloth or finished leather. Vinegar and baking soda should not be combined as a stronger cleaner. They largely neutralize each other, so use one controlled method at a time.
| Stain type | Safer first choice | Best-fit surface |
|---|---|---|
| Blood or other protein residue | Cold water, then a tested enzyme product | Cloth, with caution |
| Coffee, tea, soda, or juice | Diluted dish soap and vinegar mix, followed by residue removal | Tested cloth |
| Grease, makeup, or sunscreen | Absorbent powder, then a mild surfactant | Cloth, or material-specific cleaner |
| Ink or dye transfer | Stop and assess before agitation | Professional evaluation often safer |
| Leather or vinyl marks | Material-specific cleaner on a towel | Leather or vinyl |
For additional product guidance, compare this DIY car interior cleaning solution. The right formula still depends on the stain and the seat material.
The Cleaning Sequence That Actually Works
A family car seat often looks worse after the first wipe. Too much water or immediate scrubbing pushes residue outward, roughs up the weave, and leaves a larger ring. The reliable approach is a controlled, low-moisture cycle that matches the cleaner to the stain and the upholstery.
Follow the low-moisture workflow
- Blot the spill. Press a clean, dry microfiber towel onto the spot. Do not scrub. Rotate to a dry section as liquid transfers.
- Apply cleaner to the towel. Put the matched solution on a second towel instead of spraying the seat. This limits overspray and keeps liquid out of seams.
- Work from the outside inward. Touch the perimeter first, then move toward the center to reduce a spreading halo.
- Agitate gently. Use a soft-bristle brush or towel with short, controlled passes. Loosen residue without tearing or flattening the fibers.
- Allow limited dwell time. Let the product sit only as long as its label directs. A general automotive cleaning guide recommends roughly 30 to 60 seconds before gentle agitation and re-blotting (Capital One).
- Rinse away residue. Use a clean, damp microfiber towel. Cleaner left in the fabric attracts soil and can dry as a visible ring.
- Extract and dry. Blot with a dry towel, use a wet/dry vacuum where appropriate, and run the cabin fan with a window cracked. Avoid direct high heat.
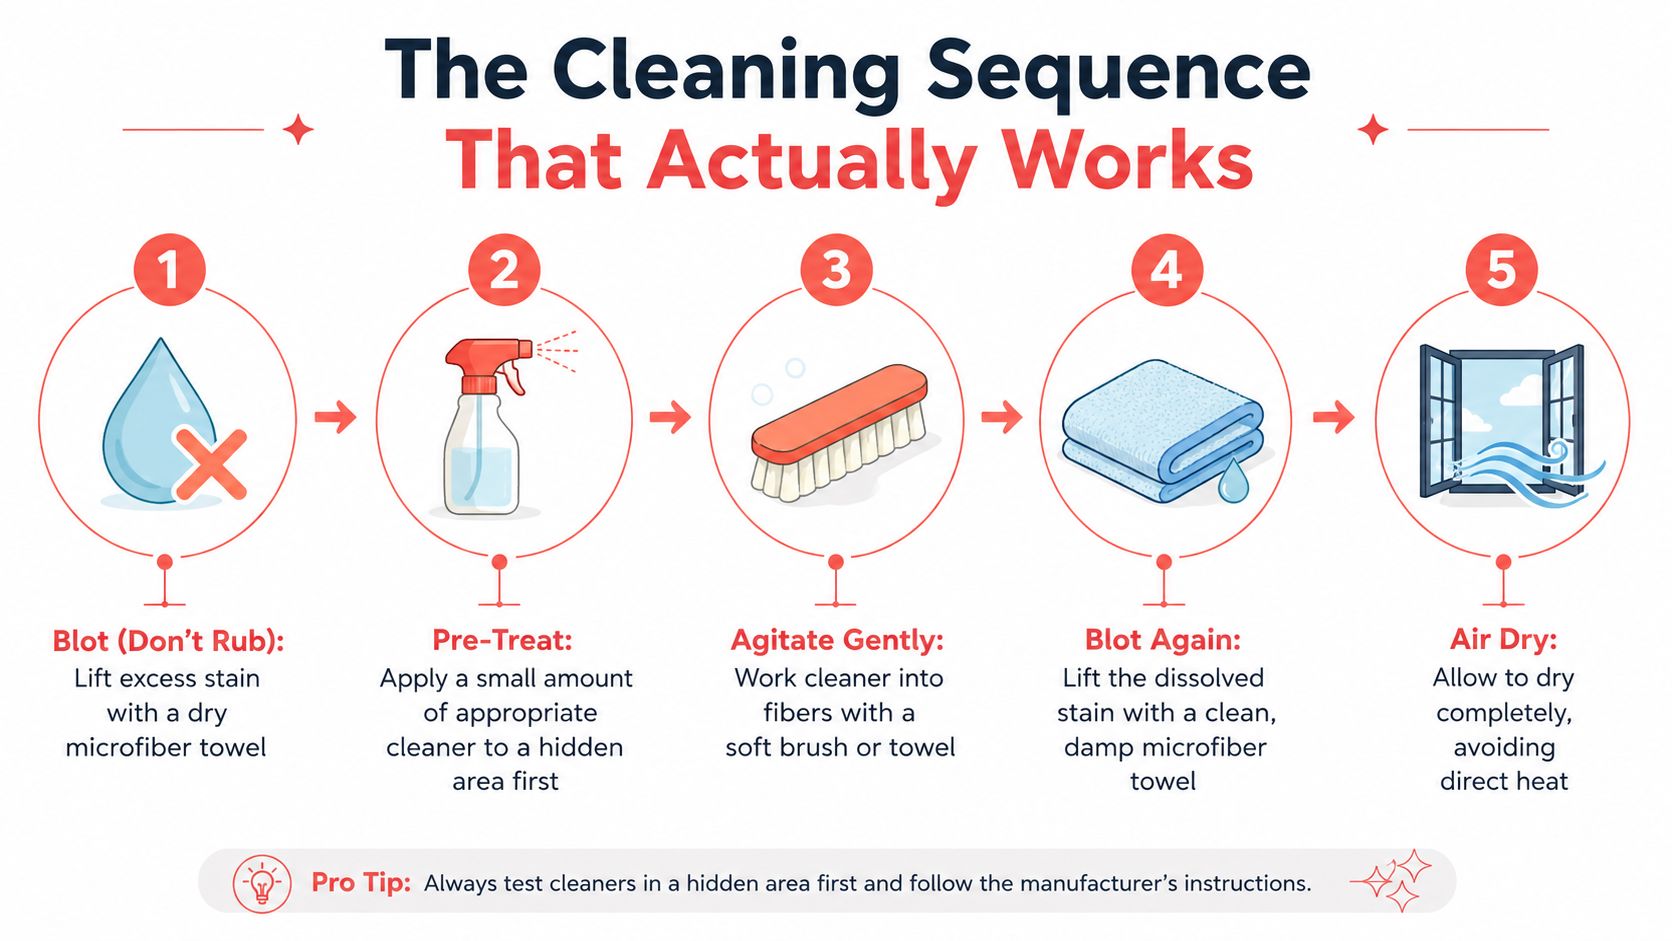
Skipping the rinse is a common reason a cleaned seat soils again. Incomplete drying also leaves moisture near the foam. OEM upholstery guidance emphasizes choosing treatment by stain type, brushing lightly, blotting gently, and removing residue before the next cleaning step (OEM upholstery guidance).
Use this practical guide to clean car seats at home for material testing and moisture-control reminders. DIY works best when the stain is limited to the surface and the seat can dry fully.
When DIY Stops Being the Right Call
Some stains get worse as soon as a homeowner starts experimenting. An old mark may have migrated below the visible fabric, while repeated dabbing can leave a clean-looking center surrounded by a larger tide line. Surface treatment can't fully solve contamination that has reached the padding.
Stop before the damage spreads
Pause DIY work when the stain is old, its chemistry is unknown, or the color begins moving into clean upholstery. Large ink marks, marker, jean transfer, and other dyes are especially risky because agitation can create a wider bleed. Mystery stains can also react unpredictably with peroxide, vinegar, solvents, or degreasers.
Biological stains deserve a higher standard. If a pet accident, vomit, or another organic spill has soaked through the face fabric, the odor source may sit below the surface. Covering it with fragrance or adding more water doesn't remove the contamination.
If the odor returns after the seat appears dry, assume the problem is deeper than the visible mark.
What extraction changes
A mobile detailer can use commercial surfactants, targeted enzymes, and hot-water extraction equipment to flush suspended soil from upholstery and remove much of the moisture afterward. That process reaches farther than wiping the seat face with a damp towel, especially when the contamination has entered foam or perforations.
Professional guidance also starts with material identification and a hidden spot test because cloth, leather, and vinyl react differently (Car Mechanic's upholstery cleaning guidance). The goal isn't to flood the seat. It's to apply the right chemistry, agitate without damaging the surface, extract residue, and dry the area under controlled conditions.
Call for help when several stain types overlap, the seat has a persistent odor, the discoloration resembles mildew, or your next DIY attempt could affect the finish. Saving a little product cost isn't worthwhile if the result is a larger stain, damaged coating, or damp foam.
Prevention Habits That Save Seats
The easiest stain to remove is the one that never gets time to settle. On family vehicles around Central Pennsylvania, the same pattern shows up repeatedly: a spill happens during a busy trip, someone puts a towel over it, and the seat stays damp or sticky until the next appointment.
Build a response kit
Keep two microfiber towels, a small spray bottle of appropriate cleaner, gloves, and a plastic scraper in the vehicle. Use the scraper for solid food or mud only after removing loose material carefully, and keep liquid application limited to the affected surface.
Respond within minutes when possible. Blot liquid before it wicks into the weave, lift solids before they smear, and leave the seat exposed to airflow rather than covering damp upholstery with a bag or blanket.
Reduce the common sources
Parents and pet owners can use seat protectors during high-risk trips, but inspect beneath them regularly. A protector that traps moisture can create a different problem. Avoid leaving cardboard, gym bags, or leaking containers on the seats overnight because compressed, damp material encourages moisture migration into the foam.
A quick weekly vacuum removes crumbs and grit before they get ground into the fabric. Pay attention to the front edge, child-seat contact points, door-side bolsters, and the creases where snack debris collects.
Detailer's observation: Most preventable seat damage starts with delay, friction, or trapped moisture, not with a lack of expensive chemicals.
Park in shade when possible. Sun and heat can darken or bake organic residue into fibers, making a previously manageable mark harder to correct. If a spill has already dried, don't compensate with heavier spraying. Remove loose soil, identify the material, and decide whether a professional extraction is more sensible than repeated home attempts.
Get a Professional Finish With The Mobile Buff
A DIY car seat stain remover can handle many fresh, surface-level spills when the material is identified correctly and the seat is kept close to dry. It can't match the reach of professional extraction when cleaner, odor, or contamination has moved into the padding.
The Mobile Buff serves Central Pennsylvania, including Harrisburg, Mechanicsburg, Carlisle, Newport, and surrounding areas in Dauphin and Perry counties. A mobile appointment brings the work to the customer's driveway, which is useful for busy families dealing with coffee, ground-in dirt, pet accidents, or several stained seats at once.
What professional treatment includes
The process starts with identifying the upholstery and checking the affected area. The detailer then selects a material-appropriate product, treats the stain without oversoaking the cushion, agitates the surface carefully, and extracts residue and moisture with commercial equipment.
Leather and vinyl may need specialized cleaning, conditioning, or dye-safe treatment rather than another round of household chemistry. Fabric seats with recurring stains or odors may need deeper extraction because wiping the face of the upholstery won't remove what has settled below it.
Professional help makes more sense when:
- The stain returns: A recurring mark often indicates residue or moisture below the surface.
- Odor remains: Persistent odor can signal contamination in the padding.
- The material is delicate: Perforated leather, suede-like microfiber, and unusual hybrid fabrics are easy to mark.
- The chemistry is unknown: Mystery stains can react badly to additional DIY products.
- The area is extensive: Large wet sections are harder to rinse and dry safely at home.
You can review the dedicated car seat stain removal service to see where professional treatment fits. The right outcome isn't always total removal. Sometimes the safest result is a controlled improvement that protects the original upholstery instead of chasing the last shadow with an aggressive solvent.
Describe the vehicle, seat material, stain type, and what you've already tried when you contact The Mobile Buff. That information helps determine whether a mobile detailing appointment is appropriate and prevents the next cleaner from becoming part of the problem.
The Mobile Buff provides mobile interior detailing and professional stain and odor removal for Central Pennsylvania vehicles, including family cars, pet-hauling SUVs, and heavily used daily drivers. Skip another risky home mixture when the stain has reached the foam or the odor keeps returning, and visit The Mobile Buff to describe the mess and request a driveway appointment.

