
Your car deserves better than a drive-thru wash. After a long week in Central Pennsylvania, it's easy to look at the paint and see the usual buildup: spring pollen, winter salt leftovers, road film, dog hair, fingerprints around the door handles, and that dusty layer that makes every darker vehicle look tired. Running it through an automatic wash feels convenient, but those brushes can leave behind the kind of marring that only becomes obvious once the sun hits the hood.
A proper hand wash is the safer answer, yet the importance of proper technique is often overlooked. The difference between a wash that preserves the finish and one that adds swirl marks usually comes down to process, not effort alone. As professional detailers serving the Harrisburg area, you can find us on our Google Business listing, and we're happy to share the industry-approved habits that protect your vehicle between full details.
If you're also thinking ahead to resale, clean presentation matters more than most owners think. A careful wash is one part of how people prep your car for sale without making the paint look worse in the process.
1. The Two-Bucket Wash Method
The fastest way to ruin a hand wash is to keep loading your mitt with dirty water. That's why the two-bucket method is the baseline in professional work. One bucket holds your soap solution. The other is only for rinsing the mitt so the grit comes off before the mitt goes back to the paint.
Early in the wash setup, this is what you want in place:
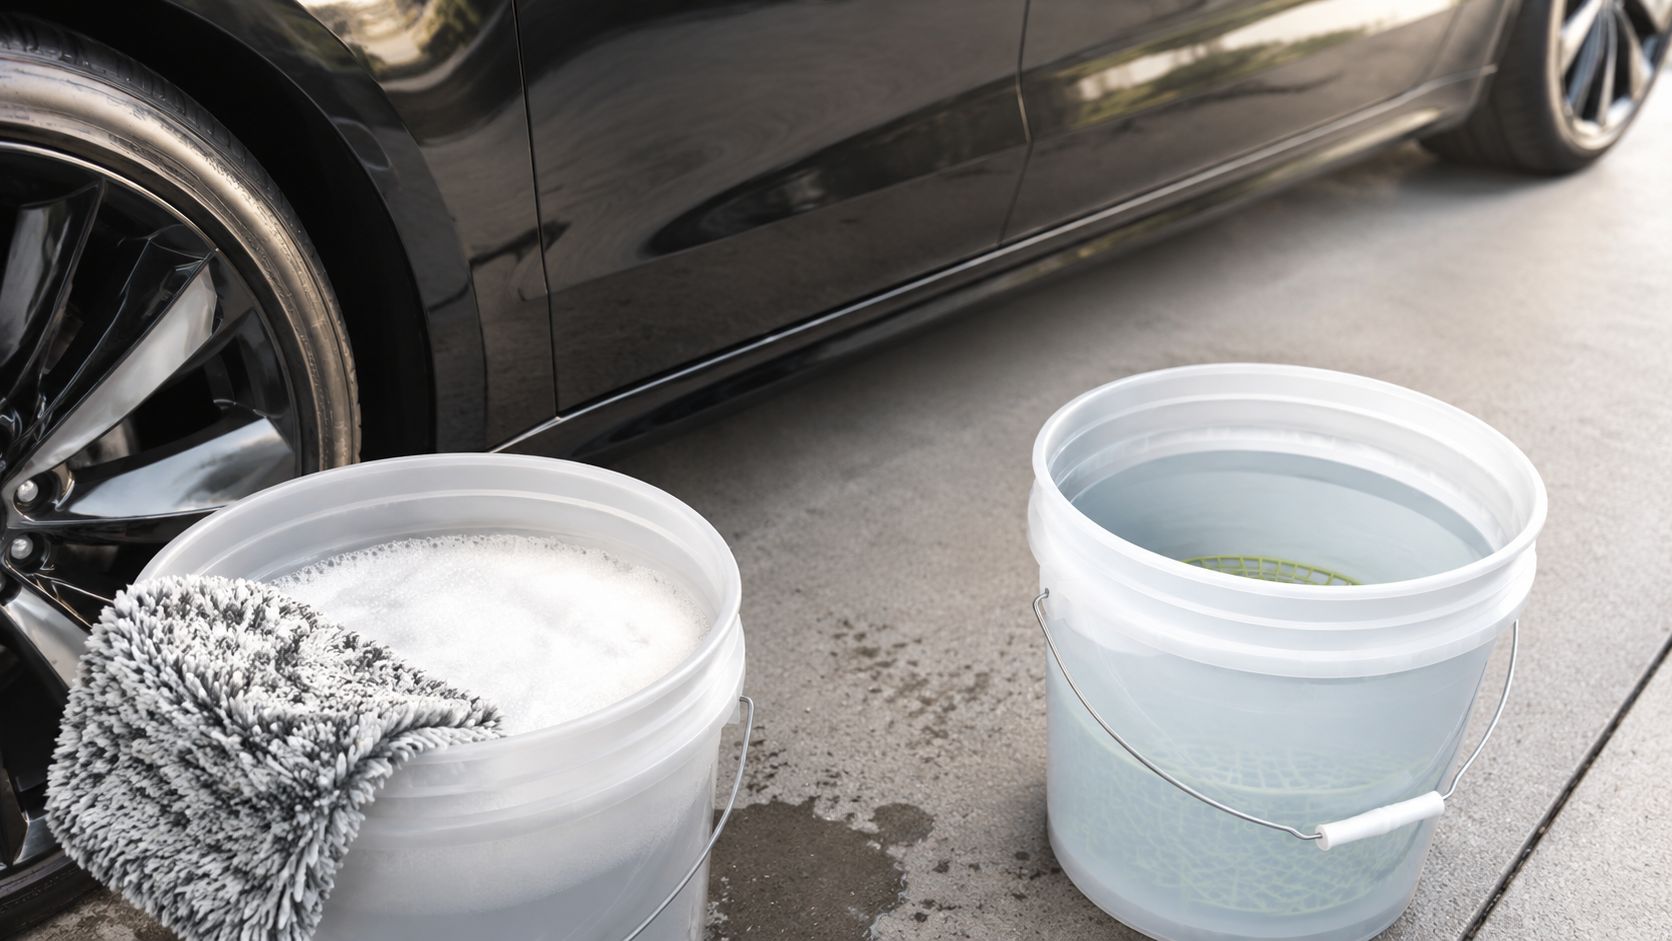
If you skip this, you're basically rubbing the same dirt back over the clear coat. That's the kind of mistake that seems harmless while the car is wet, then shows up later as haze and circular scratching. On black, navy, and deep gray paint, it stands out fast.
Why it works on real-world vehicles
A good hand car wash tip is to think of your mitt as a tool that needs cleaning during the wash, not after it. Fleet vehicles, family SUVs, and commuter cars all collect the heaviest grime on the lower doors, rear hatch, and rocker panels. If you wash those areas and then move back to the hood with the same loaded mitt, you've just moved abrasive debris to the most visible panels.
That's also why grit guards matter. They help settle sediment at the bottom so your mitt isn't fishing it right back up. Pair that with a quality microfiber wash mitt, and you cut down on the friction that leads many owners to later search for help with how to remove swirl marks from a car.
Practical rule: The rinse bucket protects the paint more than the soap bucket does.
A few habits make the method work better:
- Use separate roles for each bucket: Soap stays clean longer when the rinse step happens first, every time.
- Place buckets with intention: Keeping them on opposite sides of the vehicle reduces wasted steps and keeps your process organized.
- Swap water when it looks dirty: On heavily soiled vehicles, fresh water beats trying to “stretch” a wash.
- Choose a proper mitt: A quality microfiber mitt carries lubrication better than a flat sponge.
If you want to see the movement and rhythm of the method, this walkthrough is useful:
2. Choosing the Right Wash Mitt Material
Your wash media decides how much contact risk you're putting on the paint. Not all mitts are equal, and the cheap one hanging near the checkout aisle usually tells on itself after a few washes. It mats down, loses glide, traps debris poorly, and drags more than it should.
Microfiber mitts are the safest all-around choice for most owners. They hold wash solution well, they release contamination better when rinsed, and they're gentle enough for regular maintenance washes. Wool-blend mitts can also work, but they need more careful upkeep and aren't always the easiest option for busy households.
What detailers look for
A proper mitt should feel plush, not stiff. It should also rinse clean without staying gritty in the fibers. If I'm washing a pollen-covered sedan one day and a road-salt-coated SUV the next, I want a mitt that can hold lubrication and still release dirt predictably in the rinse bucket.
That matters even more for pet owners and families. Vehicles that carry kids, sports gear, and dogs often get washed after muddy loading areas, paw marks around lower doors, and grime around hatch openings. A better mitt won't replace good technique, but it makes good technique easier to maintain.
Use these habits to keep the mitt working the way it should:
- Wash mitts separately: Keep them away from bath towels, cotton lint, and general laundry.
- Skip fabric softener: It reduces microfiber performance and leaves residue in the fibers.
- Air dry when possible: Excessive heat shortens the useful life of quality microfiber.
- Keep more than one mitt available: Rotation helps when one becomes too loaded or when you want a separate mitt for cleaner upper panels.
A worn-out mitt still looks soft in your hand. On paint, it often behaves very differently.
Brand matters less than condition and maintenance, but reputable detailing lines usually give you better consistency than generic bulk packs. If the mitt starts feeling grabby, stays stained deep in the fibers, or won't rinse clean, retire it from paint duty.
3. Proper Water Temperature and Pressure Management
A lot of wash damage starts before the mitt ever touches the paint. Owners either blast the vehicle with too much pressure or use water that's too hot, especially when they're trying to cut through winter grime. Both choices create problems.
Warm water helps soap work. Hot water isn't necessary, and it can make surfaces harder to work on if panels are already warm from the sun. Safe, controlled pressure is the target. You want enough flow to rinse loose contamination away, not enough force to drive water into trim gaps, seals, badges, and sensitive exterior components.
Where pressure goes wrong
The usual trouble spots are older weather seals, mirror housings, front grilles, emblems, and door-jamb edges. On vehicles that already live through Pennsylvania winters, those areas don't need extra abuse. A strong stream pointed carelessly into seams can leave water where you don't want it, then it drips out later across freshly dried panels.
Keep your technique disciplined:
- Use an adjustable nozzle: A controlled fan pattern is safer than a sharp, concentrated stream.
- Aim downward on trim and glass edges: That works with gravity instead of against it.
- Pre-soak dirty sections first: Letting soap dwell briefly is safer than trying to “pressure wash” dirt off by force.
- Stay off seals and gaps: Don't spray directly into door edges, fuel doors, or weather stripping.
This is one of those professional habits people don't notice until they compare outcomes. The car still gets clean, but it dries better, leaves fewer drips, and avoids unnecessary stress on delicate components.
4. Washing in the Correct Order Top to Bottom
Order matters more than people think. If you start at the dirtiest part of the car, you load your mitt immediately and spend the rest of the wash trying to recover from that mistake. Gravity already gives you the right plan. Start at the top and work downward.
Roof, glass, hood, upper doors, mid-panels, then lower sections. Save the filthiest zones for last, especially behind wheels and along rocker panels. That way, the cleanest and most visible paint gets washed with the cleanest solution and the least contaminated mitt passes.
A simple system that keeps you out of trouble
Professional hand washing is repetitive on purpose. Consistency protects paint. On a sedan, I like to treat each major area as its own section and fully finish it before moving on. On larger SUVs and trucks, breaking the body into manageable zones helps prevent missed spots and soap drying where you haven't rinsed yet.
A few rules keep the process clean:
- Finish one section before the next: That prevents soap from drying on the panel.
- Use separate tools for wheels: Brake dust and wheel grime should never touch the paint mitt.
- Rinse often: Especially on warm or breezy days.
- Keep lower panels for the end: They hold the heaviest abrasive contamination.
Clean the cleanest areas first. Earn your way down to the dirty ones.
This hand car wash tip seems basic, but it's one of the biggest differences between a professional-looking result and a wash that leaves random streaking, hidden grit, and unnecessary rework.
5. Pre-Rinsing to Remove Loose Contaminants
The wash should not begin with scrubbing. It should begin with removal. A thorough pre-rinse clears off the loose debris that would otherwise become abrasive once your mitt makes contact.
That includes dust, sand, salt residue, dry pollen, soft mud, and road film sitting on the surface. The lower body, rear bumper, wheel arches, and tailgate area usually need the most attention. If the vehicle just came off the highway or sat outside through changing weather, the pre-rinse becomes even more important.
Treat the rinse as part of the wash
A rushed rinse is one of the easiest ways to create more work. I'd rather spend extra time flushing contamination from badges, trim edges, and lower panels than try to “wash it out” later by hand. That only increases contact with dirt that could have been safely removed first.
For maintenance washes between details, this is the rhythm that works:
- Start high and rinse downward: Let runoff carry loose grime off the vehicle.
- Pay extra attention to the lower third: That's where the worst contamination lives.
- Flush wheel wells and around trim: Dirt hides in edges, not just on flat panels.
- Let excess water drain briefly: A dripping vehicle dilutes your soap immediately.
If you're deciding whether your vehicle needs more than a maintenance wash, it helps to compare your condition against what a proper car exterior detailing service near you usually addresses. Sometimes the paint isn't just dirty. It's carrying bonded contamination, traffic film, and residue that a regular wash won't fully correct.
6. Drying Technique and Microfiber Towel Selection
A clean wash can still finish badly if the drying step is sloppy. Most streaking, spotting, and towel-induced marring shows up here. The paint is clean, but it's also vulnerable because there's no wash solution left to add lubrication.
That's why drying towels matter. A proper automotive microfiber drying towel absorbs water quickly without forcing you to press hard. It should glide, not drag, and it should be reserved for paint and glass, not mixed into general cleaning towel duty.
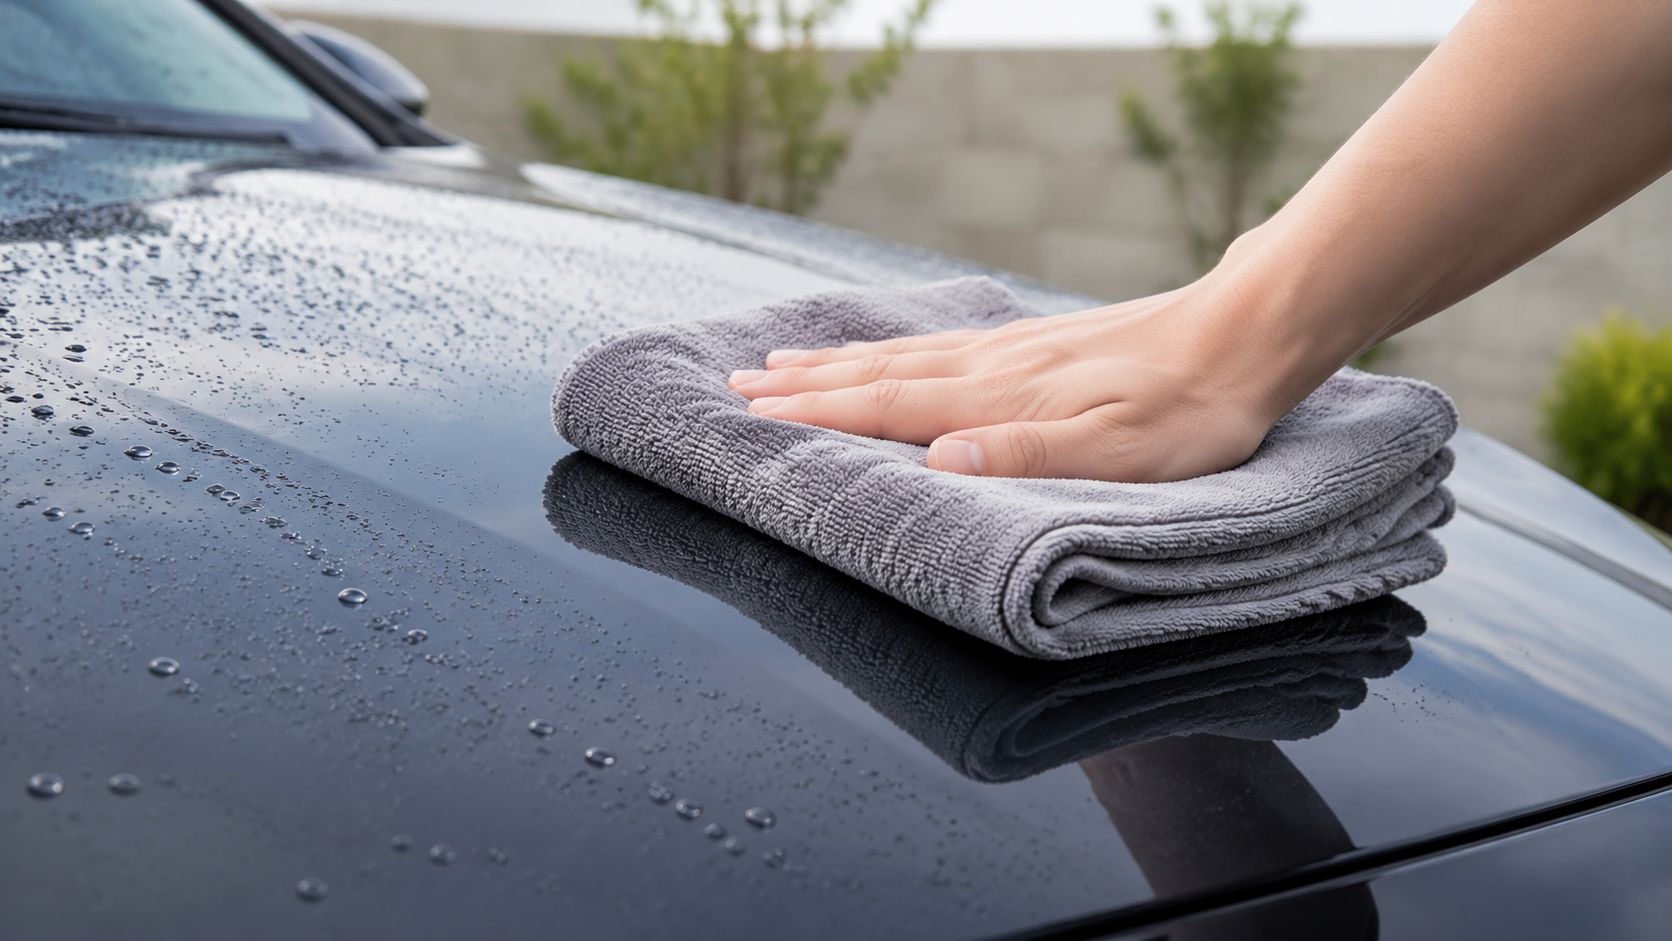
How to dry without adding defects
Blotting and light sweeping passes beat aggressive rubbing. Fold the towel into manageable sections so you always have a clean, dry face to work with. Once a towel becomes saturated, swap it out. Trying to finish an entire vehicle with one overloaded towel usually leaves behind smears and missed water.
Use a separate towel for windows if possible. Glass picks up its own residue, and keeping that apart from your paint towels helps preserve clarity and finish quality.
A few habits make a big difference:
- Work panel by panel: Don't chase random drips around the vehicle.
- Flip to a dry side often: Towel management is part of the technique.
- Use dedicated glass towels: Cross-use tends to create smearing.
- Retire damaged towels early: A towel with hardened edges or contamination isn't safe on paint.
If you want a deeper breakdown of towel types and safe finishing steps, this guide on the best way to dry a car after washing is a useful follow-up.
Shop-floor reminder: Drying is paint contact. Treat it with the same care as the wash itself.
7. Soap Selection and Water Chemistry
You finish the wash, the paint looks clean, then the panels haze over with spots before you back the car into the driveway. That usually comes down to two things. The soap was wrong for the surface, or the water left minerals behind.
Use a dedicated automotive shampoo with a pH-balanced formula. It cleans without chewing through wax, sealant, or topper products you paid to put on the vehicle. Household dish soap, strong degreasers, and DIY mixes from forums can strip protection, dry out trim, and leave the surface harder to maintain on the next wash.
This matters even more on a car you are maintaining between professional details. Good wash soap supports the protection already on the paint. Bad chemistry shortens its working life and makes protecting your car's finish more expensive and more time-consuming than it needs to be.
Water quality is the other half of the result.
Hard water changes how soap behaves in the bucket and how the panel dries. You will notice weaker lubrication, stubborn residue, and spotting that shows up after the vehicle looks fine at first glance. That is one reason home washes often disappoint ambitious DIY owners. The technique can be solid, but local water still works against the finish.
A few soap and water habits help:
- Choose automotive shampoo only: Pick a soap made for clear coat, trim, and existing protection.
- Measure it correctly: Too much soap can leave film and wastes product. Too little reduces lubrication.
- Work in shade when possible: Warm panels and mineral-heavy water are a bad combination.
- Rinse with intent: Leftover soap residue can look like poor drying or weak protection.
- Adjust expectations with hard water: In some areas, getting a spotless finish at home takes faster rinsing, better towel management, or filtered water.
Suds are not the scorecard. The test is how the paint looks after it is fully rinsed and dried. If the finish feels grabby, spots easily, or seems to lose protection after a few washes, the chemistry needs attention. That is also where professional maintenance services like The Mobile Buff save people a lot of trial and error.
8. Protective Care for Delicate Components
You finish the wash, step back, and the paint looks good. Then the sun catches the gloss-black pillar trim and mirror caps, and every fine mark jumps out. That is usually where a rushed hand wash shows itself first.
Modern vehicles have plenty of parts that do not tolerate the same contact you can get away with on the middle of a door or hood. Piano-black trim, soft plastic covers, badges, weather seals, headlight lenses, parking sensors, camera housings, and thin-painted edges all scratch, stain, or hold water more easily than the main painted panels. A careful home wash can keep them in good shape between professional appointments, but these are the spots that separate a basic clean from a finish that still looks expensive up close.
Headlights are a common trouble area. The lens feels hard, but dirty towels, leftover grit, and stiff brushes can haze it over time. Gloss trim is even less forgiving. I see plenty of vehicles where the paint is acceptable, but the black trim around the windows looks worn out because it was treated like durable bodywork.
Use a slower, more deliberate routine on delicate areas:
- Check them before washing: Loose badges, cracked lenses, peeling trim, and dry weather seals can turn a normal wash into avoidable damage.
- Use a fresh part of the mitt or a separate tool: Sensitive trim and camera housings should not get the same contact used on dirtier sections.
- Skip aggressive brushes: They are fast, but they are also one of the quickest ways to mar glossy trim and thin clear coat.
- Blot and guide water out while drying: Mirrors, emblems, handles, sensors, and trim edges trap water, then drip onto freshly dried panels.
Small details create a lot of rework. One missed drip from a mirror, one rough pass across piano-black trim, or one dirty towel on a camera lens can undo the extra care you put into the rest of the wash.
That is why owners serious about protecting your car's finish usually become selective about maintenance. DIY washing can absolutely help between full details, but delicate components demand patience, clean tools, and good judgment every single time. If that starts to feel like too much babysitting for a weekend wash, a professional maintenance visit from The Mobile Buff often costs less than fixing the marks and staining later.
8-Point Hand Car Wash Tips Comparison
| Item | Implementation Complexity 🔄 | Resource Requirements ⚡ | Expected Outcomes ⭐ 📊 | Ideal Use Cases 💡 | Key Advantages ⭐ |
|---|---|---|---|---|---|
| The Two-Bucket Wash Method | Low–Moderate 🔄; simple steps, requires setup discipline | Two buckets, wash mitts, grit guards, water supply | Strong reduction in swirl marks; improved paint longevity ⭐📊 | Regular hand-washing; dark paint care; between professional details | Minimizes cross-contamination; cost-effective; easy to adopt ⭐ |
| Choosing the Right Wash Mitt Material | Low 🔄; minimal technique change | Investment in quality microfiber or wool-blend mitts ⚡ | Significantly fewer micro-scratches; better dirt suspension ⭐📊 | Show cars, enthusiasts, regular home maintenance | Gentler on clear coat; high water retention; durable ⭐ |
| Proper Water Temperature & Pressure Management | Moderate 🔄; requires attention and control | Adjustable nozzle/hose, thermometer optional; moderate water flow ⚡ | Protects seals, trim and coatings; reduces water intrusion risks ⭐📊 | Older vehicles, coated surfaces, cold-climate maintenance | Prevents damage from high pressure; safer for delicate areas ⭐ |
| Washing in the Correct Order (Top to Bottom) | Low 🔄; requires discipline and sequencing | Standard wash tools; possible extra mitts for wheels ⚡ | More efficient wash with less rework; water savings ⭐📊 | Busy homeowners, fleet maintenance, systematic detailers | Logical workflow; reduces re-contamination; time-saving ⭐ |
| Pre-Rinsing to Remove Loose Contaminants | Low 🔄; simple but adds time | Hose with moderate pressure; sufficient water supply ⚡ | Removes majority of loose dirt; lowers abrasive load ⭐📊 | After highway drives, dusty conditions, winter salt removal | Dramatically reduces swirl risk; improves final wash efficacy ⭐ |
| Drying Technique & Microfiber Towel Selection | Moderate 🔄; careful technique needed | High-GSM microfiber towels, multiple units for rotation ⚡ | Spot-free finish; reduced streaking; showroom appearance ⭐📊 | Final finishing step for all hand-washes, show prep | Eliminates water spots; preserves finish; professional result ⭐ |
| Soap Selection and Water Chemistry | Moderate 🔄; requires product knowledge | pH-balanced automotive soaps, possible water-softening options ⚡ | Preserves wax/coatings; reduces etching in hard-water areas ⭐📊 | Areas with hard water (Central PA); routine maintenance | Protects protective layers; safer cleaning; better lubrication ⭐ |
| Protective Gear & Technique for Delicate Components | High 🔄; skilled handling and attention to detail | Soft brushes, foam shields, separate mitts, specialized tools ⚡ | Protects sensors, trim, headlights; prevents component damage ⭐📊 | Vehicles with sensors, vintage cars, PPF/ceramic-coated cars | Preserves delicate parts and electronics; reduces repair risk ⭐ |
When to Call in the Pros Get Your Time Back
Saturday morning starts with good intentions. By the time the buckets are filled, the towels are sorted, and the panels are finally dry, half the day is gone and the finish still may not look the way you wanted. That gap between a careful home wash and a truly clean, streak-free result is where many owners decide their time is better spent elsewhere.
A proper hand wash is skilled labor. Safe washing calls for clean tools, disciplined technique, enough shade or the right timing, and the patience to stop before rushing starts putting marks back into the paint. Maintenance washes at home make sense between professional appointments, especially if you enjoy the process and stay consistent. But once the vehicle is heavily soiled, neglected, or too large to handle comfortably, the job changes fast.
Dark paint shows every missed drip. Pet hair, winter grime, brake dust, tree sap, and bug residue all add time. So do tight grills, textured trim, badges, soft piano-black pillars, and delicate finishes that punish careless towel work.
That is usually the point where DIY stops being efficient.
Professional service also brings a different standard of prep and consistency. Fresh towels are rotated before they become risky. Wash media is separated by task. Problem areas get handled with the right chemistry instead of extra scrubbing. The result is not just a cleaner vehicle. It is less guesswork, less rework, and a lower chance of adding swirls while trying to save money.
If you are in Harrisburg, Mechanicsburg, Carlisle, Newport, or nearby communities, The Mobile Buff is one relevant option for mobile detailing and exterior care. We bring the tools, controlled wash methods, and hand-wash precision to your location, which saves you the setup, cleanup, and the common frustration of spending hours on a wash that still needs correction afterward.
If you would rather skip the buckets, towels, setup, cleanup, and trial-and-error, book with The Mobile Buff. We bring professional hand-wash precision and mobile detailing service right to your driveway in Central Pennsylvania.
