
You bought the car because you wanted to enjoy it, not because you wanted to stare at every new chip on the hood. Maybe it's brand new. Maybe you just paid for paint correction and finally got the finish looking right again. Either way, once the paint is clean, sharp, and glossy, every highway mile starts to feel a little more expensive.
That's where professional paint protection film installation makes sense. Not as a gimmick, and not as a trendy add-on, but as a physical barrier between your paint and the abuse that comes from normal driving. When it's installed properly, PPF is one of the few forms of protection that can take the hit instead of just making the paint look better for a while.
Why Your Car Deserves Paint Protection Film
The appeal of PPF is simple. Modern paint is beautiful, but it's exposed. Road grit, bug splatter, light scuffs around handles, and the constant wear on front-end panels all add up. Wax and sealants can help with gloss and maintenance, but they don't do the same job as a film that physically sits on top of the paint.
What changed over time is the finish quality. Older “clear bra” installs often looked obvious. Today's film is far more refined when the installer knows what they're doing. The goal is protection without turning the car into a patchwork of visible edges, trapped dust, and cloudy panels.
PPF has also moved well beyond a niche luxury upgrade. The global paint protection film market was valued at USD 630.84 million in 2025 and is projected to reach USD 1,086.07 million by 2034, which reflects how mainstream this category has become for owners who want lasting paint preservation.
What PPF does better than surface coatings
A coating can make a car easier to clean. PPF solves a different problem. It's there to absorb the kind of abuse that usually marks the paint itself.
- Front-end impact protection helps with the daily barrage that hoods, bumpers, mirrors, and fenders take.
- Scratch resistance matters most in real contact zones like door cups, trunk ledges, and luggage-loading areas.
- Chemical resistance gives you a buffer against bug remains, bird droppings, and grime that sit too long.
- Appearance retention is the quiet advantage. The less abuse the paint takes, the better the car looks over time.
PPF isn't about making a car look dramatically different. It's about keeping it from looking worse.
For many owners, the smarter comparison isn't PPF versus nothing. It's PPF versus repeatedly correcting damage that could have been blocked in the first place. If you're also weighing film against a liquid protection option, this guide on what ceramic coating is helps clarify where each fits.
Where protection makes the most sense
Not every vehicle needs full-body coverage. A commuter that sees highway miles may benefit most from a front package. A dark-colored performance car with soft paint may justify much more. A family SUV used for road trips, school pickup, and parking lots has its own risk profile.
That's why good paint protection film installation starts with the vehicle, the owner, and the use case. The product matters. The strategy matters more.
The Foundation of a Flawless Finish
Anyone can stick film to paint. That doesn't mean it will look right, stay down, or age well. The quality of a PPF install is decided before the first sheet is ever positioned on the panel.
Work begins with decontamination. A proper process removes what you can see and what you can't. Wash residue, traffic film, embedded particles, polishing oils, and leftover contamination all interfere with adhesion and clarity.
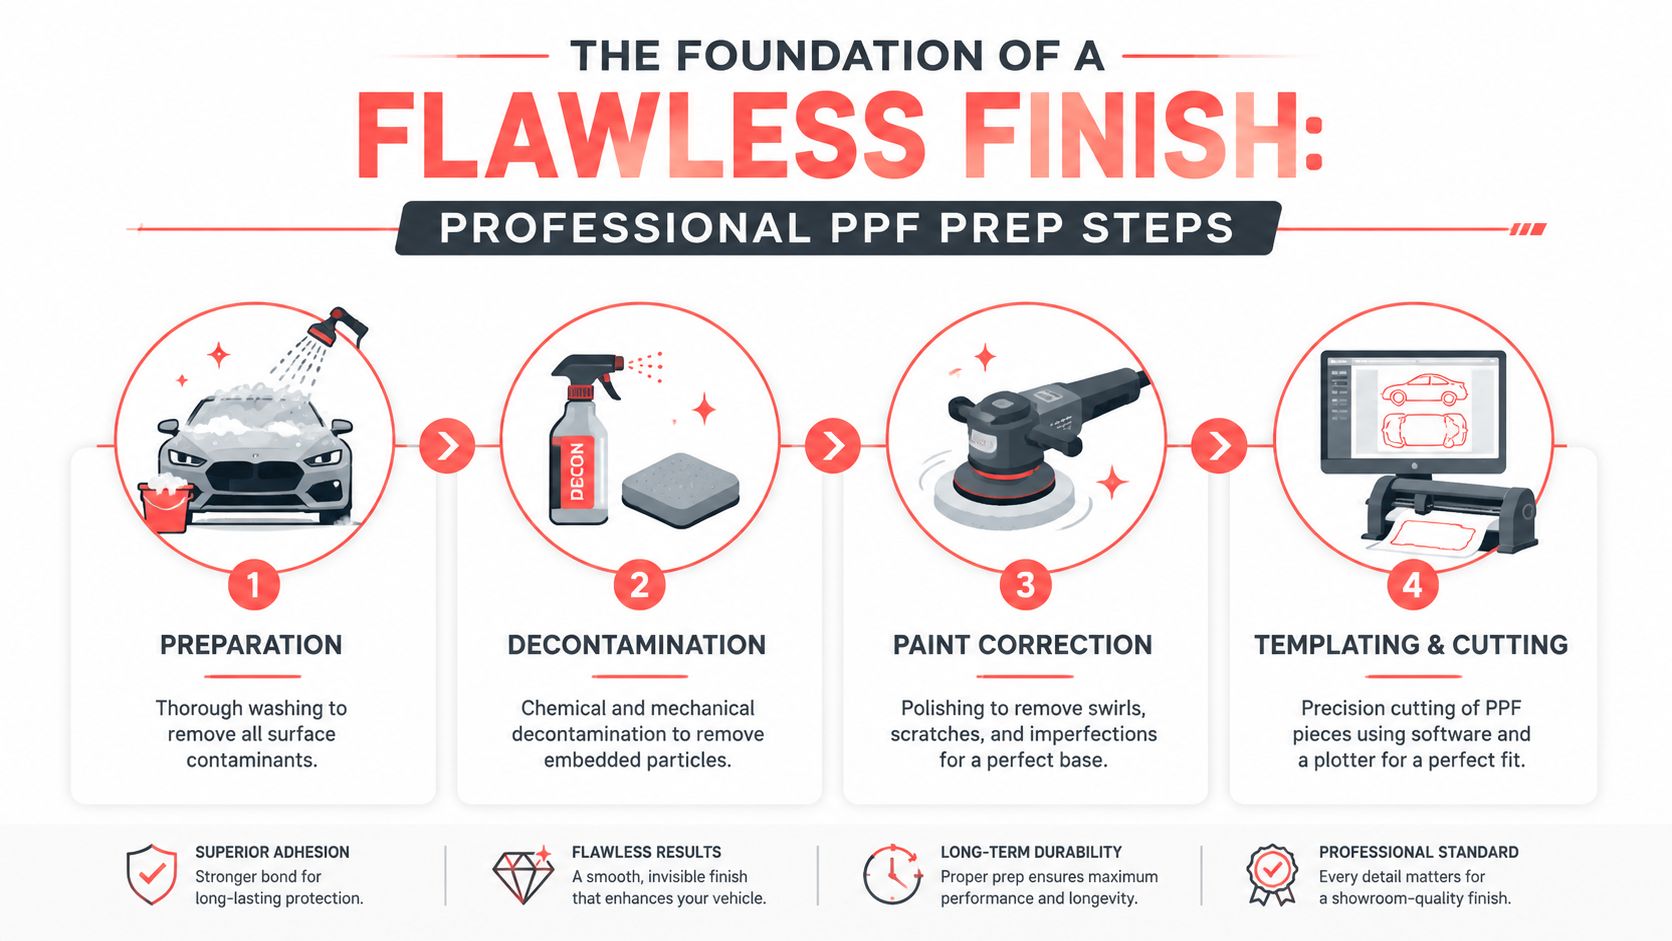
The prep sequence that professionals trust
A technically sound installation starts with a wash, then clay-bar or equivalent decontamination, then a final IPA or panel wipe before film application. That sequence matters because contamination trapped under film doesn't just look bad. It can create visible defects, reduce bond quality, and lead to edge issues later.
For the install itself, one professional guide specifies a slip solution of 1 liter distilled water plus 2 ml baby shampoo, and a tack solution capped at 17% isopropyl alcohol by volume to avoid harming the film while still setting edges properly, as outlined in this professional PPF installation guide.
Here's what that prep usually includes in practice:
- Thorough wash. The goal isn't just shine. It's removing loose grime from paint, edges, trim transitions, and panel gaps.
- Surface decontamination. Clay or equivalent methods pull bonded contamination out of the paint so it doesn't get trapped under the film.
- Paint inspection under proper lighting. Defects that are easy to miss in a driveway become obvious under strong inspection lights.
- Final wipe-down. This removes polishing oils, fingerprints, and residue that can interfere with adhesion.
Why paint correction belongs before film
If the paint has swirls, haze, or scratches, film won't magically make them disappear. In many cases, it preserves them. That's why correction and refinement are often part of the conversation before installation, especially on dark colors and soft paints.
A lot of owners underestimate this step. They assume the film is the finish. It isn't. The paint underneath is still what you're looking at.
If you're trying to understand the difference between leveling defects and improving gloss, this breakdown of paint correction vs polish is useful before making protection decisions.
Practical rule: Film magnifies careless prep. If dirt, lint, polish residue, or defects are left behind, the install won't become cleaner once the film goes on.
The tools that separate controlled work from guesswork
Professional installers don't rely on one bottle and a squeegee. They use pressure sprayers, measured solutions, plotter-cut patterns or controlled bulk methods, edge tools, multiple squeegee durometers, heat management, and strong lighting that exposes contamination and stretch marks before the job is finished.
Controlled space matters too. Clean, dry, dust-free conditions make the work more predictable. That's one reason mobile and shop-based professionals alike spend so much effort controlling the environment around the panel, not just the panel itself.
The Art of the Squeegee
Once the panel is properly prepped, the job becomes highly tactile. This is the part people tend to romanticize, but it's also the part where inexperience shows up fast. Positioning a wet sheet of film on a hood or bumper looks simple until you have to control alignment, tension, moisture, and edge behavior all at once.
The film is typically floated into place with slip solution so it can be moved and aligned before it locks down. That floating stage gives the installer time to center the pattern, check body line references, and avoid setting the film in the wrong place too early. Rush this part, and the rest of the panel becomes a recovery exercise.
Anchoring decides the rest of the panel
After alignment, the installer creates an anchor point. That's the stable section that holds position while the rest of the film is worked outward. On a hood, that may mean establishing a central area first. On a fender, the anchor may be chosen around a contour that gives the best control over stretch and edge placement.
This is where muscle memory matters. Too much tension too early, and the film starts fighting the shape of the panel. Too little control, and moisture sits where it shouldn't.
A strong installation usually follows a few consistent habits:
- Overlapping squeegee passes keep moisture from being trapped in narrow lanes.
- Deliberate pressure changes help move water without over-stressing the adhesive side.
- Angle control prevents chatter marks and reduces the risk of leaving silvering or air behind.
- Working from a known anchor keeps the pattern from drifting as the panel narrows or curves.
A clean panel can still produce a poor result if the installer builds tension into the film instead of guiding it into place.
What good squeegee work looks like
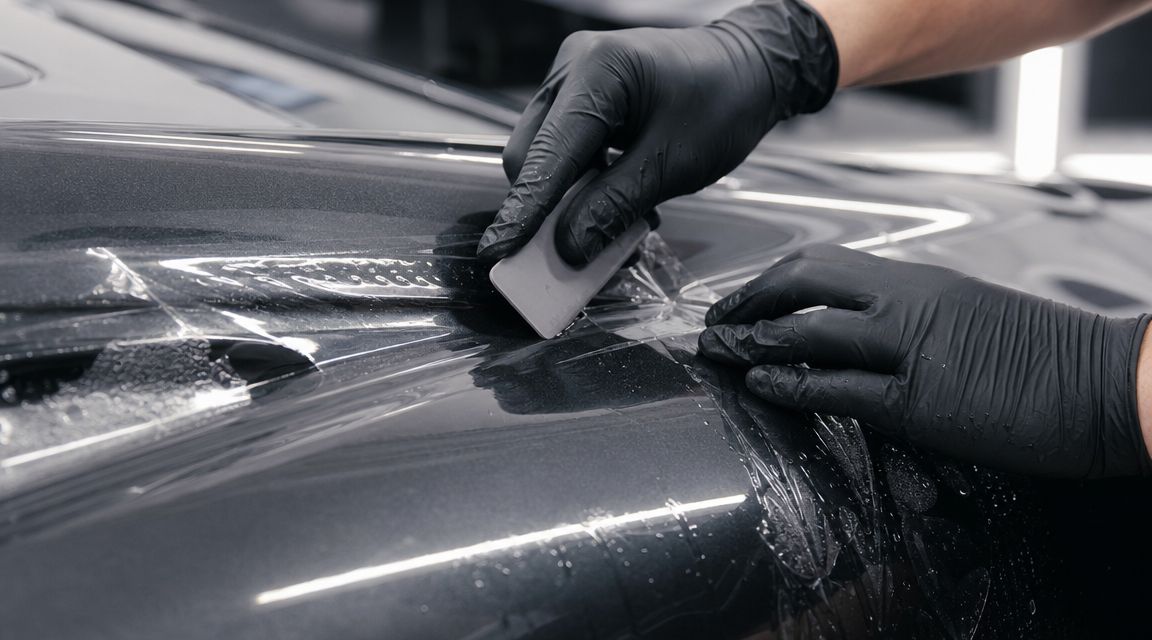
Good squeegee technique isn't dramatic. It's methodical. Passes overlap. Direction changes are intentional. The installer reads what the moisture is doing underneath the film and adjusts stroke length, angle, and pressure accordingly.
Beginners often make one of two mistakes. They either baby the film and leave too much solution trapped under it, or they push too aggressively and create tension lines, stretch marks, or misalignment. Neither one gives you that nearly invisible finish people expect from quality PPF work.
Here's a useful visual example of controlled film handling and placement during application:
Bulk installs and patterns both demand judgment
Owners sometimes ask whether a panel is “just pre-cut” or “fully custom.” The answer matters less than commonly believed. Both methods can produce excellent or poor results depending on who's doing the work. Plotter-cut patterns reduce cutting risk on the vehicle. Bulk methods can offer extra flexibility on difficult shapes. Neither one removes the need for judgment.
That judgment shows up in small decisions:
| Application choice | What the installer is balancing |
|---|---|
| Initial placement | Alignment against body lines and panel symmetry |
| Squeegee direction | Moisture evacuation versus film tension |
| Stretch management | Conformity on curves without distorting the film |
| Edge setting | Bond strength, appearance, and long-term durability |
When paint protection film installation is done right, you don't notice heroics. You notice how little there is to see. No cloudy sections. No obvious drag marks. No distracting fingers at the edges. Just a panel that looks like paint, only safer.
Mastering Curves Edges and Trimming
Flat panels are the easy part. Side mirrors, bumper corners, hood points, and trim transitions are where the craft shows. In these areas, installers stop thinking like someone applying a sheet and start thinking like someone managing stress through a flexible material.
Take a side mirror. It's small, but it can be one of the most technical parts of the vehicle. The shape changes quickly, the film wants to bridge over recesses, and the edges often sit near tight contours. A beginner usually pulls too hard, overheats the material, or tries to force one section flat while another section lifts. A seasoned installer works in stages and lets the shape dictate the sequence.
Why wrapping every edge isn't always the answer
A lot of car owners assume the best install wraps every possible edge. That sounds right until you look at how film behaves on sharp transitions and high-stress curves. In those areas, a forced wrap can store tension, trap moisture, and create the exact edge lift the wrap was supposed to prevent.
That's why experienced installers treat edge strategy as a panel-by-panel decision. As this guide on how expert PPF installers handle sharp edges and curves explains, a clean edge-stop is sometimes the better long-term choice than wrapping everything.
A few edge decisions illustrate the trade-off:
- Hood and fender edges may be wrapped when there's enough material and a stable return edge.
- Sharp bumper corners often punish overconfidence. A neat, intentional stop can outlast an aggressive tuck.
- Trim transitions need visual balance. A hidden edge is great, but not if it creates stress that lifts later.
Clean edges matter more than ambitious edges.
Trimming is precision work, not improvisation
Bad trimming leaves visible cut marks, uneven margins, and corners that start to peel. Good trimming almost disappears. The installer has to know where relief is needed, where more material should be left for secure edge treatment, and where a line needs to stay consistent so the finished panel looks intentional.
One installer guide recommends leaving at least 1 to 1.5 cm of material for edge wrap on appropriate panels to improve bond strength on curved areas, but that only works when the panel shape supports it and the film isn't being over-stressed earlier in the install.
Door handles, sensors, and badges complicate things further. Every cut line has to respect the panel design and the way the film will settle during curing. There's no shortcut for that. You learn it through repetition, mistakes, and pattern knowledge.
Post-Installation Care and What to Expect
A fresh install doesn't look the same on day one as it will after curing. That catches some owners off guard. They expect the film to be fully settled as soon as the car leaves the installer's hands, but adhesive bonding and moisture evaporation take time.
Climate plays a major role here. Professional guidance notes that full cure can take 24 to 72 hours to several weeks depending on temperature and humidity, and exposing the vehicle to harsh washing or weather too early can compromise adhesion, as explained in this PPF installation and curing guide.
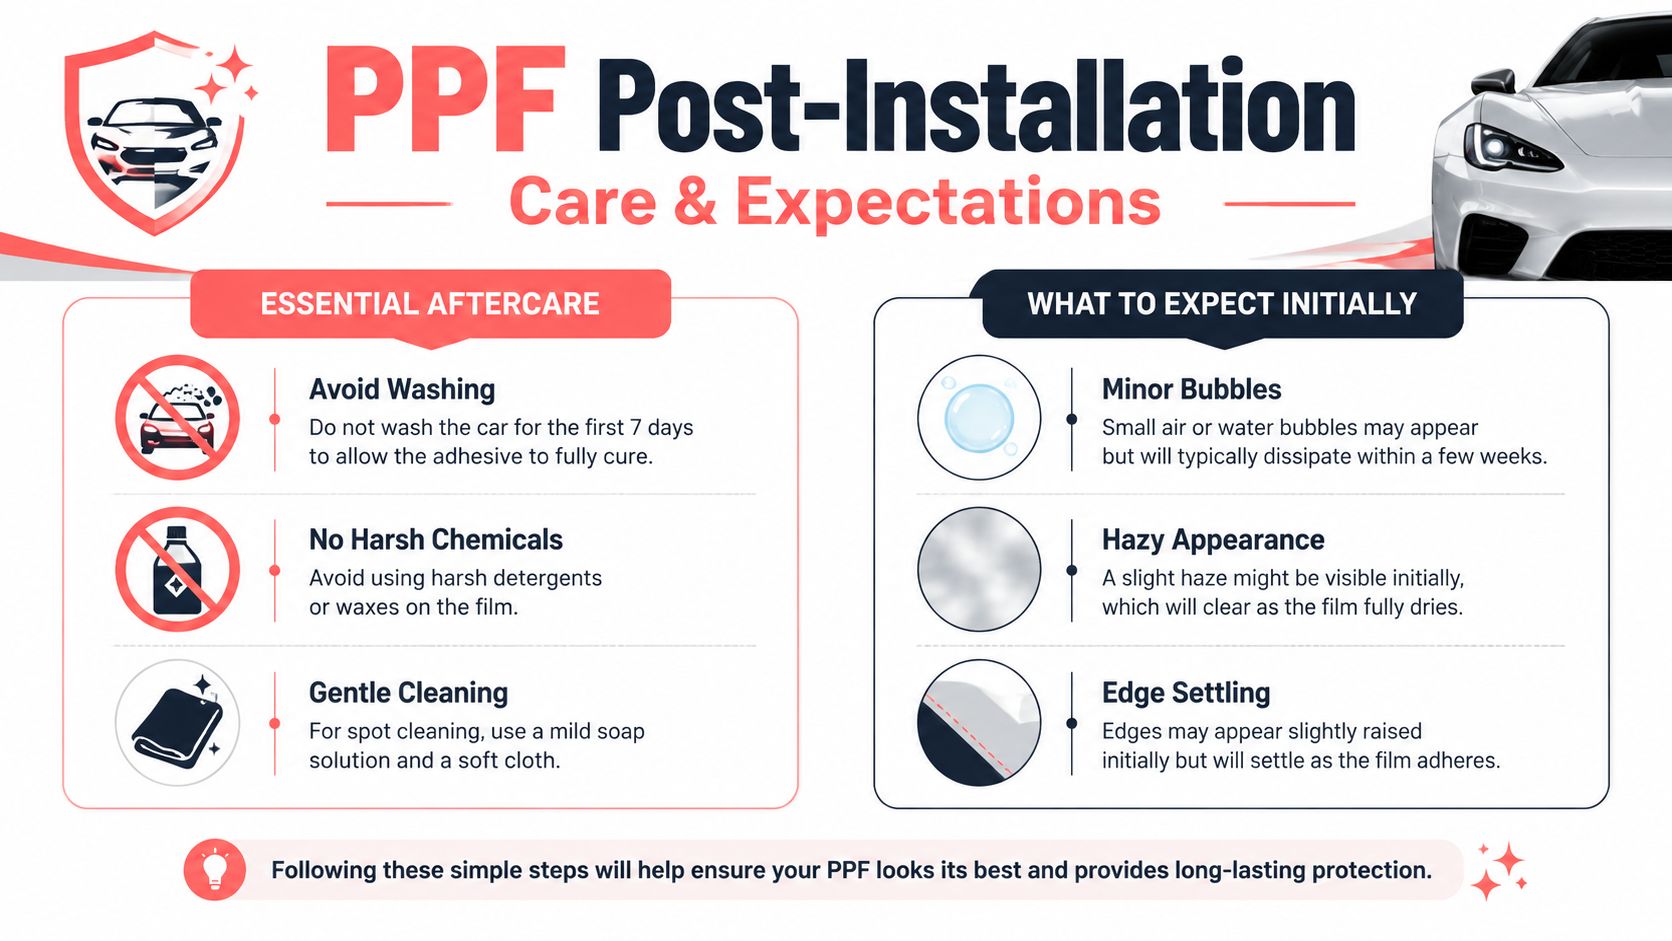
What's normal during the cure window
Some temporary visual changes are part of the process. Mild haze, small pockets of moisture, and slight edge settling can all occur as the film conforms and dries. That doesn't automatically mean there's a problem.
What matters is the direction things are going. A normal cure trend improves with time. A bad install usually reveals persistent issues.
Here's a practical approach:
| Usually normal early on | Worth asking the installer about |
|---|---|
| Light moisture haze | Debris clearly trapped under film |
| Minor moisture pockets | Edges that keep lifting instead of settling |
| Slight visual distortion while drying | Film fingers that remain unadhered |
| Edges settling as adhesive bonds | Uneven trim lines or obvious misalignment |
Aftercare that protects the result
Fresh PPF needs a little patience. The main mistake owners make is treating it like fully cured paint protection too soon.
- Hold off on washing while the film is setting. Early pressure, chemicals, or friction can disturb vulnerable edges.
- Be careful around exposed edges if you're spot-cleaning a bug or splash.
- Watch the environment. Cold, damp, dusty, or harsh conditions slow curing and make the first few days more sensitive.
If you're thinking beyond impact protection and also trying to reduce long-term sun-related wear on exposed surfaces, this article on how to protect car paint from sun damage adds good context.
New film should be left alone more than it should be fussed over.
A solid installer should also tell you what they expect to see after delivery. That conversation matters. It gives you a baseline for what's normal and what deserves a callback.
DIY vs Professional Installation A Realistic Breakdown
DIY paint protection film installation is tempting because the material looks straightforward and the internet makes everything seem manageable. In reality, film punishes small errors. Dust under the panel, uneven trimming, a crease that won't relax, or too much tension on a corner can turn expensive material into scrap fast.
The cost structure alone tells you this isn't a casual add-on. Industry reporting notes that partial coverage typically ranges from $500 to $1,500, while full-body professional installation can range from $3,000 for a small coupe to over $8,000 for a large vehicle, depending on complexity and prep, according to U.S. paint protection film market reporting and installer pricing guidance.
Where DIY usually goes wrong
The issue isn't just laying film on paint. It's everything around it. Surface prep, solution control, cutting judgment, edge management, contamination control, and curing discipline all have to be right at the same time.
A home installer also has to solve for environment. Dust in the garage. Temperature swings. Limited lighting. No repeatable workflow. That doesn't mean a determined person can't learn. It means the learning curve often happens on the vehicle you're trying to protect.
Here's an accurate comparison:
| Factor | DIY Installation | Professional Installation (The Mobile Buff) |
|---|---|---|
| Upfront cost | Lower at first glance, but mistakes can waste material and time | Higher initial cost because labor, prep, and precision are built in |
| Prep quality | Depends on tools, lighting, and decontamination discipline | Controlled process with professional prep standards |
| Film handling | Steep learning curve on alignment, anchoring, and tension | Experienced application with repeatable technique |
| Edge finish | Higher risk of visible lines, lift, and poor trimming | Better judgment on wraps, stops, and complex panel shapes |
| Risk to paint and film | Higher, especially during trimming or rework | Lower when handled by trained installers |
| Time commitment | Significant research, setup, practice, and installation time | Minimal owner time beyond scheduling and aftercare |
| Result consistency | Variable | More predictable, especially on difficult panels |
What you're really paying for
Professional paint protection film installation is expensive because it's labor-heavy and unforgiving. You're paying for clean prep, controlled application, pattern judgment, trimming discipline, edge strategy, and the ability to spot a problem before it becomes permanent.
For Central Pennsylvania drivers who want to compare local work before making a decision, The Mobile Buff's Google Business Profile is one place to review recent customer feedback and service information.
If your car matters to you, the decision usually comes down to one question. Do you want to learn on your own vehicle, or do you want the job done with the kind of restraint and precision that makes the film disappear?
If you want paint protection film installation done with careful prep, realistic panel-by-panel planning, and professional aftercare guidance, contact The Mobile Buff. We serve Central Pennsylvania with mobile detailing and protection services that prioritize clean workmanship and convenience at your location.
